Lock Fields and Actions with an Integrated ERP System
When your ERP system integrates with Cost Management, it creates a connection that ensures data consistency and financial accuracy across your entire organization. However, this integration also introduces the need for careful data governance to prevent conflicts between the two systems.
The Integrated and Locked feature provides essential protection for your financial data by establishing clear boundaries between what can be modified in Cost Management versus what should remain under ERP control. This prevents the common problems that arise when the same data exists in multiple systems: duplicate entries, conflicting information, and accidental overwrites that can compromise your project's financial integrity.
Why Lock Fields and Actions?
Data Integrity: When cost items, budgets, and contracts are managed in your ERP system, allowing unrestricted editing in Cost Management can create discrepancies that are difficult to reconcile. Locking ensures that the ERP system remains the single source of truth for financial data.
Workflow Protection: ERP systems often have complex approval workflows and business rules. By locking integrated items, you prevent inadvertent changes that could bypass these critical controls or disrupt established processes.
Error Prevention: Construction projects involve significant financial commitments. Locking prevents costly mistakes like accidentally deleting budget line items, modifying contract values, or creating duplicate payment applications.
Compliance: Many organizations have financial controls and audit requirements that mandate specific approval processes. Locking helps maintain compliance by ensuring that all financial changes flow through the appropriate ERP workflows.
How It Works
After the ERP system is integrated with Cost Management, account administrators can lock fields and actions to avoid inconsistency, unplanned changes in projects, and errors.
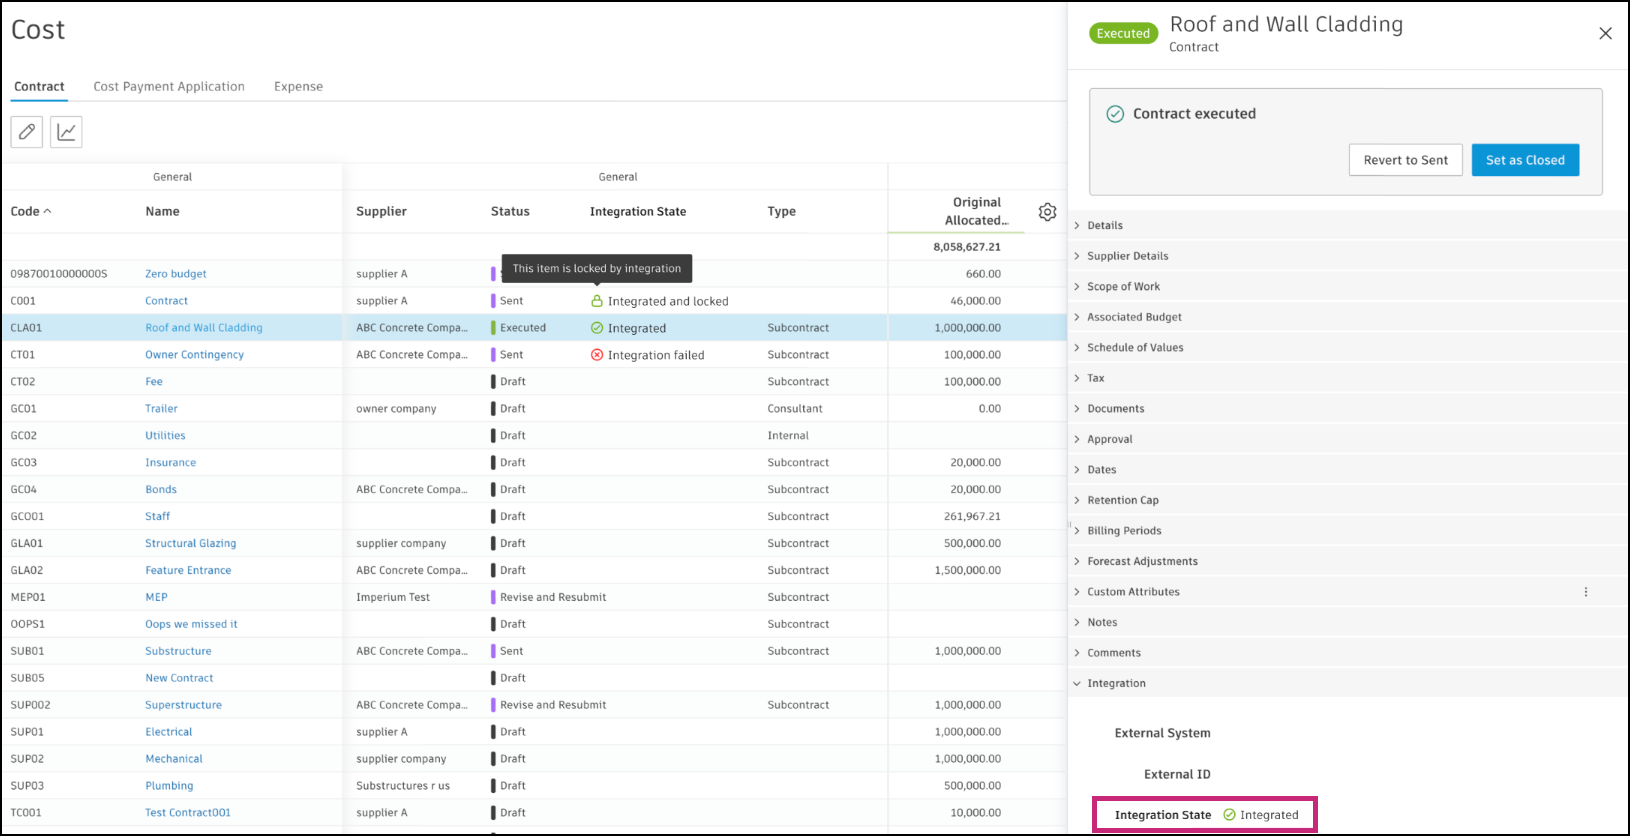
Since the ERP system is integrated with Cost Management, the  status will be visible in the:
- Integration State column
- Integration section in the details panel of the item

Lock Fields and Actions
You can change fields and actions to read-only mode for integrated and locked items. Review the table to see what can be locked. Use the search at the top of the table to narrow down the results.
| What is integrated and locked | Locked sections and fields in the flyout panel | Locked fields in the table view | Locked actions |
| Budget |
|
These fields are locked in the Budget table:
|
These actions are locked in the More menu of a budget:
|
| Main Contract |
|
All fields are locked except for Custom Attributes | These actions are locked in the More menu of a main contract:
|
| Main Contract Subitem |
|
All fields are locked except for Custom Attributes | These actions are locked in the More menu of a main contract subitem:
|
| Budget Payment Application |
|
All fields are locked except for Custom Attributes | When a budget payment application is locked, you can't proceed with its workflows. The previous application can't be set as an approved anymore.
In the Manage Master Schedule dialog box, deleting an application or billing period is unavailable. Managing billing periods from a details panel in the Contract tab is locked. |
| Budget Payment Application Subitem |
|
All fields are locked except for Custom Attributes | Mark as Completed is locked in the More menu of a budget payment application subitem |
| Contract - either in the Executed status or when integrated and locked |
|
These fields are locked in the Contract table:
|
When a contract is integrated and locked, you can't delete it. In the Budget tab, allocating a budget to a contract is unavailable. |
| Cost Payment Application |
|
All fields are locked except for Custom Attributes | When a cost payment application is locked, you can't proceed with its workflows. There is no option to delete an application or billing periods. Previous application can't be set as an accepted, approved, or paid anymore. |
| Cost Payment Application Subitem |
|
All fields are locked except for Custom Attributes | Mark as Completed is locked in the More menu of a cost payment application subitem |
| Expense |
|
All fields are locked except for Custom Attributes | These actions are locked in the More menu of an expense item:
|
| Expense Subitem |
|
Delete is locked in the More menu of an expense subitem | |
| Cost Item |
|
All fields are locked except for Custom Attributes | These actions are locked in the More menu of a cost item:
|
| PCO |
|
All fields are locked except for Custom Attributes | When a PCO is locked, you can't delete it, change its status, or proceed with its workflows.
In the More menu, these actions are locked:
|
| RFQ |
|
All fields are locked except for Custom Attributes | When an RFQ is locked, you can't delete it, change its status, or proceed with its workflows |
| COR |
|
All fields are locked except for Custom Attributes | When a COR is locked, you can't delete it, change its status, or proceed with its workflows. A PCO can't be assigned to a locked COR. |
| OCO |
|
All fields are locked except for Custom Attributes | When an OCO is locked, you can't delete it, change its status, or proceed with its workflows. You can't assign a PCO or COR to a locked OCO. Add Markup is unavailable. |
| SCO |
|
All fields are locked except for Custom Attributes | When an SCO is locked, you can't delete it, change its status, or proceed with its workflows |
| Forecast Adjustment |
|
- | Forecast adjustment can't be deleted once locked |
Example - lock contract
To prevent unscheduled changes to a contract, enable the lock through your ERP system vendor. You can do this with ERP integration. Request an ERP system vendor to enable the lock.
Review the table to see which fields and actions are locked. In detail:
- In the first column in the table, you’ll see what can be locked. In this case, the contract is locked.
- In the second column, you can see that many the sections and fields of the flyout panel for this contract are locked. From now on, you can make changes only to the few of them, for example: Type of the contract, Supplier Contact, Tax, Documents, Retention Cap.
- In the third column, you can see what fields are locked in the Contract table view. From now on, you can make changes only to the few of the fields: Name, Unit, Input Qty, Location.
- In the Locked Actions column, you can see which actions are unavailable after integration. Once you lock the contract, you can’t add subitems or delete a contract.
Add, Manage, and Filter by Integration State Column
By adding the Integration State column to the Budget, Cost, and Change Order tool’s table views, you can see which of the items, sections, and actions are locked and integrated.
To add this column to your views:
Select the tool from the left navigation.
Switch to the tab where you want to add the Integration State column.
Click the
 icon.
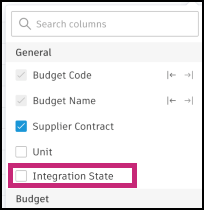
icon.Check the Integration State option.

After selecting, the column appears in the table view. Change its position by:
- Using the snap icons

- Dragging it with

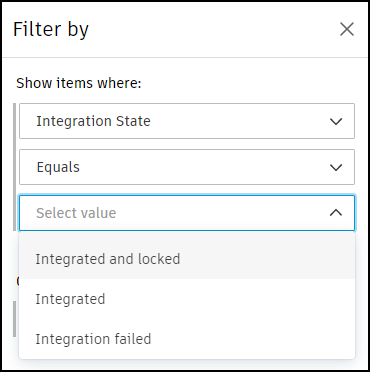
You can also filter the table view by the status of the integration:
