Document Templates in Cost Management
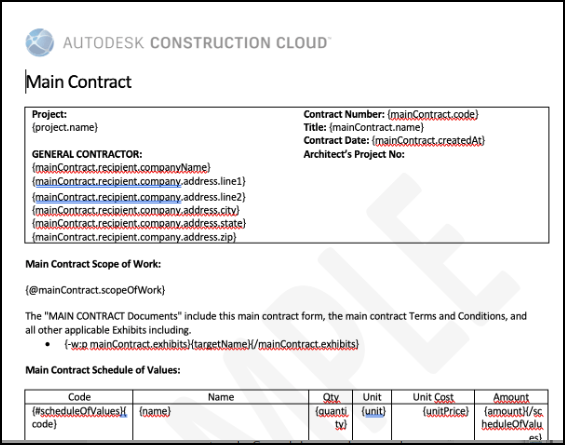
Create standard documentation formats for distribution using Cost Management's document template capabilities. Templates use variables (fields in brackets) that are automatically populated with data from the system when documents are generated.
Project administrators can create templates for:
- Contracts
- Budget payment applications
- Cost payment applications
- PCOs, RFQs, CORs, OCOs, and SCOs
In this article:
- Create a Document Template
- Customize Your Template
- Set a Template as Default
- Restrict Contract Templates by Contract Type
- Best Practices
- Troubleshooting
- Related Articles
- Members with hub administrator permission can manage document templates at the hub level. Create a template once and use it across all projects by adding it to the Library. See Cost Settings in the Library to learn more.
- Learn about variables to create effective document templates.
Create a Document Template
To create a document template:
Click the Settings tool from the left navigation.
Switch to the Budget, Cost, or Change Order tab.
Scroll down to the Document templates section.
Click Add in the section where you want to add a template.
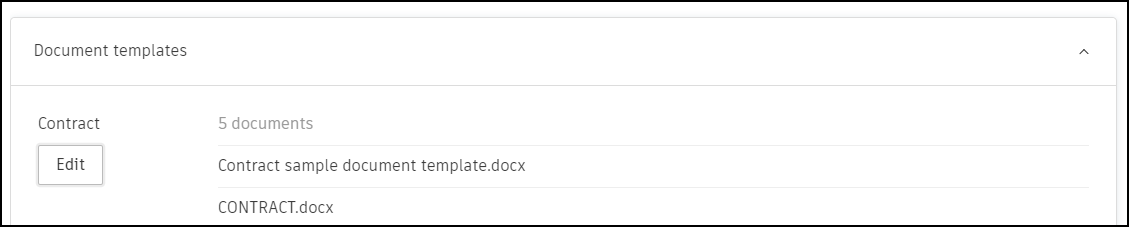 Note: For sections with existing templates, click Edit to add or modify templates.
Click
 to download a customizable Word or Excel template. Note: While in the section, you can also click Look up document variables to view available variables, or configure E-signature signers and fields if your template requires signatures.
Customize the content as needed. See Customize Your Template for guidance.
Once customized, update the template name and click Save.
Drag or browse for your created document to upload it as the template.
Select Finish to save and exit.
Customize Your Template
When customizing your template, do not edit the content within the brackets - these are variables that the system uses to auto-populate data when generating documents. Learn more about variables.
Look Up Document Variables
To find available variables while creating or editing a template:
Click Look up document variables in the document template dialog.
Browse or search for variables by category. For more details, see Variable Finder.
Copy the variable syntax and paste it into your Word or Excel template.
This feature helps you discover all available variables without leaving the template creation workflow.
Payment Application Templates
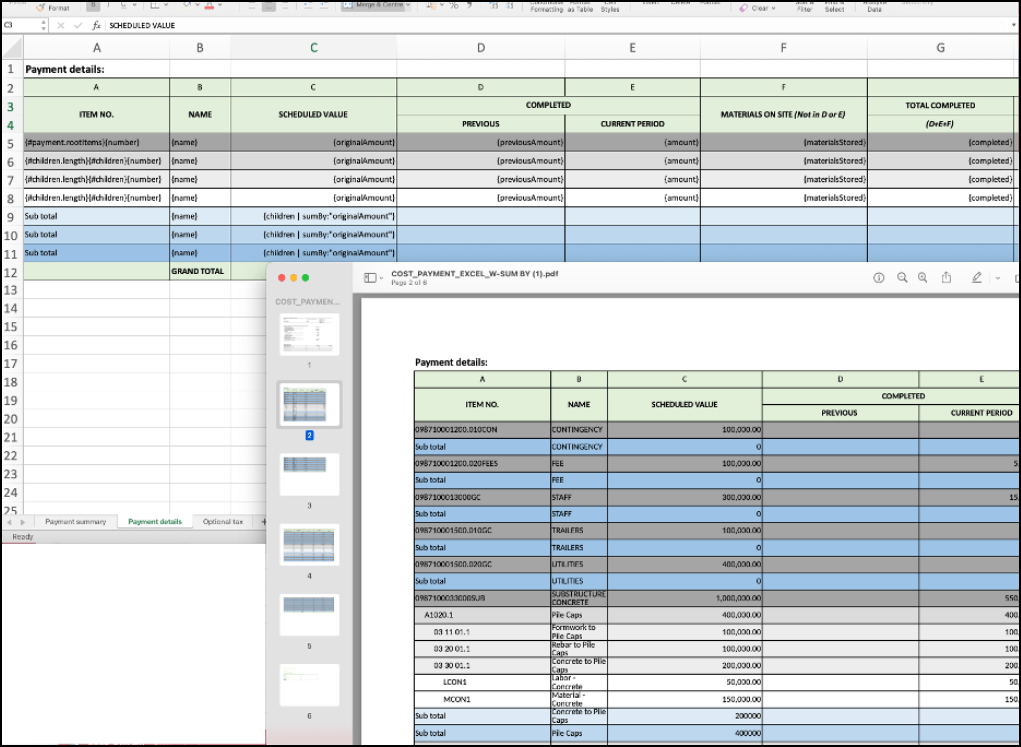
Payment application templates include extra rows in the payment details table that allow you to define hierarchy levels, parent node background colors, and fonts.
Use Percentages in Templates
There are two ways to incorporate percentage format into document templates.
Option 1: Automatic interpretation
Format cells as General in Excel. During import, Cost Management will automatically interpret the value as a percentage (for example, 12.39 becomes 12.39%).
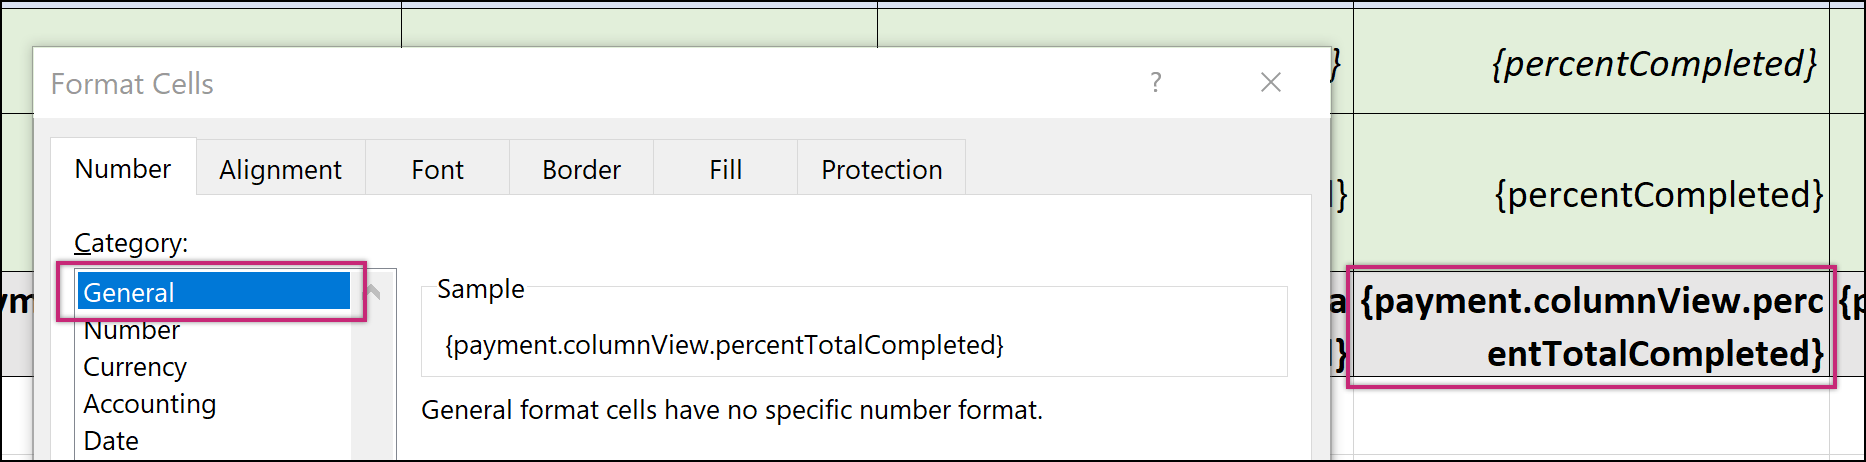
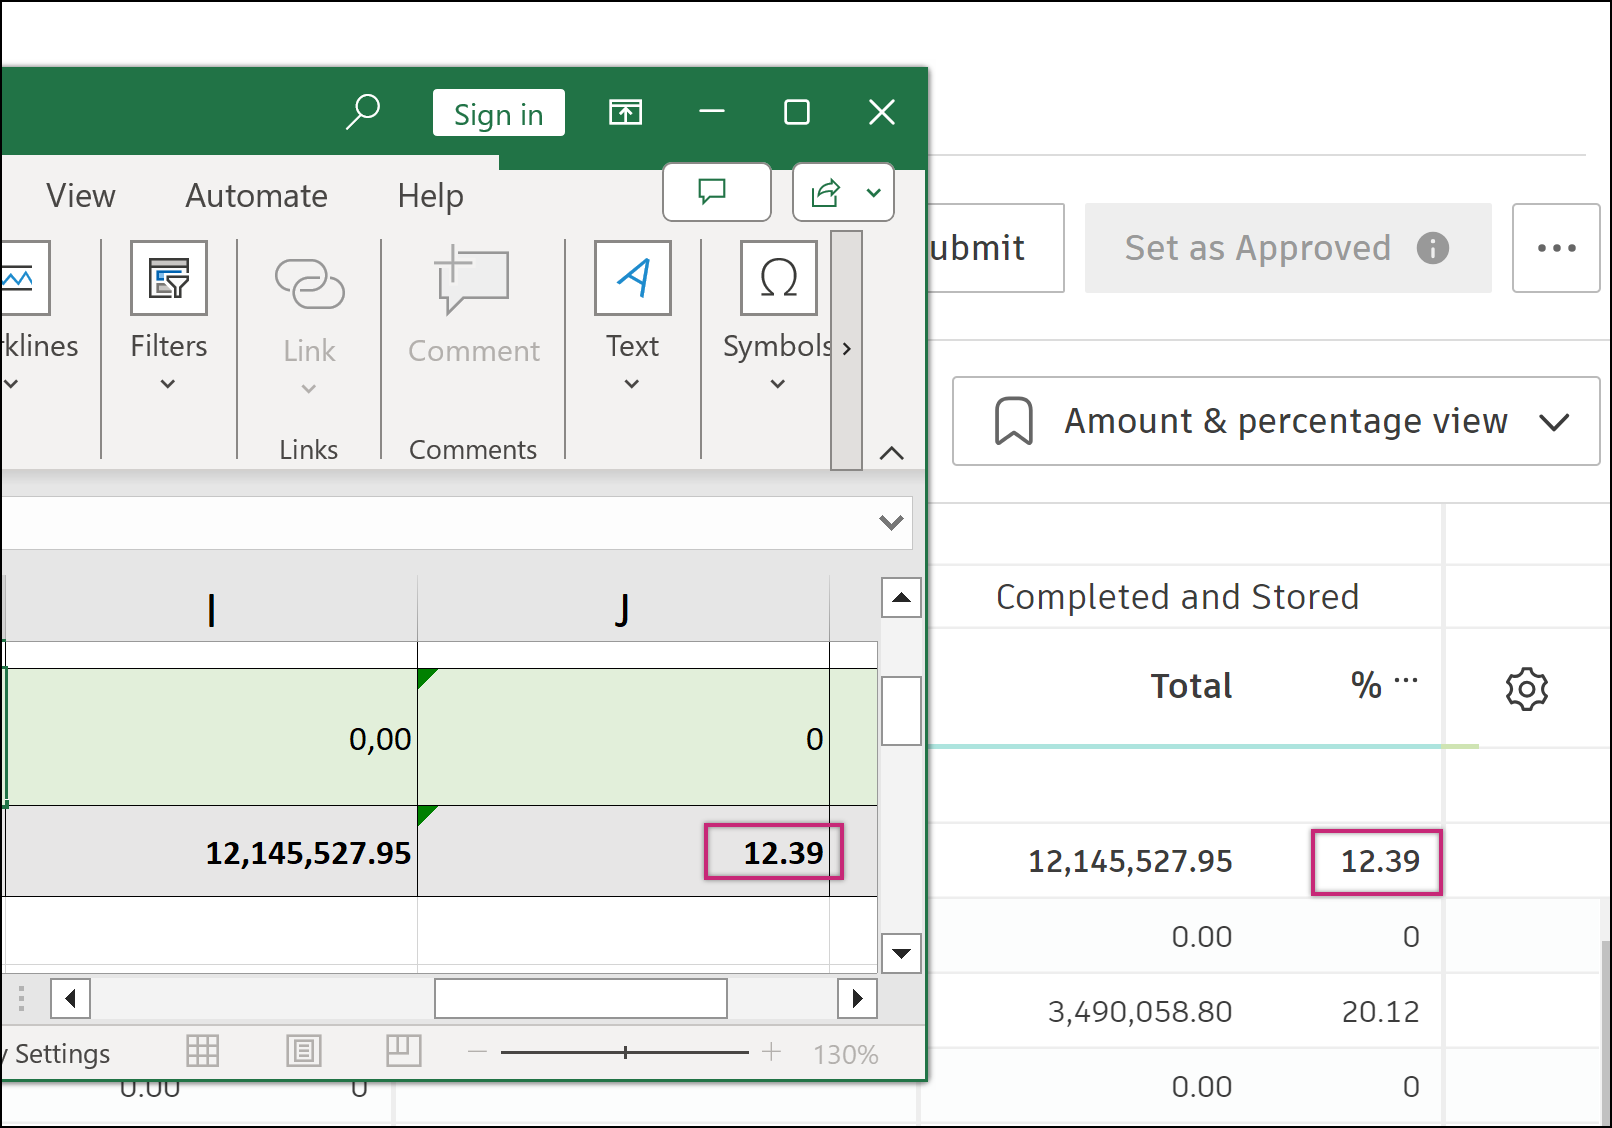
% character to each cell, format the cell as General and manually add % to the variable, for example: {payment.columnView.percentTotalCompleted}%.Option 2: Native Excel percentage format
Use Excel's native Percentage format cells by defining a percentage formula. For example, for the total completed percentage column of a Cost Payment Application:
{completed | divide: revisedValue}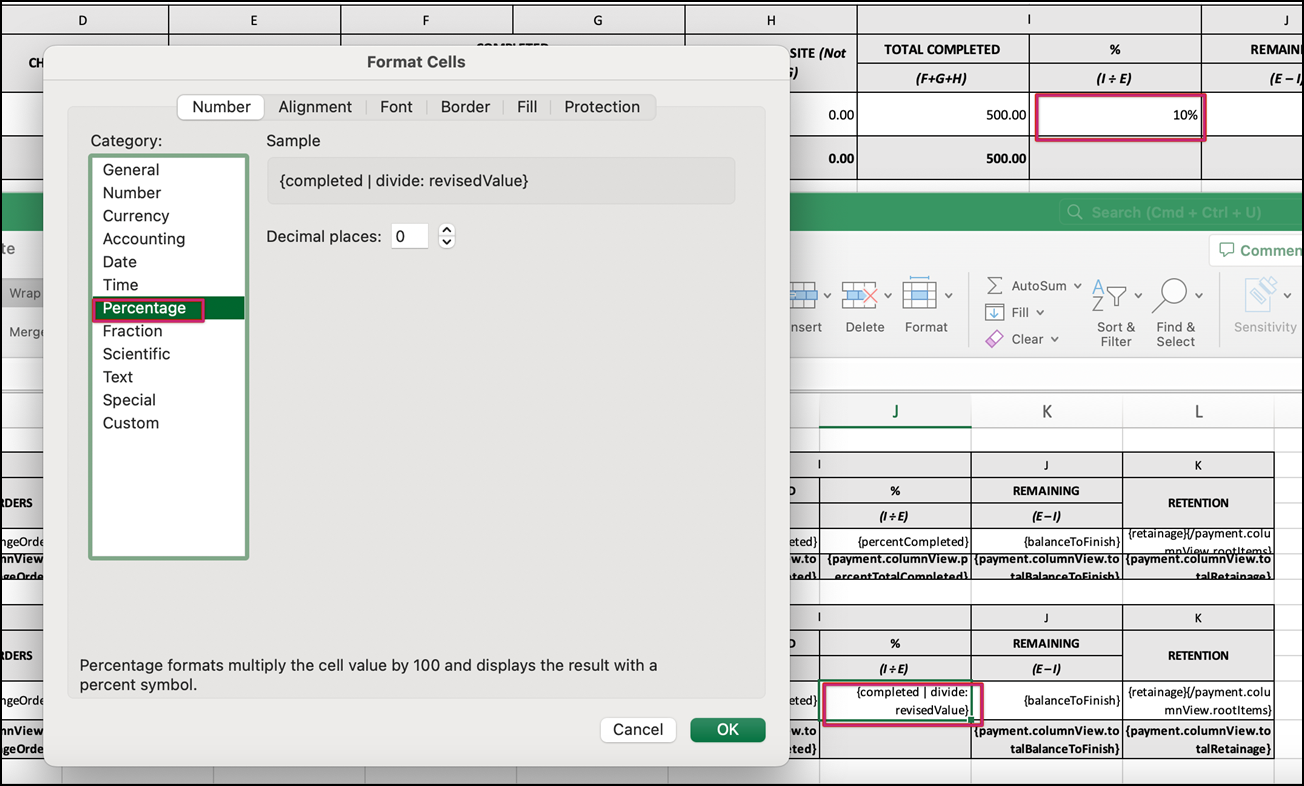
Learn more about Variable Formatting.
Set a Template as Default
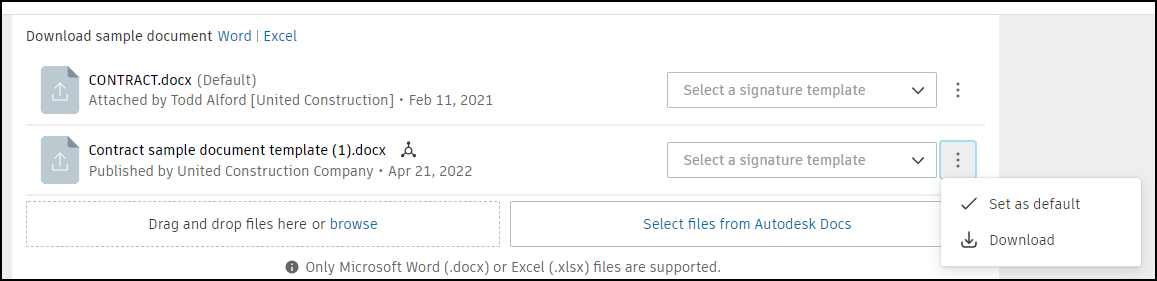
Set a document template as default to display it first in the list of available templates when generating documents.
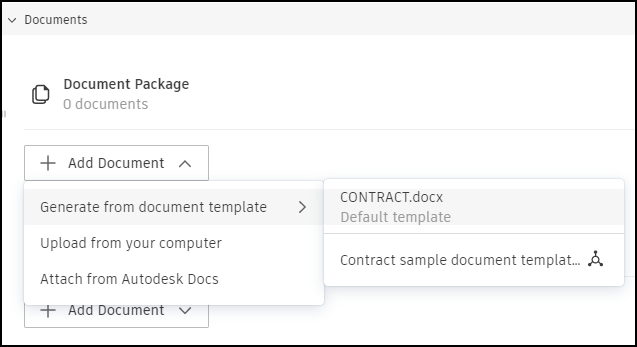
To set a template as default:
Select the Settings tool from the left navigation.
Switch to the Budget, Cost, or Change Order tab.
Scroll down to the Document Templates section.
Click Edit in the upper left corner of the section.
Click the More
 menu next to the template.
Click Set as Default.
Restrict Contract Templates by Contract Type
By default, each contract document template is available for all contract types. Use the Apply to Contract Type setting to limit a template to specific contract types — for example, to prevent a Subcontract template from appearing on a Consultant contract.
When a member generates a document, only templates that include the contract's current type appear in the list.
To assign contract types to a template:
Select the Settings tool from the left navigation.
Switch to the Cost tab.
Scroll down to the Document templates section and click Edit.
In the Apply to Contract Type column, click the cell for the template you want to restrict.
Select one or more contract types. To make the template available for all types, select Select all.
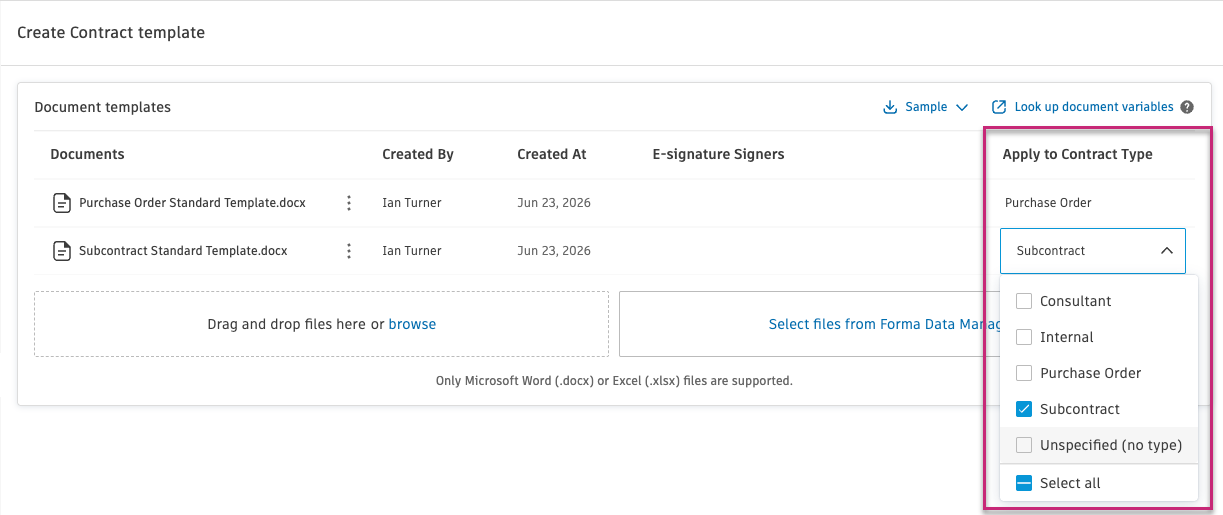
Click outside the dropdown to apply.
When contract types change:
| Event | Template set to All Types | Template set to specific types |
|---|---|---|
| New type added | Automatically included — no update needed | Not included — add the new type manually to each relevant template |
| Type deleted or deactivated | Type disappears from the dropdown; template still applies to remaining types | Deleted type is removed from the selection; template applies to remaining types. If the deleted type was the only selection, the template applies to no types |
| Previously deactivated type re-activated | Same behavior as adding a new type | Same behavior as adding a new type |
Best Practices
Embed Fonts in Your Template
If you experience formatting issues with generated documents (such as fonts appearing differently than expected), embed the fonts in your Word template file. This ensures the document displays correctly regardless of which fonts are installed on the recipient's system.
On Mac:
- Open the template in Microsoft Word.
- Go to Word > Preferences.
- Select Output and Sharing > Save.
- Enable Embed fonts in the file.
On Windows:
- Open the template in Microsoft Word.
- Go to File > Options.
- Select Save.
- Enable Embed fonts in the file.
Template Design Tips
- Keep variable names exactly as provided—do not modify content within brackets
{ }. - Test your template by generating a sample document before deploying it to your team.
- Use consistent formatting throughout the template for a professional appearance.
- Consider creating separate templates for different use cases (for example, internal vs. external distribution).
- To remove the word SAMPLE, click the document header.
- Summaries can be placed at the top or bottom of a document to increase visibility of summary items.
- Templates support native Excel format cells such as Number, General, and Currency.
Troubleshooting
Review Invalid Variables
When variables in a template become invalid (due to system updates or errors), you'll see a  icon next to the affected template. To resolve:
Click the More
menu next to the invalid document template.Choose Review Issues.
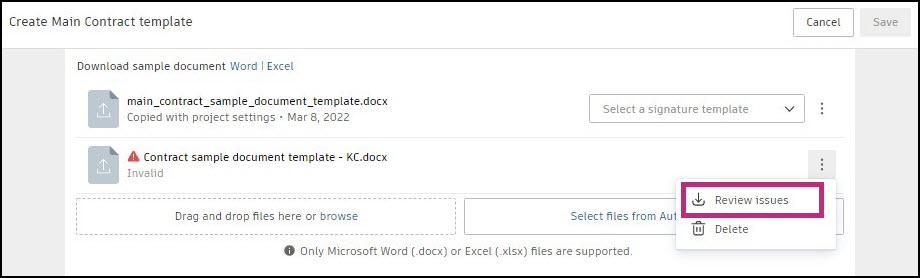
The template downloads automatically. Open it to see comments next to invalid variables.

Resolve the issues within the document.
Upload the corrected template.
Layout Issues in Generated Documents
If you see layout issues in generated documents or in PDFs sent for e-signature (for example, text or tables appearing compressed or warped), adjust your document template in LibreOffice. Using LibreOffice as the template authoring tool can resolve spacing and alignment problems that may appear during document conversion or when documents are merged.
Common Issues
| Issue | Solution |
|---|---|
| Fonts look different in generated document | Embed fonts in the template file. |
| Layout appears wraped or compressed in generated or merged PDFs | Adjust the template in LibreOffice. |
| Variables not populating | Ensure brackets { } are not modified and variable names are spelled correctly. |
| Percentage values incorrect | Check cell formatting - use General format or define a formula. See Use Percentages in Templates. |
| Template shows warning icon | Use Review Issues to identify and fix invalid variables. |
| Warning icon on a recently generated document | The document was generated from a template that doesn't apply to the contract's current type. The document itself is not affected. Regenerate using a matching template if needed. |