Budget Settings
Project administrators can access the settings for Cost Management from Settings tool in the left navigation. This article focuses on the Budget settings:
- Budget Code Format
- Budget Name Format
- Budget Overview Columns
- Fee Analysis
- Budget Financial Markup Formulas
- Budget Lock
- Internal Budget Transfer
- Schedule Budget Snapshots
- Budget Forecast
- Date Range Based Resources Update Schedule
- Main Contract Schedule of Values
- Main Contract Types
- Budget Payment Application Approval Workflows
- Document Templates
- Dates for Main Contract and Budget Payment Application
- Custom Attributes
- Default Email Message
Budget Code Format
Create your budget code format by following the guidelines in the Budget Code Setup article. Define the budget code segments before importing a budget into Cost Management.
See the Budget Code Setup article to learn how to:
- Set up budget code segments
- Download a budget template and import a budget
- Work with the segment code master list by adding, editing, and locking segment values
Budget Name Format
Select one or more budget segment descriptions as the default name of new budgets.
When you rename budget segments, delete them, or change the order in the Budget Code Segments setting, the default names will also change.
Budget Overview Columns
Project administrators can manage the name, group, and order of existing columns. They can also create custom columns based on project values or other columns.
To manage existing columns and create custom calculated budget columns, click Manage.
To change where existing columns appear (group and position), rename them and control which appear by default. Select the column name and choose the desired option beneath the list view.

To learn more about managing custom columns, see the Create Custom Columns article.
Fee Analysis
Set up fee categories and their data sources for analysis in the Budget view. Each fee category points to budget columns that supply the original and forecasted fee values, and the Fee Analysis table calculates variance, ratios, and percentage of the main contract from those values.

To set up Fee Analysis:
- Open project Settings, then the Budget tab.
- Expand the Fee analysis section and click Manage.
- Add a row for each fee category you want to analyze (for example, Base Fee, Shared Savings, Billed Rates). For each row, set:
- Name — Required. Display name used in the Fee Analysis table.
- Original Fee — The budget column that supplies the original fee value, or a fixed number.
- Forecasted Fee — The budget column that supplies the forecasted fee value, or a fixed number.
- Save your changes.
The remaining columns — Original Main Contract %, Final Main Contract %, Fee Variance, and Variance Ratio — are calculated automatically from the Original Fee and Forecasted Fee values. Fee Goal defaults to the Forecasted Fee value but can be edited manually in the Budget view, and Notes is a free-text field also editable in the Budget view.
To deactivate or delete a fee category, use the 3-dot menu next to each row.
- Original Fee and Forecasted Fee can reference any budget column whose total is calculated by summing all rows. Custom columns must already exist in the project before you can pick them here. See Create Custom Columns for setup.
- Fee analysis values are project-level totals and ignore filters applied to the Budget view.
See Fee Analysis and Fee Analysis Snapshot for how project members consume these settings in the Budget view.
Budget Financial Markup Formulas
Define markup formulas that calculate values on the Final Main Contract Amount column in the Budget view. When a formula is applied, the affected budgets become markup budgets, and their Final Main Contract Amount values come from the formula calculation instead of the column's defined formula.

To create a budget financial markup formula:
- Open project Settings, then the Budget tab.
- Expand the Budget financial markup formulas section and click Add. The formula editor opens.
- Set the formula's name and an optional description (the pencil icons next to the title and subtitle).
- Build the formula by dragging items from the Drag and drop to add formula item panel on the left into the formula table. Two item types are available:
- Markup — A markup row. After dropping it, click the row to open the Markup edit panel on the right and configure:
- Name (required).
- Type & rate — Percentage (calculated against the selected Cost Basis) or Lump sum.
- Cost Basis — The basis used to calculate this markup, such as Current cost basis or a previous subtotal.
- Variable — Toggle on to allow the markup amount to be edited at the time the formula is applied.
- Description (optional).
- Map markup to budget code (required) — The budget code in the project that this markup writes to. Each markup must map to a unique budget code. If the code doesn't exist when the formula is applied, a new budget is created using the markup name, with Original Budget set to Qty 1, Unit Cost 0, Amount 0.
- Calculated on non-markup budgets where — Optional filter that scopes which budgets this markup calculates against, based on the value of the column where the formula is applied or on budget code segments.
- Subtotal — A subtotal row. After dropping it, click the row to open the Subtotal edit panel on the right and configure:
- Markup subtotal name (required).
- Cost basis revising — Revise cost basis recalculates the Cost Basis used by markups that follow this subtotal. Info only displays the subtotal without changing the cost basis for subsequent markups.
- Markup — A markup row. After dropping it, click the row to open the Markup edit panel on the right and configure:
- Reorder, rename, or remove markup and subtotal rows as needed. The system fills in the Amount column for each markup, and Markup total and Grand total are calculated at the bottom of the formula.
- Click Save.

Manage saved formulas:
To manage saved formulas, open the 3-dot menu on the formula row in the list:
- Deactivate (or Activate if previously deactivated) — A deactivated formula is hidden from the Apply markup formula modal in the Budget view but its configuration is preserved. Recalculating a budget that already has the formula applied continues to use the previous formula even if it has since been deactivated.
- Delete — A formula that has already been applied to a budget column can't be deleted, only deactivated.
Project copy and templates:
- When you copy a project or apply a project template, budget financial markup formulas are copied along with their mapped budget codes.
- If a budget code in the formula contains project-specific segments, an administrator may need to remap markups in the destination project after the copy.
See Apply Markup Formula on Budget Columns for how project members apply, recalculate, and clear formulas in the Budget view.
Budget Lock
Once the original budget setup is finalized, select the Lock Budget button to lock it.
After a budget is locked, the quantities, units, unit costs, and ratios of the forecast are also locked. However, with the Forecast tab, you can still:
- Edit the start and end dates
- Create or delete forecast distributions
- Link schedule tasks to the budget
- Calculate ratios
Internal Budget Transfer
Enable this setting to allow team members to perform internal budget transfers from the budget summary view.
Toggle on Approval Workflow to create a workflow for budget transferring. Learn more about Approval Workflows.
Learn more about internal budget transfers which you can do in the Budget tool, from forecast adjustments, or in the Change Order tool for PCOs and SCOs.
Schedule Budget Snapshots
Set up automatic snapshots to capture budget data at regular intervals. You can configure the frequency, day, time, and duration for which snapshots should be taken:
- Choose between weekly or monthly snapshots.
- Specify the day of the week for weekly snapshots. For monthly schedules, snapshots occur only once per month.
- For monthly schedules, define the specific instance of the day within the month (for example, first, second, or last). The default value is first. For example, selecting second Tuesday schedules the snapshot for the second Tuesday of each month.

When configuring snapshots, you’ll receive an estimate of how many snapshots will be generated within the specified time frame.
To delete a schedule, click Edit schedule, and then select Remove schedule.
Snapshots are accessible in the Budget tool, where you can filter between manually and automatically created snapshots. Learn more about Budget Snapshots.
Budget Forecast
Budget forecast allows you to forecast both revenue and costs, providing visibility into projected fees by calculating the difference between forecasted budget revenue and forecasted costs. This enables general contractors to manage scenarios where time-related resources may change (such as increased hours) without exceeding the Guaranteed Maximum Price (GMP), requiring either change order transfers or internal budget transfers.
Turn on to show budget forecast columns and allow budget forecast adjustments. Recommended when using a cost plus main contract.
If the toggle is on:
Columns Billed To Date, Budget Forecast Adjustments, Forecast Budget To Complete, and Forecast Final Budget are visible by default in the budget overview.
Budget forecast adjustment columns Qty, Unit, Unit Cost, and Amount are visible by default in the budget overview and forecast adjustment bottom flyout.

Budget forecast columns in date range resources are visible by default. See Date Range Based Resources Update Schedule to learn how to configure the frequency settings.
You can generate a PCO from budget and forecast adjustments and make budget transfers.

Related articles:
Date Range Based Resources Update Schedule
Configure the Qty Elapsed update schedule for date range based resources so they stay in sync with your project's billing and actual cost cycles.
The collapsed section shows a summary of the current configuration — for example, how often the budget forecast and cost forecast update and the schedule's start and end dates. Click Edit schedule to open the configuration modal.
To configure the schedule:
- Open project Settings, then the Budget tab.
- Expand the Date range based resources update schedule section and click Edit schedule. The Edit date range based resources update schedule modal opens.
- Configure the Billing schedule (available when budget forecast is on):
- Frequency — Monthly or Weekly. The frequency you pick determines which fields appear below.
- Every {N} — The repeat interval for the selected frequency (for example, every 2 months or every 3 weeks).
- For Monthly frequency, set On day — two dropdowns that pinpoint the exact day each update falls on, such as the Last Day of the month.
- For Weekly frequency, set Run on — click a day-of-the-week button (S, M, T, W, T, F, S) to choose the day each weekly update runs. Weekly schedules can only run once per week.
- Covers work from — The reporting period each update represents. Options vary by frequency, for example The same month, 2 months ago, or The same week. The helper text below the field shows a worked example for the selected option (for example, with 2 months ago selected for a monthly schedule, an Apr 30, 2026 update counts Feb 1, 2026 – Feb 28, 2026 as elapsed).
- Configure the Actual cost schedule using the same fields. When budget forecast is off, only the Actual cost schedule is configurable.
- Set the Start and end dates for when the schedule is in effect.
- Click Save schedule. To clear an existing schedule, click Remove schedule.

In the budget bottom flyout, the Billing Frequency and Actual Cost Frequency columns reflect the configured schedule. All date range based resources share the same schedule configuration.
See Date Range Based Forecasting to learn how to create and manage date range based resources.
Main Contract Schedule of Values
Show change orders in the main contract as line items or a column. Individuals can toggle this view in the main contract, but this selection sets the default view. See the Main Contract article for more information.
You can toggle this view for:
- The Main Contract tab
- The Budget Payment Application tab
To do so:
- Expand the Main Contract Schedule of Values section.
- Select As Line Items or As a Column using the radio button.
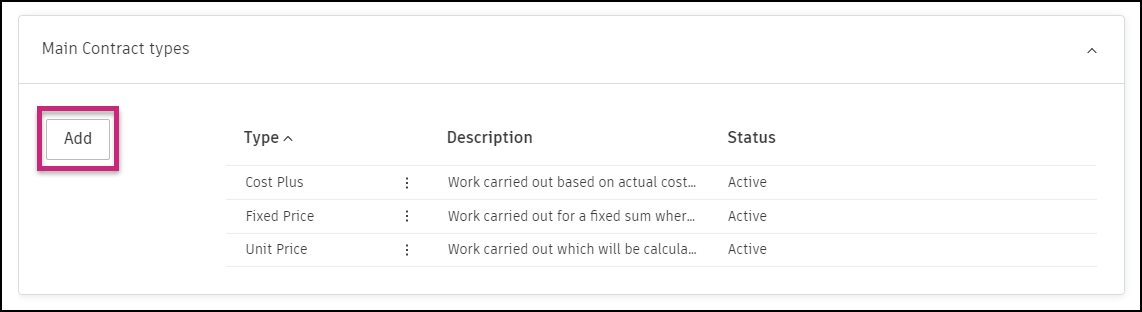
Main Contract Types
A main contract is the primary contractual agreement entered into directly, for example, between an owner and a main contractor. When creating a new main contract, you can choose your main contract type from the predefined options or add one in the settings to fit your company's needs.
Choose from the presented options:
- Cost Plus - Work carried out based on actual cost plus additions such as overheads and profit.
- Fixed Price - Work carried out for a fixed sum where actual costs incurred may differ from the incoming value paid. If you choose this option, markup cost item values will be spread over normal cost items in approved owner changes. Learn more about spreading markup budget values. When this option is selected as the main contract type, any additional costs added to change orders will be hidden from the client. For example, if a 10% markup is added to a $10,000 concrete works change item, the client will only see the final cost of $11,000 on their invoice.
- Unit Price - Work carried out which will be calculated based on detailed measurement of task progress.
To add a main contract type, click Add in the upper left corner of the Main Contract Types.
To assign a contract type to a line item by a drop-down list:
Go to the Budget tool.
Switch to the Main Contract tab.
Enter edit mode by clicking
 .
.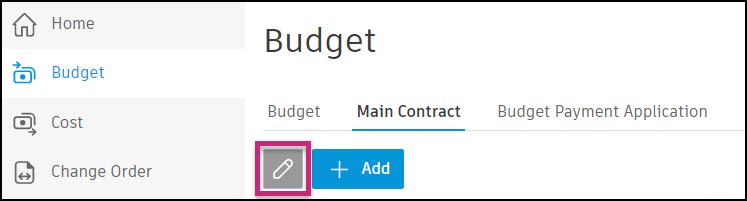
Choose the contract type in the Type column.
To learn how to create a contract, see the Work with Contracts article.
Budget Payment Application Approval Workflows
Project administrators can create custom approval workflows for budget payment applications. This allows you to automate the routing of documents for internal review and keep the consistency and transparency of company-defined processes across projects. Learn more about approval workflows.
Document Templates
Create standard main contract and budget payment application template formats using fields that automatically populate with data. See the Document Templates in Cost Management article for more information.
Dates for Main Contract and Budget Payment Application
You can define a default value for dates and choose to have them displayed on the home page. This will help you manage the schedule in Cost Management. To do so, open the More menu  and click Edit.
can't be displayed on the home page and can't be edited.If applicable, you can choose the default value for the date. Use the relative date option for cases where an activity is relative to the date of another activity (for example, creating a procurement schedule). The relative date option is only available for editable system-generated dates and custom dates.
Available document variable examples are shown by clicking Show More. You can use those to prepare a document template.

Custom Attributes
Create custom attributes for the details panels within budget items, main contract items, and budget payment applications in Cost Management. See Create Custom Attributes for more information.
Default Email Message
Customize the default email message for budget payment applications submitted for review.