Cost Settings
Project administrators can access the settings for Cost Management from the Settings tool in the left navigation. This article focuses on the Cost settings:
- Number Format
- Contract Schedule of Values
- Contract Overview Columns
- Required Fields for Contract
- Contract Types
- Expense Types
- Contract, Cost Payment Application, and Expense Approval Workflows
- Compliance Requirements
- Document Templates
- Dates for Contract, Cost Payment Application, Expense
- Custom Attributes
- Default Email Message
Number Format
You can define the number format for:
- Contract. Choose whether you want numbers to be automatically generated or manually entered when creating contracts. See the Define the Code Formats section to learn more.
- Expenses. Define the prefix, suffix, number of digits, and start number for expenses. See the Define the Code Formats section to learn more.
- Contract Schedule of Values. Select one or more budget segment codes as the default code for budget-associated items in the contract Schedule of Values.
Define the Code Formats
Project administrators can control the default display of code formats within Cost Management.
To define the code format settings:
Choose Settings from the left navigation.
Switch to the Cost tab to define the expense code formats.
Click the Number Format drop-down list.
Select the More menu
 next to Contract or Expense.
Click Edit.
For Contract select Manual entry or Automatically generated.
Note: If the contract code is automatically generated, format settings will be ignored. The contract code will be treated as a manual entry when created from ERP or imported from Excel.For each code type, define the following:
- The maximum number of characters.
- Prefix: anything before the generated numbers.
- The number of digits and starting number. This sets how the numbers are automatically generated.
- Suffix: anything after the generated numbers.
Click Done.

Contract Schedule of Values
Project administrators can set a default behavior for the schedule of values. Choose between two options:
- Amount locked. This locks the amount of each budget-linked item and allows for further breakdown.
- Fully locked. This locks the amount hierarchy.
Learn more about locking the amount and hierarchy in the Schedule of Values.
Contract Overview Columns
Project administrators can manage the name, group, and order of existing columns. They can also create custom columns calculated on project values or other columns.
To manage existing columns and create custom calculated contract columns, click Manage.
To change where existing columns appear (group and position), rename them and control which appear by default. Select the column name and choose the desired option beneath the list view.

To learn more about managing custom columns, see the Create Custom Columns article.
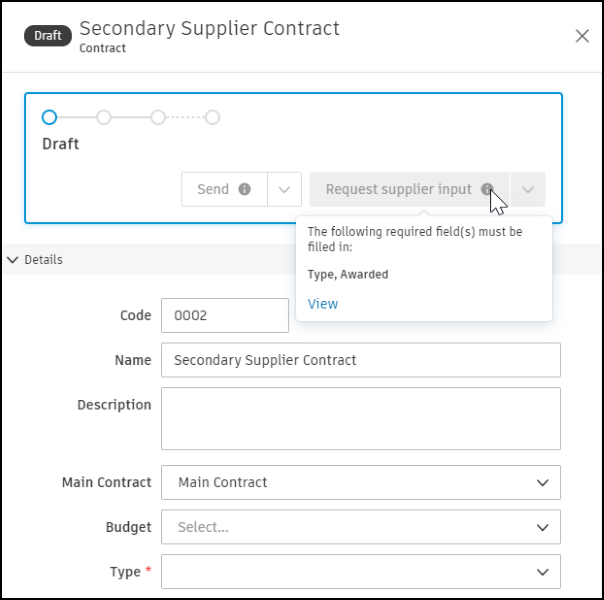
Required Fields for Contract
Project administrators can define a batch of fields as required when filling in data for a contract.
To do so:
- Open the Settings tool from the left navigation.
- Switch to the Cost tab.
- Scroll down to Required Fields and click it.
- Choose which fields should be marked as required. Custom attributes are also listed and can be chosen.
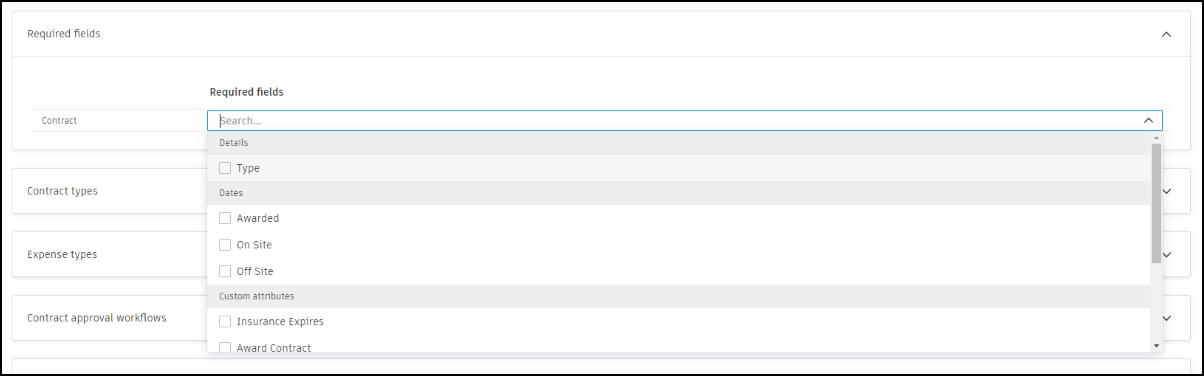
After setting it up, when creating a contract, those fields are marked as obligatory and must be completed to proceed with the contract workflow. By clicking View, you'll be redirected to the missing data.
Contract Types
Contract types help you categorize and organize contracts in your project. You can create custom types and control which custom attributes apply to each type.
Click Add to create more types for selection. Click Description and Prefix code fields to edit. Use the More menu to deactivate a default type.
Click the drop-down list in the Custom attributes column to select which custom attributes apply to each contract type. When a new contract type is added, all custom attributes are enabled for that type by default.
Unspecified (no type): Contracts without an assigned type are categorized as Unspecified (no type). This default category appears in the Contract Types table but does not appear in the contract type drop-down list when creating or editing contracts. In the Contract table, contracts without a type show an empty cell in the Type column.
How Contract Types and Custom Attributes Settings Interact?
The settings in Contract types and Custom attributes influence each other. Changes made in one section automatically update the other. For example, if you uncheck a custom attribute for a type, that type will also be unchecked from the custom attribute setting. See Custom Attributes and Contract Types to learn more about how these settings interact and how to manage custom attributes that don't apply to specific contract types.
Expense Types
Click Add to create more types for selection. Click Description and Prefix code fields to edit. Use the More menu to deactivate a default type.
Contract, Cost Payment Application, and Expense Approval Workflows
Project administrators can create custom approval workflows for contracts, cost payment applications, and expenses. This allows you to automate the routing of documents for internal review and maintain the consistency and transparency of company-defined processes across projects. Learn more about approval workflows.
Toggle Auto start after submission to automatically start the approval workflow after submission of the cost payment application. Switching this option affects new applications and those in status Draft, Pending Supplier Input, and Revise and Resubmit. Learn more about payment applications’ statuses.
Compliance Requirements
Compliance requirements ensure that specific documents or conditions are met before contracts and cost payment applications can be submitted or processed. These requirements help maintain project standards, regulatory compliance, and ensure all necessary documentation is in place before proceeding with financial transactions.
To define compliance requirements for contracts and cost payment applications:
- Choose the Settings tool from the left navigation.
- Switch to the Cost tab.
- Click the Compliance Requirements drop-down list.
- You can add compliance requirements by clicking Add next to Contract or Cost Payment Application. After clicking Add, the respective requirement window opens.
- Add the name and description of the requirement. These will be seen in the Compliance Requirements section in the contract details panel.
- Then, follow the steps below depending on whether you're setting up compliance for contracts or cost payment applications:
For Contracts:
Choose document-based or condition-based requirements:
For document-based: In Requirements to submit contract, Requires a document is a default option. You can choose an extra option Requires a document expiration date. See the Set Expiration Dates section in the Compliance Requirements article for more information.
For condition-based: Set a condition on which compliance will be based. For example:
- Block sending contracts when linked budget code segments match specific values (e.g., Cost Type equals EQ or MA).
- Block sending contracts when Original Commitment exceeds Revised Budget.
Note: If the requirement is non-compliant, you can choose to Block Contract Action or Allow Contract Action.
You can choose if the requirement applies to one, several, none, or all contract types.
Click Save.
For Cost Payment Applications:
Choose a document-based requirement. You can select an extra option Requires a document expiration date. See the Set Expiration Dates section in the Compliance Requirements article for more information.
Specify aplicability for this requirement:
Contract type: You can choose if the requirement applies to one, several, none, or all contract types.
Retention release status: Choose between Any, Released, and Not Released. Learn more about retention release.
Payment application status: Choose the applicable stage: Initial, Progress, or Final. Learn more about payment applications' stages.
You can create different sets of compliance for payment applications depending on the options you choose. A helpful note will appear, explaining how your choices affect the application. For example:

Click Save.
After adding a compliance requirement in the Settings tool, whenever compliance is not met during the workflow, you'll see a notification: The following compliance requirement is required followed by a list of unmet requirements. Here is the example:
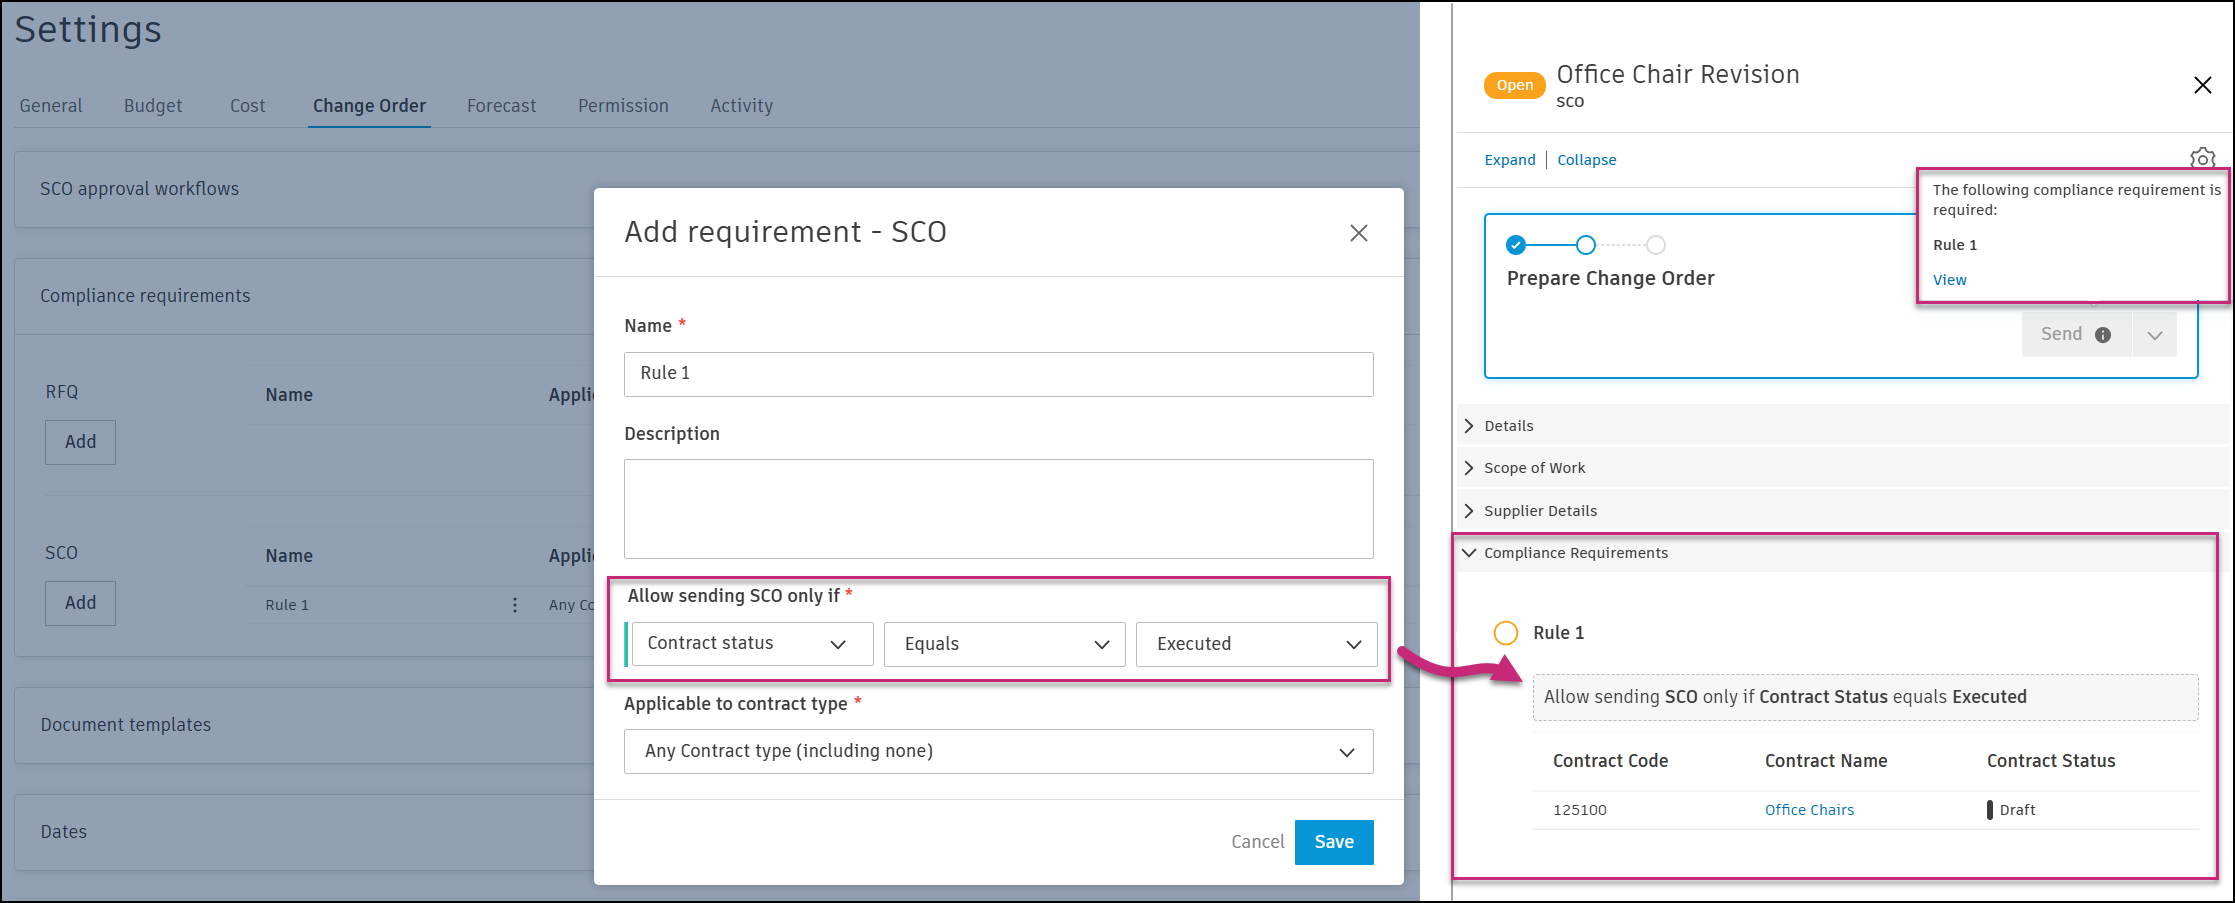
See the Compliance Requirements article to learn how to work with these types of documents.
Edit compliance requirements
By clicking the More menu next to the compliance requirement, you can choose from the options:
- Edit - Opens the Add Requirement window where you can make edits
- Move Up or Down - Moves the item up or down the list within the flyout panel
- Deactivate – Inactivates the item at any time, even if a requirement instance exists
- Delete - Deletes the item but is enabled only when there is no requirement instance
Document Templates
Create standard contract and cost payment application template formats. The templates are created using fields that automatically populate with data. See the Document Templates in Cost Management article for more information.
Dates for Contract, Cost Payment Application, Expense
You can define a default value for dates and choose to have them displayed on the home page. This will help you manage the schedule in Cost Management. To do so, open the More menu and click Edit.
can't be displayed on the home page and can't be edited.If applicable, you can choose the default value for the date. Use the relative date option for cases where an activity is relative to the date of another activity (for example, creating a procurement schedule). The relative date option is only available for editable system-generated dates and custom dates.
Available document variable examples are shown by clicking Show More. You can use those to prepare a document template.

Custom Attributes
Create custom attributes for the details panels within:
- Contracts
- Contract schedule of values
- Cost payment applications
- Expense items
- Expense subitems
See Create Custom Attributes for more information. See Custom Attributes and Contract Types to learn more about how Contract Types and Custom Attributes settings interact with each other.
Default Email Message
Customize the default email message for contracts and cost payment applications submitted for review.