General Cost Management Settings
Project administrators can access the settings for Cost Management from the Settings tool in the left navigation. This article focuses on the General settings:
- Project Process with details about collaborative potential change order workflow, simplified change order process, and description of owner role
- Unit of Measure
- Company Setup
- Currency
- Budget and Contract Allocation
- Rounding Settings
- Materials in Payment Applications
- Retention
- Tax Formulas with details on applying the tax
- Documents and Attachments in Cost Management
- Work Schedule
- Tab Names and Order
- Additional Terms
Project Process
This optional project process setting supports a straightforward setup process for different members. Based on the selected role and project preferences, you can configure which components display in Cost Management and apply appropriate permissions.
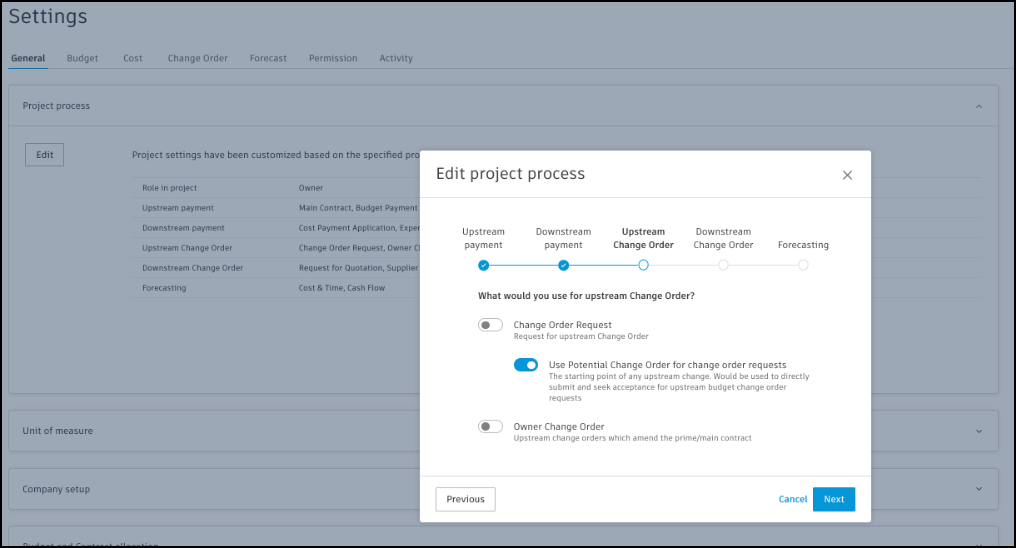
By using project process settings, the option to enable a collaborative Potential Change Order workflow is available. For more details on collaborative workflows and their impact on PCOs, see the Collaborative Potential Change Order Workflow article.
Owner Role Behavior with Cost Change Workflow
When the primary user is assigned the Owner role in the project process setting, the system automatically applies specific behavior changes to optimize the cost change workflow:
- OCO (Owner Change Order) is automatically hidden - Since owners don't typically create change orders to themselves, the OCO functionality is disabled to streamline the interface.
- Markup setting switches to "Cost side" - The "use markup on" setting is automatically configured to apply markups on the cost side rather than the budget side, aligning with the Cost Change workflow.
- Contract linking requirement - Cost items under the same PCO (Potential Change Order) must be linked with the same contract to ensure proper cost tracking and allocation.
This automatic configuration maintains proper cost control and workflow alignment when projects are managed from an owner's perspective. For more information about owner workflows, see the Collaborative with Others in Cost Management article.
Collaborative Potential Change Order (PCO) Workflow
The optional collaborative workflow for PCOs allows you to:
- Work with your downstream collaborators on the PCO for acceptance of the proposed price on potential changes. Your suppliers can generate PCOs and review, accept, or reject proposed changes.
- Send a PCO out to request pricing for a change order instead of using an RFQ.
- Work with your upstream collaborators on PCOs instead of CORs for budget change requests. Submitted values show up as Pending Owner Changes even if a COR is not used.
See the Collaborative Potential Change Order Workflow article to learn more.
Simplified Change Order Process
The simplified change order process lets you generate OCOs and SCOs directly in their final status (Approved for OCOs, Sent for SCOs), bypassing intermediate statuses and approval workflows. This streamlines workflows for teams that don't need multi-step review processes.
The available options and defaults depend on your company's role in the project:
- Main Contractor: Both simplified processes available, off by default.
- Owner: Simplified Supplier Change Order Process available and on by default.
- Supplier: Simplified Owner Change Order Process available and on by default.
See the Simplified Change Order Process article to learn more.
Unit of Measure
Determine which unit system is used in Cost Management. To adjust the unit of measure:
- Click the Settings tool
 from the left navigation.
 - On the General tab, click Unit of Measure.
- Use the drop-down list to choose Imperial or Metric units.
Units
Create custom units for cost items. To create a custom unit:
- Click Add in the upper-left corner of the Unit of Measure section.
- Enter a display name to appear in the drop-down list for cost item units. You can also add a description or enter the dimension of the units using the drop-down list.
Company Setup
Company Setup defines default contacts for key project roles. These contacts are used for document generation templates and as default recipients when sending change orders or payment applications.
To configure company roles:
- Go to the Settings tool and switch to the General tab.
- Expand the Company Setup section.
- Select the appropriate company and contact for each role:
- Owner: Receives change order requests from contractors
- Main Contractor: Receives change orders from owners
- Architect: Can be included in change order and payment application workflows
- Notary: Used for document templates requiring notary information
Contact Inheritance Hierarchy
Contacts can be specified at multiple levels. When displaying contact information for COR, OCO, or Budget Payment Application items, the system checks these levels in order:
- Item flyout (highest priority): If the contact is specified in the item's flyout panel, this value is used.
- Main Contract: If the item flyout doesn't have a contact, the system inherits from the associated Main Contract.
- Company Setup (lowest priority): If neither the flyout nor the Main Contract has the contact, the system falls back to Company Setup.
This allows you to set project-wide defaults in Company Setup, override them per Main Contract, and further override them for individual items.
- Send a Change Order - How contacts from Company Setup are used as default recipients
- Collaborate in Cost Management - Working with owners, architects, and external collaborators
- Cost Management Permissions - Assigning permissions to company roles
Currency
You can set many base and foreign currencies in your project. The default base currency for every project is USD (US dollars). To change this setting:
- Go to the Settings tool.
- Switch to the General tab.
- Scroll down to the Currency section.
- Select one of the available currencies next to Base Currency.
Foreign Currencies
With multicurrency functionality, foreign supplier management is streamlined. Teams can easily manage supplier contracts, change orders, payment applications, and expenses in different currencies. The system then automatically converts all foreign currencies to the project’s base currency and displays exchange rate gains and losses for better cost control.
Check out this video for a brief introduction to multicurrency functionality:
To set up foreign currency:
Click On in Foreign Currencies, and then click Add.
Search for the abbreviation of the currency.
Tip: The full list of available currencies can be found here.Provide an exchange rate of 1 USD. Use numeric values only and a maximum of eight decimals. The exchange rate won’t be rounded.
Select the dates that the exchange rate is valid from and to. Those fields are optional and can be left empty.
You can always delete foreign currency and the existing instances using this foreign currency won't be affected.
Once you enable foreign currencies in your project, you can now easily create and manage foreign supplier contracts, change orders, payment applications, and expenses in the set currencies.
- Foreign Supplier Contract Management
- Foreign Supplier Change Order Management
- Foreign Currency in Payment Applications
- Foreign Supplier Expense Management
- Foreign Supplier Budget Management
Budget and Contract Allocation
Members can add multiple budgets to a single contract by default. Here is the diagram that demonstrates the relationship between budget and contract allocations when this option is chosen:

For all diagrams presented in this section of the article:
- Darker colors indicate items that are directly linked to the budget.
- Lighter colors represent subitems of those directly linked items.
- No background color means that there is no direct relationship with the budget.
Clicking Assign the same budget to multiple SOV items when the option of Multiple budgets to one contract is on helps organizing your budget and contract items differently but still connected. It allows multiple contract items to link to the same budget item:

To restrict this, select the One budget to one contract option. This option limits each contract to a single budget code:

Alternatively, you can allow a single budget to be allocated across multiple contracts. When this option is enabled, project members will be prompted to specify a contract each time they select a budget for the following:
- Cost items
- Expenses
- Actual costs
- Forecast adjustments
- Internal budget transfers

Rounding Settings
Use the rounding settings to control how numbers display in Cost Management. You can customize rounding separately for Currency, Number, and Percentage formats to match your project needs.
| Format | Applies To |
| Currency |
|
| Number |
|
| Percentage |
|
Rounding settings include three controls:
Rule: How numbers are rounded.
- Half Up: Typical rounding: five and above round the number up, four and below round down.
- Round Up: All values are rounded up.
- Round Down: All values are rounded down.
Accuracy: How many decimal places to show (examples: 0.01 shows two decimals, 0.001 shows three decimals).
- For Currency and Number formats: You can set accuracy up to eight decimal places (0.00000001).
- For Percentage format: You can set accuracy up to eight decimal places (0.00000001).
Sum (for Currency and Number only): How totals are calculated.
- Calculate on actual values then round: Adds up the exact values first, then applies rounding to the total.
- Calculate on rounded values: Rounds each line item first, then adds up the rounded values.
When choosing Calculate on rounded values for Currency or Number:
- Each line item is rounded first, then the total is calculated
- If you enter a total at the summary level, the system will adjust a subitem to match the total

Existing project data won't be recalculated when you change the setting.
Default settings apply the same rounding rules to Currency, Number, and Percentage formats. You can customize each format separately as needed.
Materials in Payment Applications
Cost Management currently follows the AIA G703 standard, providing a binary material tracking approach. According to this standard, materials are either considered as work completed or presently stored. If a material has been fixed in place, it is classified as work completed and placed in the column: This Period – Work Completed. On the other hand, if the material has been delivered to the site and stored, it remains in the column: This Application – Total Work Completed. This Period category accumulates materials delivered over multiple months and should only be moved to Work Completed when it is completed and put in place.
However, we also recognize that some owners prefer to view the previous period's materials as previously billed rather than previously completed. They expect to see that the full payment amount is reflected in the From Previous Application section. To address this requirement, we have introduced an option that allows the combination of work completed and materials, treating them as a unified work completed value for the next period.
With the Materials in Payment Applications setting, you can choose a method to calculate materials in This Application in budget and cost payment applications.
To do so:
Go to the Settings tool from the left navigation.
In the General tab, scroll down to the Materials in payment applications.
Choose a method to calculate materials:
- Materials Stored – Includes materials newly stored in the current period and previously stored materials not yet incorporated into the project.
- Materials Billed – Includes both materials to be billed in the current period and materials previously billed. If Materials Billed is selected, a whole new set of columns will be added to both budget and cost payment applications, replacing the original Materials Stored columns.
Switch between options to see the difference in the payment applications’ columns.

The change in setting will also be visible in the flyout panel of the budget payment application, in the Associated Costs section. The Materials Stored column changes to Materials Billed, and the new % column is added. You can also see the change in the Expense category in Associated Costs. If not visible, to see the new columns there, click the ![]() icon and choose the necessary columns.
icon and choose the necessary columns.
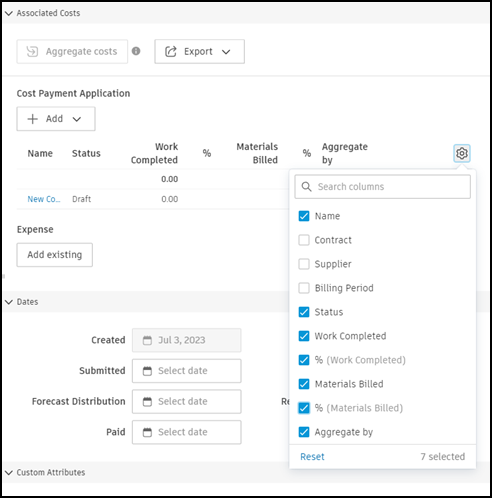
Retention
This setting allows you to specify a retention rate for completed work and materials stored for both budgets and costs. Every payment application line item gets a line for retention added to it automatically but it can be removed. The default retention cap is applied automatically to each main contract or contract and can also be adjusted.
See the Retention article to learn more.
Tax Formulas
Use the custom tax calculation feature to calculate taxes in all cost processes and show tax in the generated cost documentation to comply with government requirements. Project administrators can add multiple tax formulas to control how taxes are applied for each contract, payment application, and change order. Any existing formulas will be available in the list.
Create a Tax Formula
To create a tax formula:
Within Cost Management, click Settings from the left navigation.
On the General tab, click Tax Formulas, and then Add.

Select the pencil icon to edit the formula's name.
To update the net total default (1,000.00) in the center preview panel, click Net Total.
Drag a new tax into the center column to add to the formula.
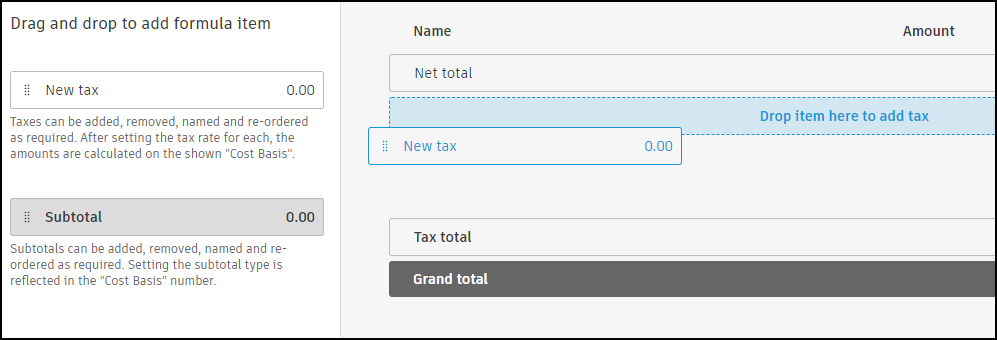
Click newly added New Tax to specify the Tax Rate as a percentage. The tax rate can be positive or negative. Negative tax rates are useful for figuring out CIS deductions.
 Important: If taxes in different tax formulas have the same name, they'll be combined into a single tax in the tax summary regardless of the tax rate.
Continue adding more taxes as needed to build out your formula. As you add taxes, the tax total is calculated based on the tax rate and the net total. Combined, these values produce the grand total. Taxes can be added, removed, named, and reordered as required. After setting the tax rate for each, the amounts are calculated on the Cost Basis column.
Note: You can add a taxable base limit. This limit determines the maximum amount of income that can be subject to taxation within a specific period.Drag a new subtotal into the center column to add to the formula. The subtotal is used to support a tax-on-tax use case.
On the right panel, you can choose between two options:
- Revise Cost Basis to recalculate the cost basis for subsequent taxes.
- Info Only to have the subtotal visible for informational purposes without recalculating the cost basis for subsequent taxes.
 Note: If there are multiple taxes above the subtotal, the subtotal will display both the tax subtotal and the subtotal.
Click Save to save the tax formula.
To show tax in the generated cost documents, the document template will need to be updated with the new template available in settings.
Edit and Manage Tax Formulas
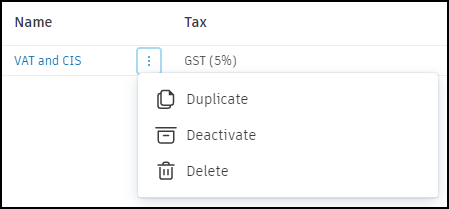
After the tax formula is created, you can use the More menu  to modify the formula by:
- Duplicating. That makes a copy of the formula that can be used as a basis for a new tax formula.
- Deactivating. It makes the formula unavailable for selection when applying the tax formula. Actively used formulas may be deactivated, but you'll be prompted to recalculate those taxes.
- Deleting the formula. You can only delete tax formulas that haven't been applied.
Apply a Tax
As a project administrator, you can add tax formulas, a tax summary, or apply a tax to the document for easy calculation in all costing processes. Showing the tax in the generated cost documentation helps to comply with government requirements too.
To apply a tax:
Click the relevant Cost, Budget, or Change Order tool from the left navigation, depending on where you are applying the tax.
Note: Make sure you added your tax formulas in advance. See the Create a Tax Formula section to learn more about adding tax formulas.Click the relevant tab. Available options are:
- Contract
- Cost Payment Application
- Main Contract
- Budget Payment Application
- OCO
- SCO
Click a line item's name to open the details panel.
In the details panel on the right, scroll to the Tax section and click Apply Tax. If you only have one tax formula available, that formula is applied to the expense. If you have multiple tax formulas, select the formula to apply.

The applied tax is visible in the tax summary for the line item.
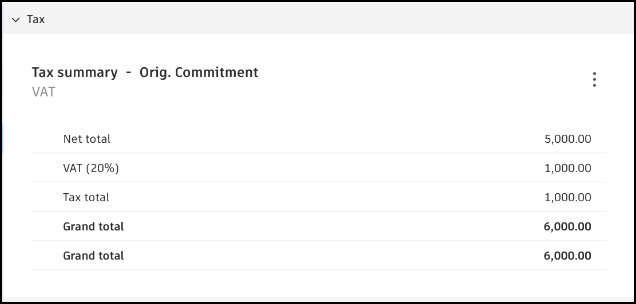 Note: You may see a message indicating the base data was modified. In that case, you'll be prompted to recalculate the applied tax. Several things can lead to the prompt to recalculate, depending on where the tax is being added:
Contract Cost Payment Application Main Contract Budget Payment Application OCO SCO Budget added Period work complete value changed Subitem added in table Period work complete value changed Committed value changed in cost item Approved value changed in cost item Budget deleted Materials stored value changed Subitem imported in table Materials stored value changed Cost item attached/detached Cost item attached/detached SOV amount changed in table Retention setting changed SOV amount changed in table Retention setting changed Cost item hierarchy changed Cost item hierarchy changed Subitem added in SOV table Retention value changed Linked budget changed Retention value changed Cost item hierarchy changed Cost item hierarchy changed Subitem imported in SOV table Value changed from previous period Subitem deleted Value changed from previous period OCO markup changed SCO added/deleted for Cost Payment Application OCO added/deleted for Budget Payment Application If you levy a tax on a sent or executed SCO, it will be displayed under the contract tax. You'll be able to see the net total and tax total for all change order taxes that are related to the contract. You can expand to see more detailed information, including specific change orders that affect contract tax.
If necessary, use the More menu
 and choose Edit Tax Detail or Delete Tax.
Editing the tax details allows you to turn on or off specific taxes as needed. The change is automatically updated in the Tax summary table.
Documents and Attachments in Cost Management
You can choose to store documents and attachments in both Cost Management and a specified location in Autodesk Docs.
Documents and attachments will be stored in a subfolder created for each company when choosing the Autodesk Docs option. Choosing to store the files in Autodesk Docs creates a single repository of all generated documents specific to each company for future audit purposes. If desired, the folder can be shared with other project members to access the information. To do that, members must upload permission to the related folder to generate documents or upload attachments in Cost Management.
As a project administrator, you can automatically grant the Create permission to the assigned company. See the Folder Permissions article to learn how to manage folder permissions for each company.
In the Documents section, you can manage folder permissions for your company by accessing the flyout panel of the contract, main contract, payment applications, and change orders. Simply click Manage Folder Permissions to open the relevant permissions for this company's folder.
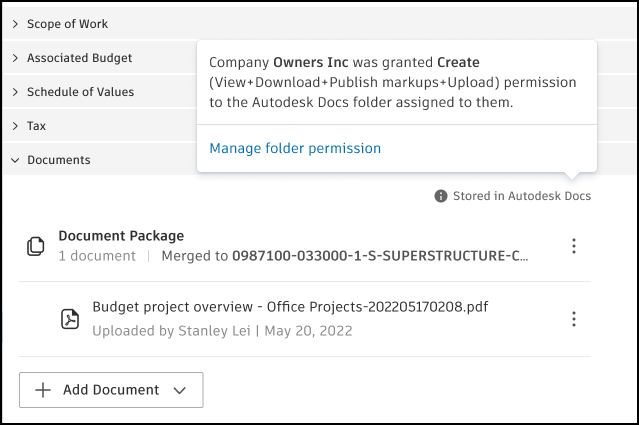
You can also include or exclude an item name in the folder and file names.
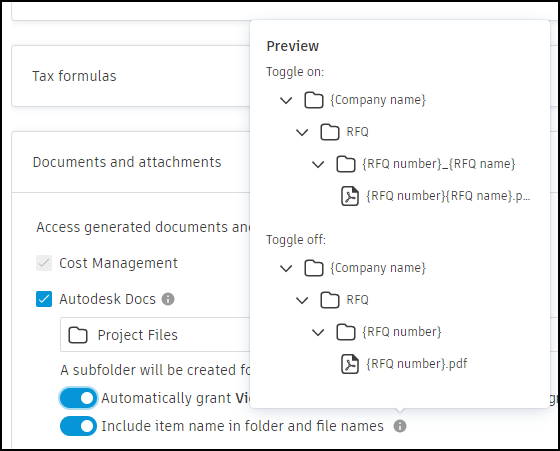
Learn more about:
- Creating document templates
- Creating document packages
- Adding markups to documents
Work Schedule
You can set how many hours a working day should have and what days the working week consists of.
Tab Names and Order
You can customize the names and order of the tabs. Refer to the Customize Cost Management Tables article. Also, you can disable any unnecessary tabs. To learn how, see the Project Process section of this article.
Additional Terms
As Owner or General Contractor, you can customize:
- Project team-related terms,
- Cost Item values,
- Budget change status,
- Cost change status and action,
- Cost Payment Application status and action.

Input your preferred terms into the Customized column. These terms will be automatically integrated and will appear in relevant areas across the entire Cost Management.
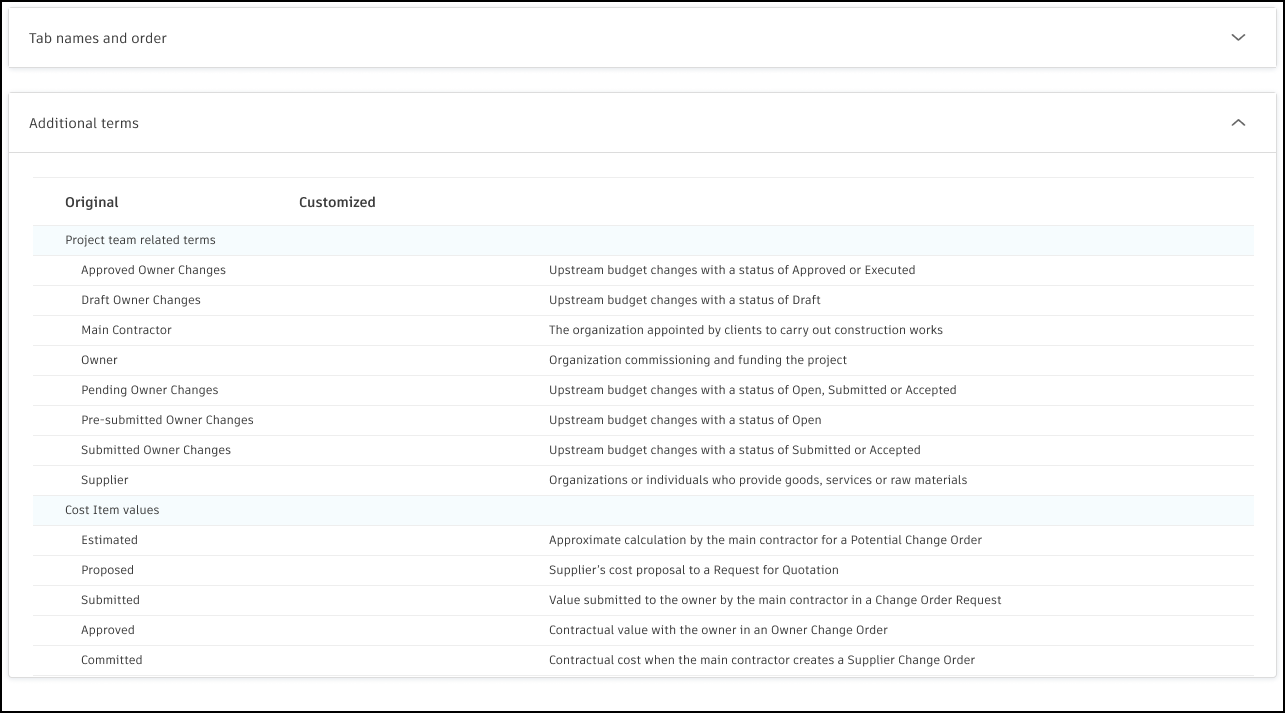
More Resources
Check out our video courses on:
- How to manage, access, and review project files using a web browser and from your mobile device.
- Accessing all reported data across workflows and features of Cost Management.