Markups in Sheets on Mobile
The Autodesk Construction Cloud mobile app allows you to create, edit, and delete markups on sheets on your mobile device.
- Create Markups in Sheets on Mobile
- Publish and Unpublish Markups on Mobile
- Edit and Delete Markups on Mobile
- Add References to Markups on Mobile
- View, Edit, and Delete Markup References on Mobile
- Create Issues in Sheets on Mobile
Create Markups in Sheets on Mobile
Open the Autodesk Construction Cloud mobile app.
Navigate to the Sheets tool
 .
.Tap a sheet to open it.
Style your markup using the styling tools in the markup toolbar on the right. Select from border, fill, and text characteristics if applicable.
Note: Your selections will be saved from now on so that you can create markups in the style that you prefer without having to customize them each time.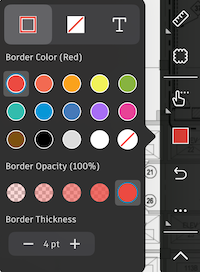
Select a tool from the markup toolbar.
Tap the sheet to place the markup. Adjust the handles of the markup shape to control the size and layout of the markup.
Tip: Hold and drag when placing the markup to control the size and orientation of the markup from the start.
At this point, the markup is unpublished and only visible to you as the creator.
Publish and Unpublish Markups on Mobile
An unpublished markup is only visible to the member who created it. All markups are initially unpublished, and members with the relevant permissions must publish these to make them visible to the entire project.
Published markups are visible to all members. Only members with Create permissions or higher can publish markups. See Markups Permissions for more information.
To publish a markup:
Tap the markup.
Tap
 in the menu above the markup.
Markups you create on mobile will sync to the web.
Edit and Delete Markups on Mobile
In the Autodesk Construction Cloud mobile app, you can edit a markup's border color, opacity, and thickness and a markup's fill color and opacity. If the markup has text, you can edit the text and change the text color and size.
Only project members with Edit permission or higher can edit or delete any published markups. Learn more in Markups Permissions.
Tap on a markup.
In the toolbar that appears, you can
 Edit the border and fill of the markup Select from the available colors or slide the opacity and thickness bars as applicable.
 (For text markups only) Edit the text color and size
 Open and edit the markup details like border, fill, or text, publish, and delete. You can also see markup information like who created the markup and when.
  Duplicate the markup
 Add and remove references to the markup. Learn more in the following section.
- Publish or unpublish the markup
 Delete the markup
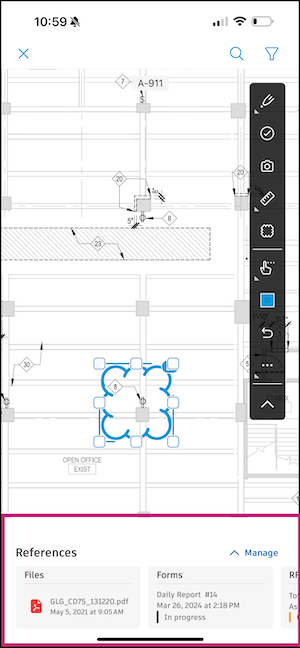
Add References to Markups on Mobile
In the Autodesk Construction Cloud mobile app, you can add references to other sheets, files, RFIs, forms, submittals, and assets on a markup.
Tap on a markup.
Tap
in the menu that appears.Tap Add next to any of the project items you want to reference to this markup.
Note: You can create a form or an RFI from here to link to your markup.Select from the list of items.
Tap Add or Save.
Once linked, a badge appears to the top-right of the markup. You can hold and drag the badge to move it. This won't affect anyone else's view of the badge and the move only lasts as long as your current viewing session.
![]()
View, Edit, and Delete Markup References on Mobile
Tap a markup. Markups with references have a badge at the top right corner.
In the bottom drawer that appears, the references will be listed. Swipe right to view all references and tap on any of the project items to open it.
Alternatively, to edit or delete a reference, tap Manage.
To add more References, tap Add on the desired project item.
To delete a markup link:
- Android: Tap on the
 next to the linked item and tap Remove.
 - iOS: Tap on Edit, tap on the
 next to the linked item, and tap Delete.
- Android: Tap on the
Swipe down on the Reference window or tap away to return to the sheet.
Create Issues in Sheets on Mobile
In the Autodesk Construction Cloud mobile app, you can create issues and place them on any sheet.
In the Sheets tool, tap to open a sheet.
Select the issues markup tool
 from the toolbar. Depending on your device, you may need to tap
  to find the issue markup tool.
Select from the issue Types or Templates.
- Types are preconfigured or created in the Types settings
- Templates have an associated type and can contain prepopulated information to make creating issues faster. Templates are created in the Templates settings
Tap the sheet to create an issue. The issue will be automatically published.
Edit the desired fields.
Note: If there is at least one empty required field, the issue will be created in the Draft status. You cannot change the status until all required fields are complete. Required fields are displayed with a red asterisk. Project administrators set fields as required in the Statuses settings.Tap Back to return to the sheet.