Model Viewing Toolbars
When you open models in the viewer, there are various viewing tools you can use for review and analysis. To access the toolbars either:
Select an object and right-click to open the context menu (1).
Use the viewing toolbar which is permanently displayed at the bottom of the screen (2).
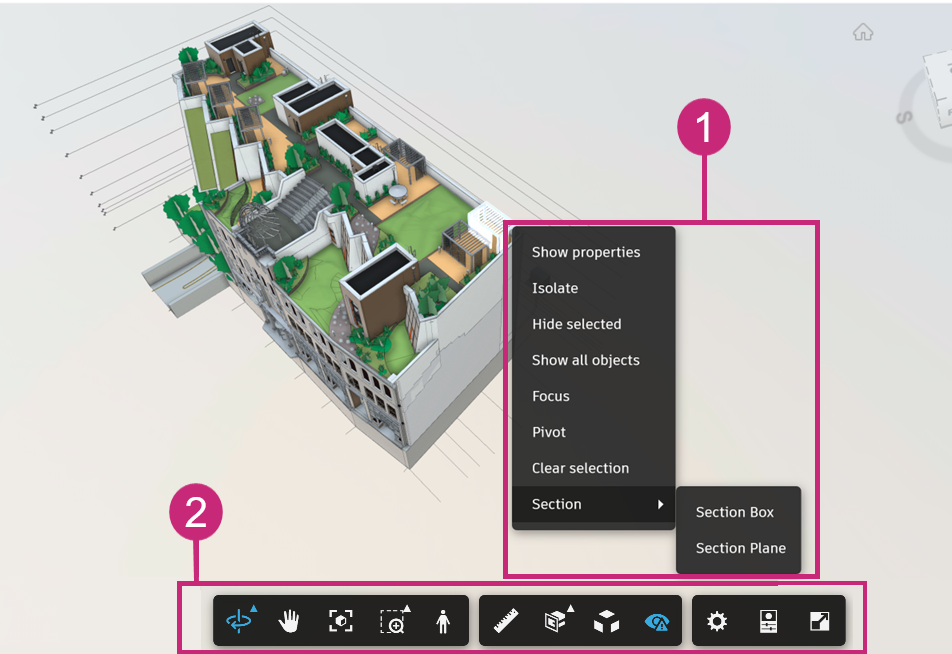
Context Menu
Click in the viewer to select an object in the model and right-click to view the following options:
Show Properties: Displays properties of the selected objects.
Isolate : Isolates the selected objects by making the rest of the models transparent.
Hide selected: Hides the selected objects from view.
Show all objects: Shows all objects in the models if they've been hidden.
Focus: Zooms the view on the selected objects.
Pivot: Uses the selected objects as a pivot point.
Clear selection: Clears the selection.
Section:
- Section Box: Uses the selected object as a box to section the models.
- Section Plane: Uses the selected object as a plane to section the models.
Viewing Toolbar
The viewing toolbar is displayed at the bottom of the viewer, and contains the following options:
 Orbit: In orbit mode, the camera moves around the focal point of the model. In this mode, the up direction is always maintained. Click the arrow for Orbit or Free orbit options.
 Pan: Moves the view parallel to the screen.
 Fit to View: Zooms the viewport in or out to contain just the selected elements or visible elements, if none are selected.
 Zoom Window: Click the arrow to see zoom options: Zoom or Zoom Window. With Zoom Window, you can drag a box to zoom a selected area or window on the model.
 First Person: With the First Person tool, you can navigate through a model as if you are walking through it. When in first person mode the mini-map will also display based on your mini-map settings.
 Measure: Use the tools to measure distance, angles, or area. You can also calibrate using a known measurement, and specify the units and precision settings.
 Distance: Click to create the two endpoints of the desired distance.
 Angle: Click to capture a point along the first ray, then the vertex, and then along the second ray to measure the angle created by these points.
 Spot Coordinate: Click a snapped point in the model to see the coordinates and elevation values.
 Laser: Click any surface on the model to find the measurements of the surface from the closest edge to edge.
 Calibrate: Set the scale or select two points to calibrate.
 Delete Measurement: Delete the selected measurement from the model.
 Measure Settings: Specify the units, precision settings, and other settings.
 Section Analysis: Click the arrow to view the model in sections along the X, Y, or Z planes, or using a section box.
 Explode Model: Drag the blue dot along the bar to expand the model out into its individual components.
 Show / hide all issues: Click to show or hide all issues on your models.
 Settings: Use the tabs on the Settings panel to customize the viewer. You can edit the performance and display settings, navigational tools, visual quality, and change the image environment and lighting. A description of each setting is displayed on the panel.
Settings > Configuration tab
Some of the most useful settings are on the Configuration tab:
Progressive display - This setting increases object dropout in order to offer smoother navigation.
Large model experience (BETA): Provides an improved viewing experience when working with large models. See the Design Collaboration FAQ for more information.
Tip: After turning on this option, you need to refresh your browser and reload your models or views for it to take effect.WebGPU Graphics (BETA): Uses the most up to date graphics technology for your web browser, to provide the best performance when working in the viewer with complex 3D models.
Tip: After turning on this option, you need to refresh your browser and reload your models or views for it to take effect.- The WebGPU option also incorporates the Large model experience settings. If you turn on the WebGPU Graphics option, the Large model experience option is disabled and can't be turned off independently.
See the Design Collaboration FAQ for more information.
Ghost hidden objects: Leave hidden objects slightly visible. Applies to objects that are hidden using the model tree visibility controls and those that are hidden when reviewing clashes. Doesn’t apply to objects that are filtered out using the Model Browser.
Selection mode: Determines what level of object in the model tree will be selected when clicking objects in the viewer.
- First Object: Selects the highest level of object, for example, a whole model.
- Last Object: Selects the lowest level of object. For composite objects: selects the composite object rather than the leaf objects within it. For example, when a Curtain wall is modeled as a composite object, clicking any part of the curtain wall will select the entire curtain wall.
- Leaf object: Selects the lowest level of object. For composite objects, selects the individual leaf objects within the composite. For example, when a Curtain wall is modeled as a composite object, clicking part of the curtain wall will select the individual panel / mullion.
 Properties: Inspect properties of the model or selected objects, including constraints, materials and finishes, and identifying data.
 Full Screen: View the model in full screen mode.