Custom Integrations
Custom integrations are integrations that you develop using publicly available Autodesk APIs to expand the capabilities of your platform. Sign up at Autodesk Platform Services. You can also find the API documentation there.
Custom integrations can have their permissions controlled by Secure Service Accounts (SSAs). Learn more about SSAs in Secure Service Accounts.
Add Custom Integrations
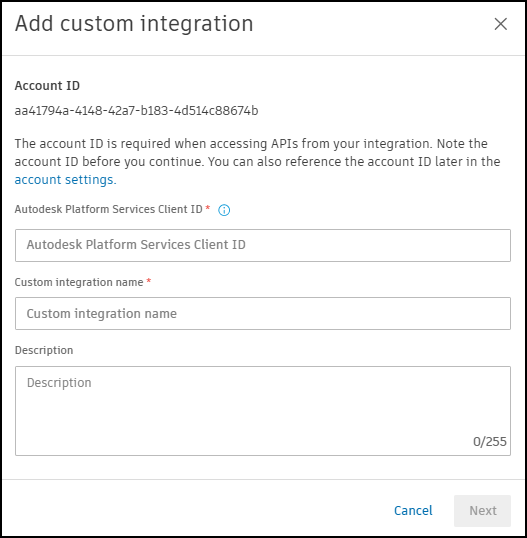
To add a custom integration, you must first create a custom integration in the Autodesk Platform Services (APS) portal. After you create the custom integration, you can add it to the Autodesk Construction Cloud platform (Autodesk Construction Cloud).
- Click Add custom integration in the Custom integrations tool.
- Provide your APS Client ID. The Client ID is the unique identifier for your custom integration. You can find the Client ID in the APS portal.
- Provide your integration name.
- Provide an integration description.
- Click Next.

- The system automatically retrievs previously configured Secure Service Accounts (SSAs) for your Client ID.
- If no SSAs are found, there will be no way to control the permissions for this integration and it will act as an Account Administrator with immediate access to all data within your account. Click Proceed anyway to complete the integration.
- If a single SSA is detected, the integration is automatically attached to this SSA. No data access is granted to the integration until the SSA account has been invited to a project. Click Got it to complete the integration.
- If multiple SSAs are detected, provide the email address of the SSA you wish to attach to this integration. Click Add to complete the integration.
Integration Status
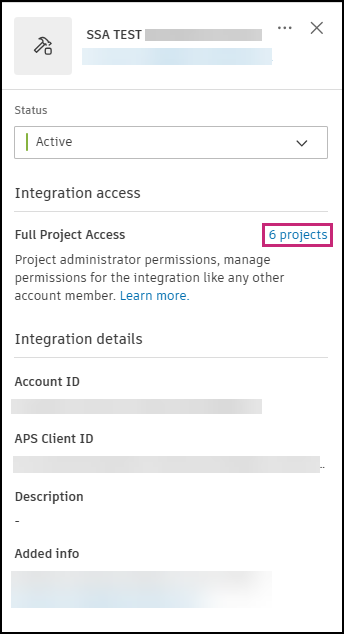
The integration status indicates whether the integration is active or inactive. You can change the integration status at any time. To troubleshoot issues with your integration, it is recommended that you set the integration status to inactive.
- Active: The integration can read and write data to the Autodesk Construction Cloud (Autodesk Construction Cloud) platform using Autodesk APIs.
- Inactive: The integration is not reading or writing data to the Autodesk Construction Cloud platform using Autodesk APIs.
To change the status of an integration:
- Select the integration from the integration list in the Custom integrations tool.
- Select the status drop-down list and choose the desired status.
Integration Access
Selecting a custom integration from the list in the Custom integrations tool will show details about the integration, including its access level. The highest level of access that the integration has across all projects is shown here. For example, if the integration has full access to one of your projects, but restricted access to another project, the integration access will still be "Full Project Access".
To view details on the access level of an integration on a per-project basis:
- Select the integration from the integration list in the Custom integrations tool.
- Under "Integration access", Click the number of projects link.

There are three possible access levels, each meaning the following:
- Full Account Access:
- No associated SSA, so the integration has access to account-level data (as opposed to only project-level). The available account data is what is accessible by public APIs. This applies to integrations created before SSA support. If the integration was created in the BIM 360 UI and the access was limited to Admin or Document Management, the setting continues to be respected. The integration doesn't have access to the service that was restricted. In this case, the integration can use two-legged authentication. The Integration email field is empty.
- An associated SSA has been granted "Account Administrator" access in your account. The integration email field is populated. The integration using the SSA acts as an automation user and has the permission in user context only, which can be used as part of three-legged authentication.
- Full Project Access: The SSA attached to the integration is a Project Administrator to at least one project.
- Project Access: The SSA attached to the integration is a Project Member to all projects it has been invited to.
To modify the access of an existing SSA, go to the Members tool of Project Admin within each project.
Delete Integration
You can delete an integration that is no longer useful. The Inactive status should be used to temporarily stop an integration from transferring data to and from Autodesk Construction Cloud. Deleting the integration removes it from the list, but it can be added again. To delete an integration:
- Select the integration from the integration list in the Custom integrations tool.
- Click the More menu
 in the drawer.
 - Select Delete integration.
- Click Remove in the confirmation dialog.