Parameters
The Parameters Service (or Parameters under Autodesk Construction Cloud Library) is used to manage Revit shared parameters and import them into Docs and Model Coordination.
Account administrators and standards administrators can access the Parameters service from the Autodesk Construction Cloud web interface.
The Parameters Service is available in the US, EU, AUS, DEU, JPN, IND, GBR, and CAN data storage regions.
In this topic, you'll learn how to use Parameters in the Autodesk Construction Cloud Library:
- Set Up and Access Parameters
- Create Parameter Collections
- Edit Parameter Collections
- Manage All Parameters
- Parameters Troubleshooting Questions
To learn about the Parameters Service in Revit and Model Coordination, see Using the Parameters Service in Revit and Extended Properties.
Set Up and Access Parameters
- Sign in to Autodesk Construction Cloud as an Account administrator or Standards administrator.
- Navigate to Account Admin.
- Select Library from the left navigation.
- Select the Parameters card.
- To start a first-time setup, click Create parameter collection.
- Click Start using the Parameters Service.
- You can start managing parameters or click Done. This creates the All parameters collection.
- Once your collection is created, you can select the All parameters collection in the list. Click Edit in the right panel and manage all your parameters.
You can now create more parameter collections.
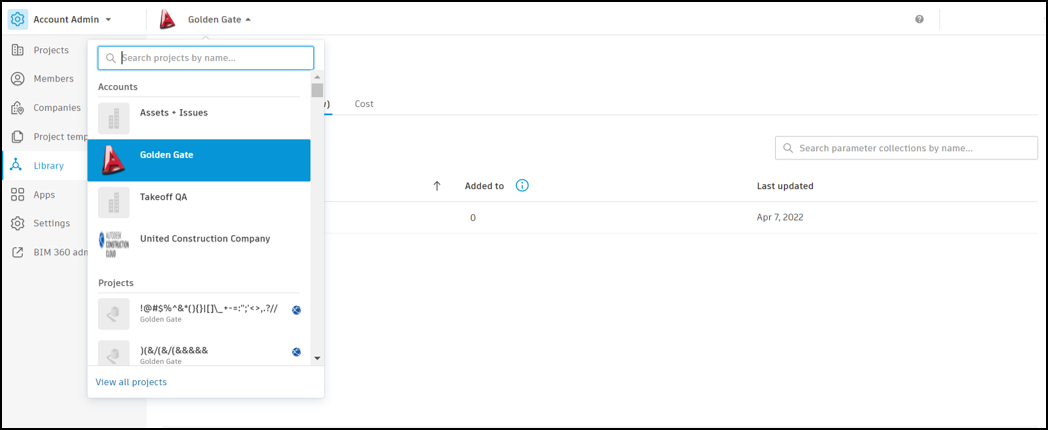
Parameters on the service are organized under an Autodesk Construction Cloud account. In the upper left section of the page, click on the account name and a drop-down menu will show all the accounts you have access to.
Create Parameter Collections
Navigate to the Library tool in Account Admin.
In the Parameters tab, click Create parameter collection.
Enter a name and description (optional) for this collection.
Click OK.
Note: If you don't want to add parameters yet, you can create an empty collection. Click Done to return to the Parameters tab.You can add or create a parameter for the collection.
To add a parameter:
- Click Add parameters.
- Select parameters to be added to the collection. These are from the All parameters collection.
- Click Add. The selected parameters appear in the table.
To create a parameter:
Click the drop-down arrow next to Add parameters and select Create new parameter.
You must fill in the name and data type.
Note: Parameter names can't contain these symbols:\ : { } [ ] | ; < > ? ` ~ + - * / ^ = ' " $ %Click OK. The parameter you created appears in the table. You can now use it in any future collections you create.
To remove a parameter in the table, select the parameter and click Remove. In the pop-up window, click Remove.
When you finish building the collection, click Done. Your collection is created. You can see your collection in the Parameters tab.
To learn about viewing your collections in Revit and Model Coordination, see Using the Parameters Service in Revit and Extended Properties.
Edit Parameter Collections
Navigate to the Library tool in Account Admin.
In the Parameters tab, select a parameter collection.
Click Edit in the panel that appears on the right side of your screen.
You can add or create a parameter for the collection.
To add a parameter:
- Click Add parameters.
- Select parameters to be added to the collection. These are from the All parameters collection.
- Click Add. The selected parameters appear in the table.
To create a parameter:
Click the drop-down arrow next to Add parameters and select Create new parameter.
You must fill in the name and data type.
Note: Parameter names can't contain these symbols:\ : { } [ ] | ; < > ? ` ~ + - * / ^ = ' " $ %
Click OK. The parameter you created appears in the table. You can now use it in any future collections you create.
To remove a parameter in the table, select the parameter and click Remove. In the pop-up window, click Remove.
Manage All Parameters
Navigate to the Library in Account Admin. In the Parameters tab, click Manage all parameters.
Use the numbers on the following screenshot and find the matching information. Learn how to view, create, edit, export, and archive parameters:
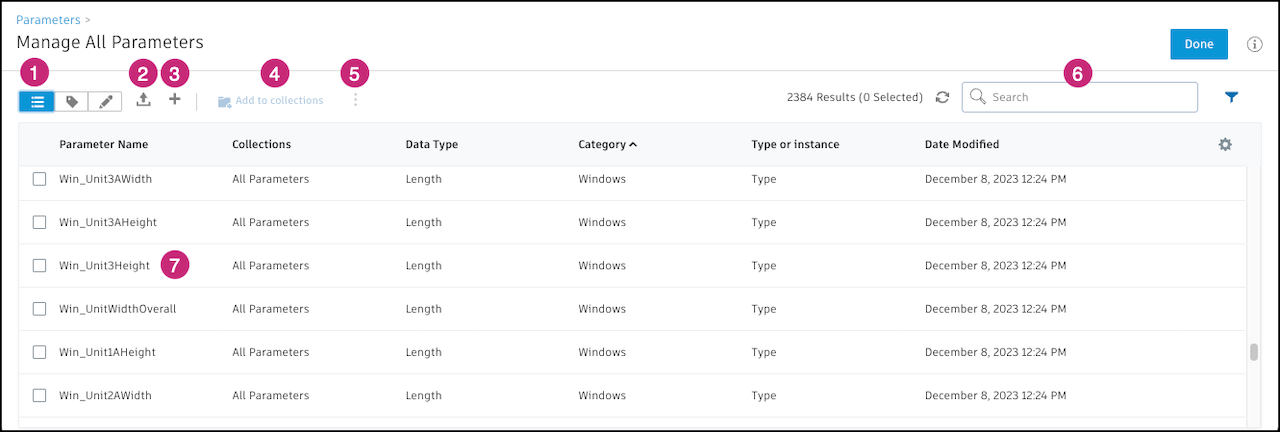
Views
List view
 : Default view where you can select parameters to edit. Use the cog icon on the far right to edit the columns that appear in this view.
Labeling view
 : In the labeling view, you can organize your parameters by attaching labels to them.
 You can review the labels assigned to the parameter and remove any unnecessary ones.
Select one or more parameters in the table.
Next, use the Add Labels flyout to attach or detach labels on the selected parameters.
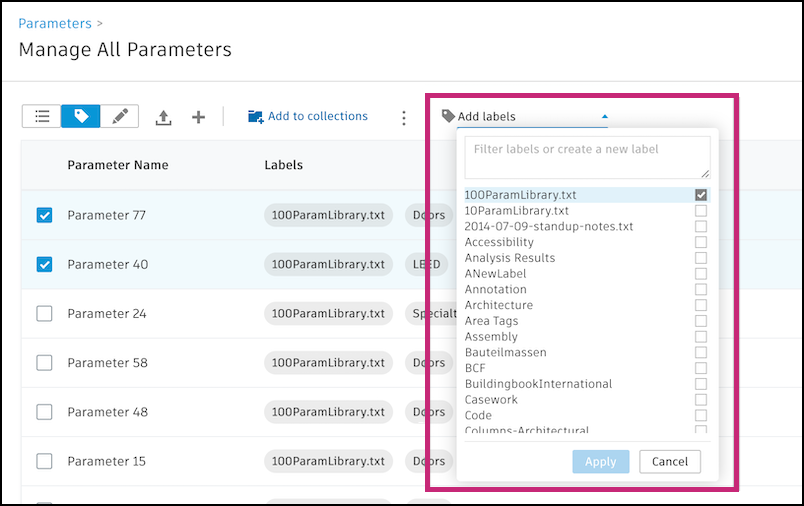
Type in the text box to search for labels or to create labels. To create a new label, click the box next the label. It applies to the selected parameter and becomes available for other parameters.
Select the X at the end of the label name to remove it from that parameter.
Edit view
 : Use Edit view to edit each parameter's category, type/instance, and properties palette group. You can select multiple parameters to make multiple edits at the same time.
After making edits to the selected parameters click Apply to commit your changes or click Discard to cancel your changes.
Tip:While in Edit view, sort parameters by Category, Type or instance, or other columns to see parameters that may be missing data.
Upload to Parameters Service: Upload a shared parameter file from your computer to load into Autodesk Parameters Service. Learn more
Create parameters: To manually create a parameter, select the + button. You must fill in the name and data type.
Note: Parameter names can't contain these symbols:\ : { } [ ] | ; < > ? ` ~ + - * / ^ = ' " $ %Add to collections: Select the checkboxes next to parameters in the list and click Add to collections. Select collections that you want to add these parameters to and click Add.
More menu
 : Select the checkboxes next to parameters in the list and click the menu icon for various options:
Remove from collections: Removes parameters from collections that they are part of. In the pop-up window, select the relevant collections and click Remove.
Export: Download a Revit shared parameter text file with the selected parameters. In the pop-up window, click Export.
Archive: In the pop-up window, click OK.
Note: You can restore archived parameters using this same menu and selecting Restore.Restore: Only available for archived parameters.
Search and filter for parameters
Search: Input your query in the box on the upper right of the Manage All Parameters window. Parameters are searched by name.
Filter: Activate the filters panel from the filters icon
 to the right of the search box. You can filter parameters by property palette group, discipline, data type, and category. You can also toggle to filter the list by certain characteristics like instance parameters, hidden parameters, archived parameters, and more.
Use the Save this search button at the bottom-right corner of the filters pane to save the current search for later use.
Switch to the Saved Filters tab to recall or delete a saved search.
Edit existing parameters: Click the parameter name and the Parameter Properties window opens on your screen.
You can change the following data for a parameter:
Category bindings
Property palette group
Type vs. Instance
Description
Hidden Flag
Note: Parameter Name, Discipline, Data Type, and Read Only Flag are not editable after the creation of a parameter.Click OK to save your edits.
Parameters Troubleshooting Questions
Do you have more specific questions about parameters workflows, troubleshooting, settings, and more? Check out this Troubleshooting: Parameter Service Help topic to answer your questions.