As-built Export in Autodesk Build
The As-built Export feature available in Autodesk Build speeds up the handover process and improves the accuracy of handover documentation.
Project administrators can easily filter, find, and export all relevant as-built information for sheets, RFIs, and submittals. The export will also preserve links to other related project documents such as files and photos. You'll also be able to share as-builts with other Autodesk Construction Cloud projects using Bridge.
In this topic, you'll learn how to:
- Create As-built Exports
- Download As-built Exports
- View Downloaded As-built Exports
- Use Bridge to Share As-builts
Create As-built Exports
Project administrators can configure and export as-built information for their project in Build product settings.
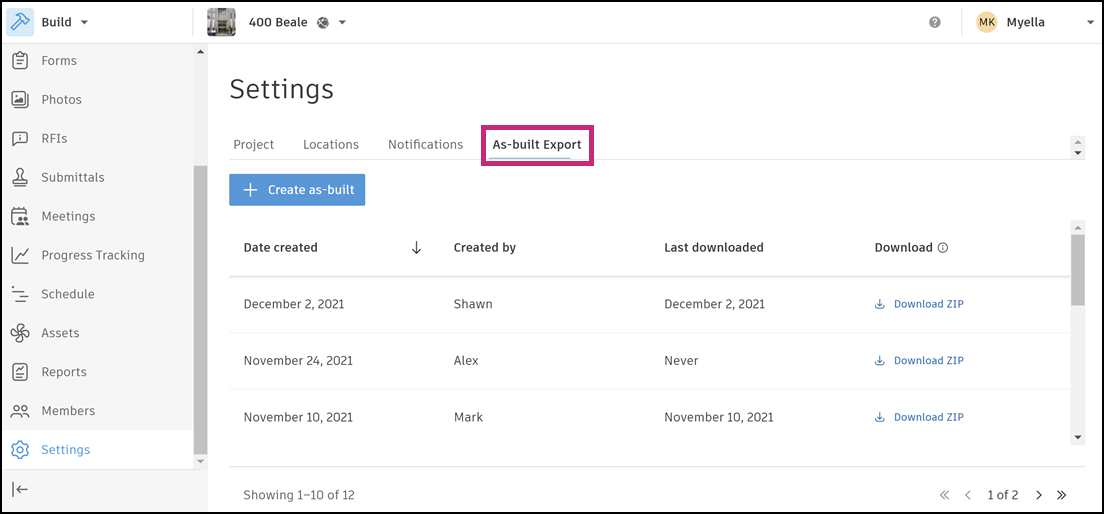
From the left navigation in Project Administration, select Settings.
Click the Product Settings drop-down and select Build. This will open the Build Settings page.
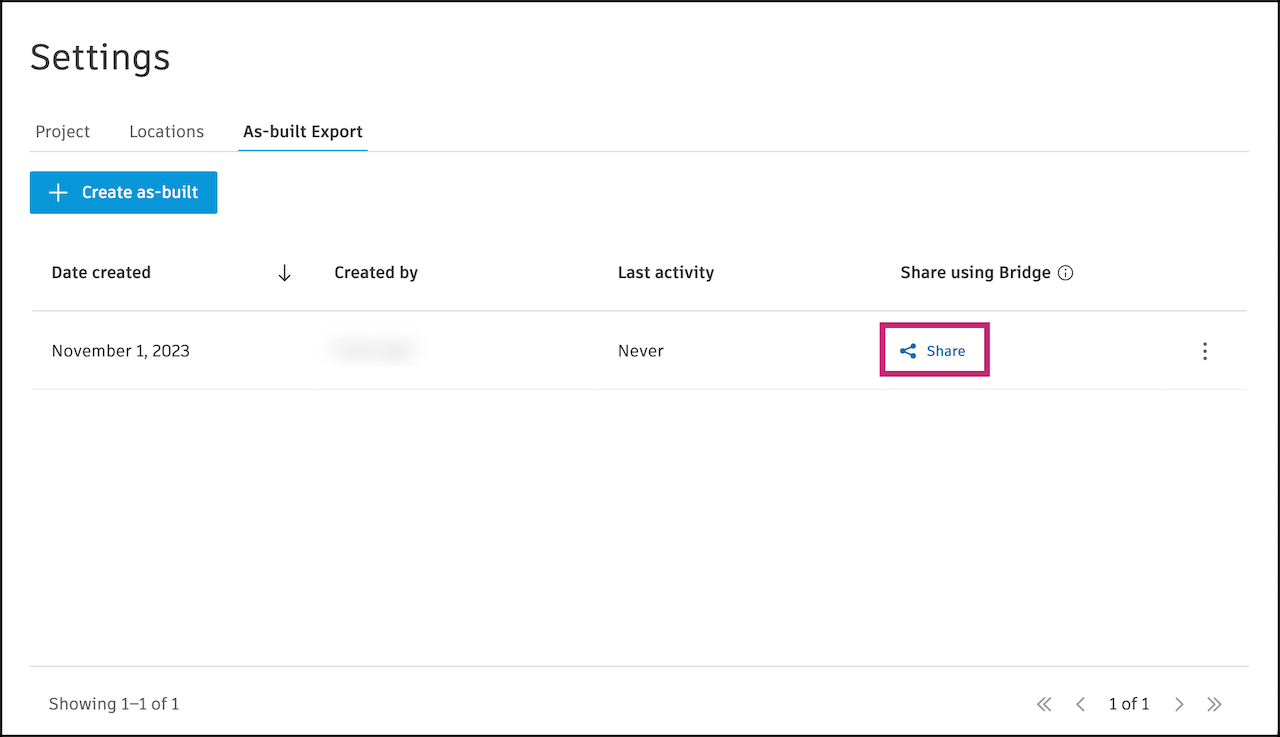
On the Build Settings page, click the As-built Export tab.
Click Create as-built to configure an as-built export.
Click Edit details to deselect any items you don't want to include in the as-built, or to change the configurations.
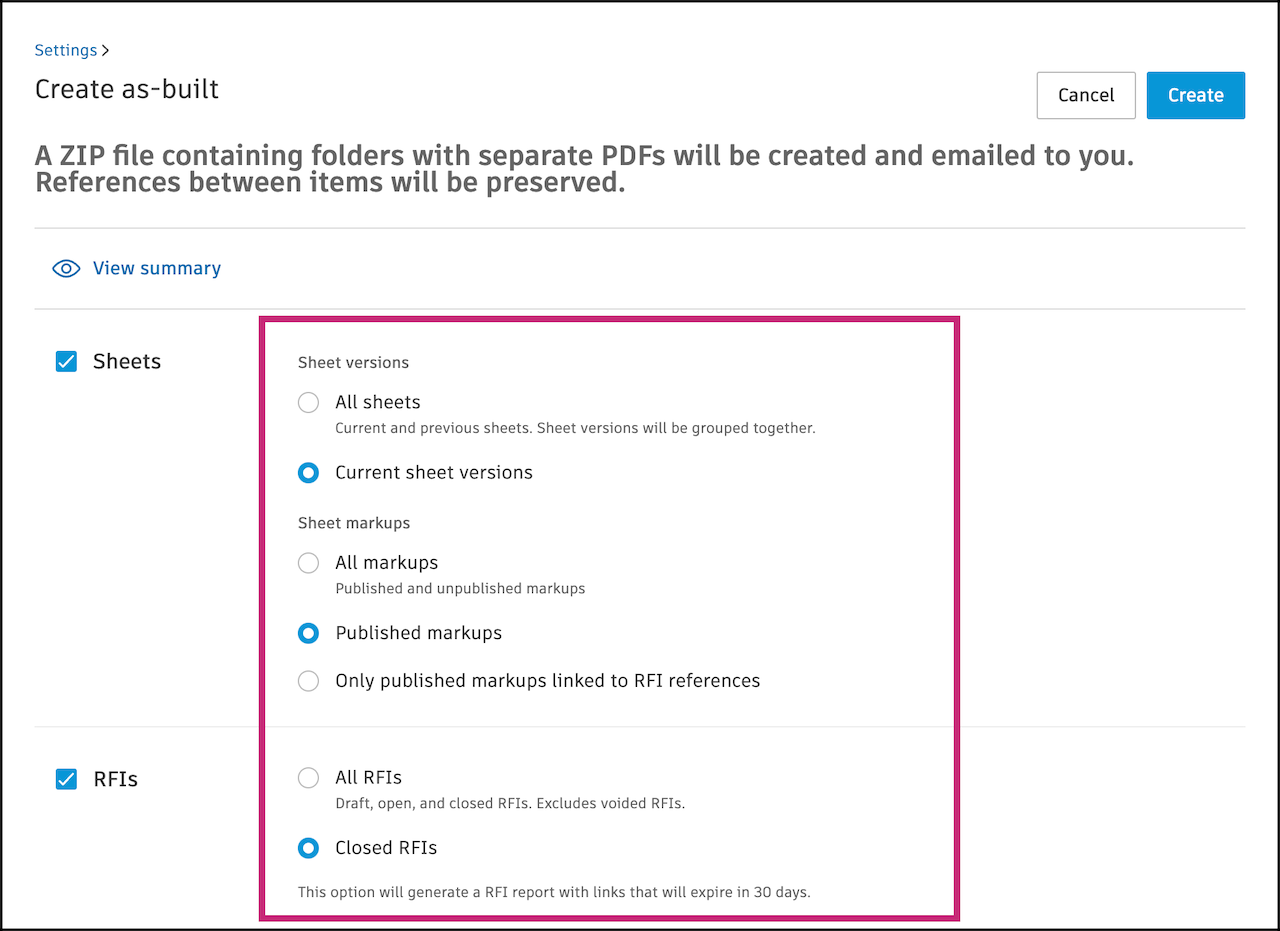
The Create as-built screen has the following default options preselected. These are the project items that are supported for an as-built export:
- Sheets - current sheets versions and published markups
- RFIs - closed RFIs
- Submittals - closed submittals
- Files - current file versions for basic file types (PDF, JPG, PNG, XLSX, DOCX), not including markups
- Issues - closed issues
- Forms - open, closed, and archived forms
- Photos - all photos
For each project item, select from the available options.
Sheets
- Sheet versions- Include all sheets (current and previous sheets) or current sheet versions.
- Sheets markups - Include all markups (published and unpublished markups), published markups, or only published markups linked to RFI references.
RFIs
- Include all RFIs (draft, open, and closed RFIs, but excludes voided RFIs) or only closed RFIs.
Submittals
- Include all submittals (draft, required, open, and closed submittals. Excludes voided submittals) or closed submittals.
Files
- Include all files, basic file types (PDF, JPG, FNG, XLSX, DOCX), model files (RVT, DWG, NWC), or select specific file types for current file versions, not including markups.
Note: A maximum of 15,000 files can be included.Issues
- Include all issues (open, in review, pending, and closed) or only closed issues.
Forms
- Include all forms or closed and archived forms only.
Photos
- Include all photos
(Optional) If you are not including all the supported project items in this as-built, you can toggle on Include references to project items not selected. This will include any supported references and attachments in the as-built, even if you don't select them on this page.
For example, you create an as-built with only Issues. If you have this toggle on and some issues have references to RFIs, the RFI references will be included in the as-built. References will appear in a "Reference and attachments" folder in the downloaded export. This allows you to easily access these available references offline. Learn more about viewing as-built exports offline
Note: Forms, Issues, and RFI Attachments are not supported for an as-built export.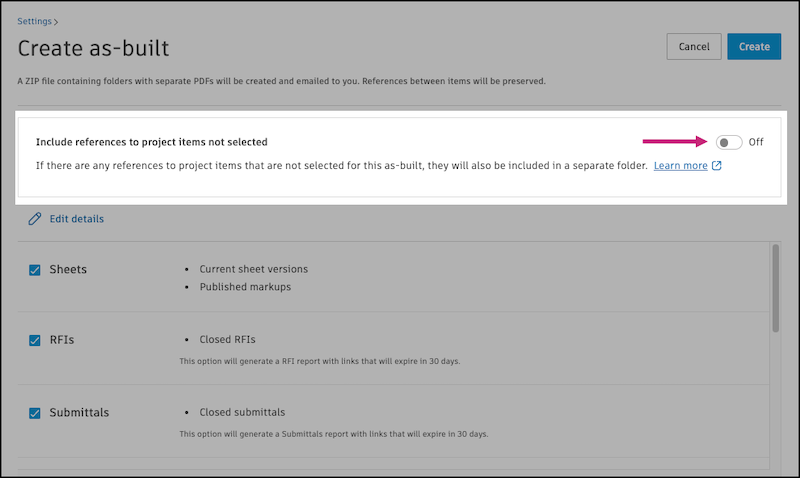
Click Create.
You will receive a brief notification in the upper right of the page confirming the as-built export is in progress. It can take from one to several hours to generate your export. You’ll receive an email with a link to download the export when it is complete and available.
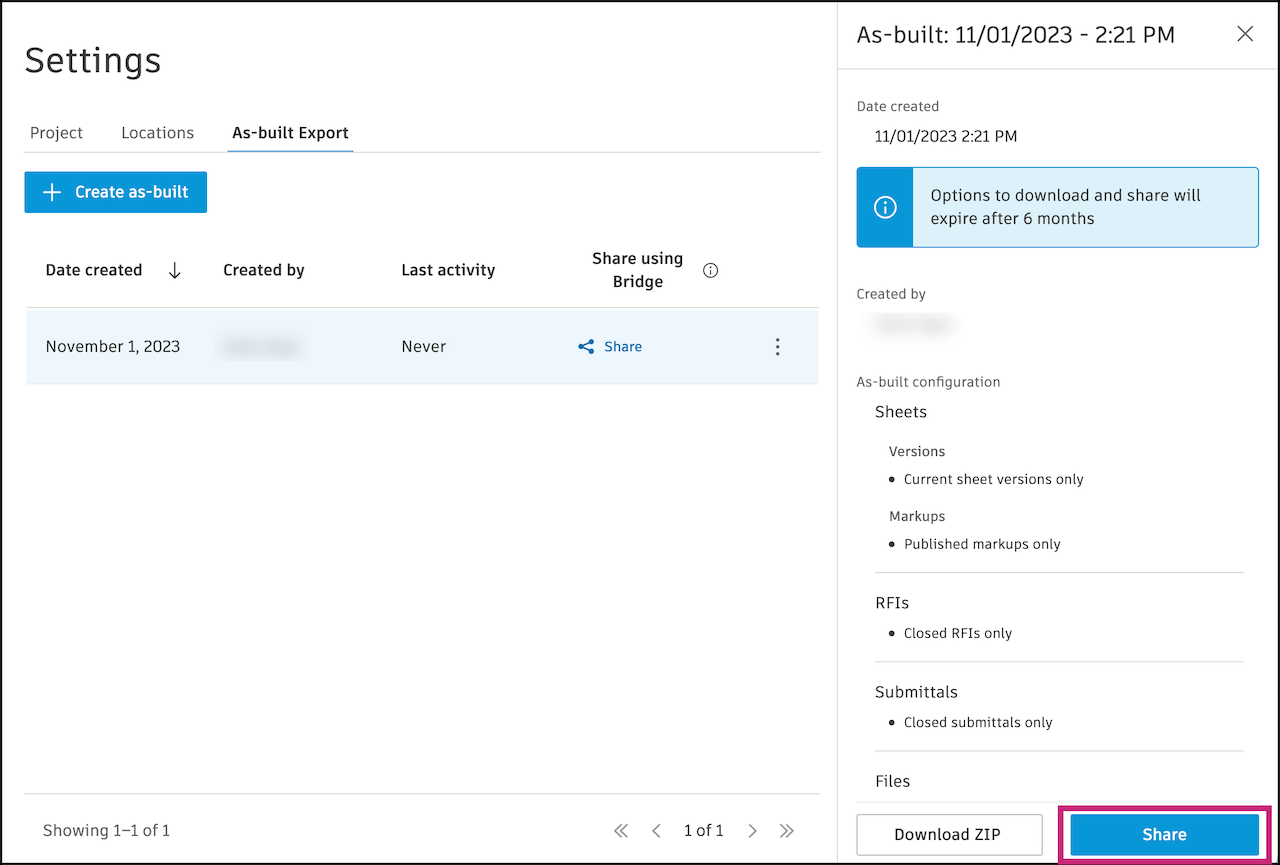
The option to download and share an as-built expires after six months for security purposes.
Download As-built Exports
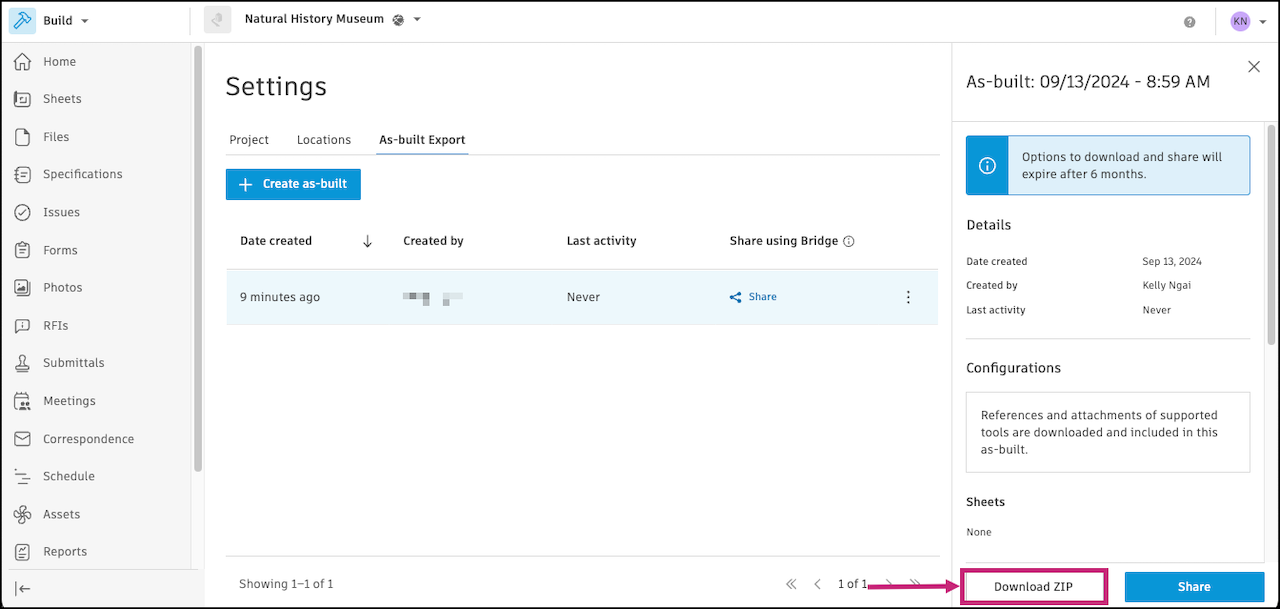
After an as-built export has been created, the download link is available in the As-built Export log.
On the As-built Export page, click the as-built and a panel will open.
Click Download ZIP at the bottom of the panel.
View Downloaded As-built Exports
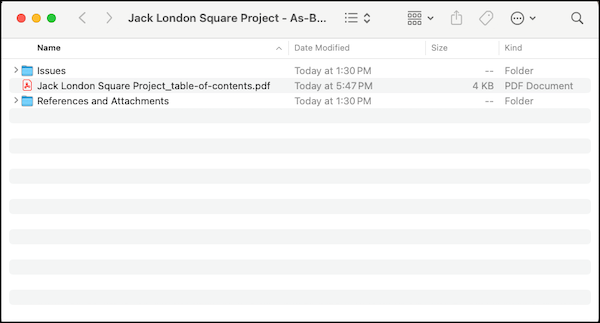
To access the as-built folders, unzip the downloaded file on your computer.
Each supported tool will have its own folder. If you chose to include references and there were applicable items, you will also see a "References and Attachments" folder. The following is a MacOS example of an as-built with only Issues selected.
We recommend using Adobe Acrobat to take advantage of local linking. Clicking links to supported references and attachments will open the relevant file on your computer. For example, if an issue has a form reference and that form was downloaded, clicking the link will open the downloaded form report on your computer. So anyone viewing the as-built export can have easy access to all relevant information offline, without navigating back and forth between the PDF export and ACC.
- Links between RFIs and sheets will be included as local URL links in the PDF.
- Photos linked to an RFI will show up as thumbnails in the PDF.
- Titles of project items are not links so they do not open the item in Autodesk Construction Cloud on the web.
- Any links to nonsupported references and attachments will be disabled to prevent viewers from encountering expired links. For example, since Assets is not a supported reference type, a link to an asset will be disabled. However due to technical constraints, the color of disabled links remains the same as active links.
To preserve local links between files after export, do not move or rename files that link out to another file in the exported folder. For example, if an RFI contains a link to a sheet, the local link will break if the sheet name is changed.
The Preview app on Mac can be used with the following limitations:
- RFI references on sheets are not available.
- Local links between files with the exported folder are not available.
Use Bridge to Share As-builts
Bridge is the enabling technology that allows you to easily share project information with other Autodesk Construction Cloud projects and accounts. Project administrators can share as-builts with other projects in which they are also a project administrator or member. Learn more about the Bridge tool in About Bridge.
There are two ways that you can start sharing as-builts with another project:
Click Share on the As-built Exports log
Click the as-built on the log and a details panel opens up. Click Share at the bottom of the panel.
Enter a name for this event. This will help you and the team you are sharing the project with to track what is shared in the Bridge tool.
Note: <>:"/|?*` are not allowed.Select a target project.
Select a target folder for the as-built to go into.
Click Share. You'll receive an email when the share is complete.
Once shared, you can track this in the Outgoing tab of the Bridge tool. Learn more.