Add, Import, and Export Locations
Locations are set up in tiers to create a hierarchy of physical locations in your project. You can manually add or bulk import locations using the template spreadsheet to create a location breakdown structure. It is faster to import your locations than manually adding them.
See Visual Workflow: Locations for a visual overview of the basic steps taken while working with locations.
In this topic, you'll learn:
Access Locations
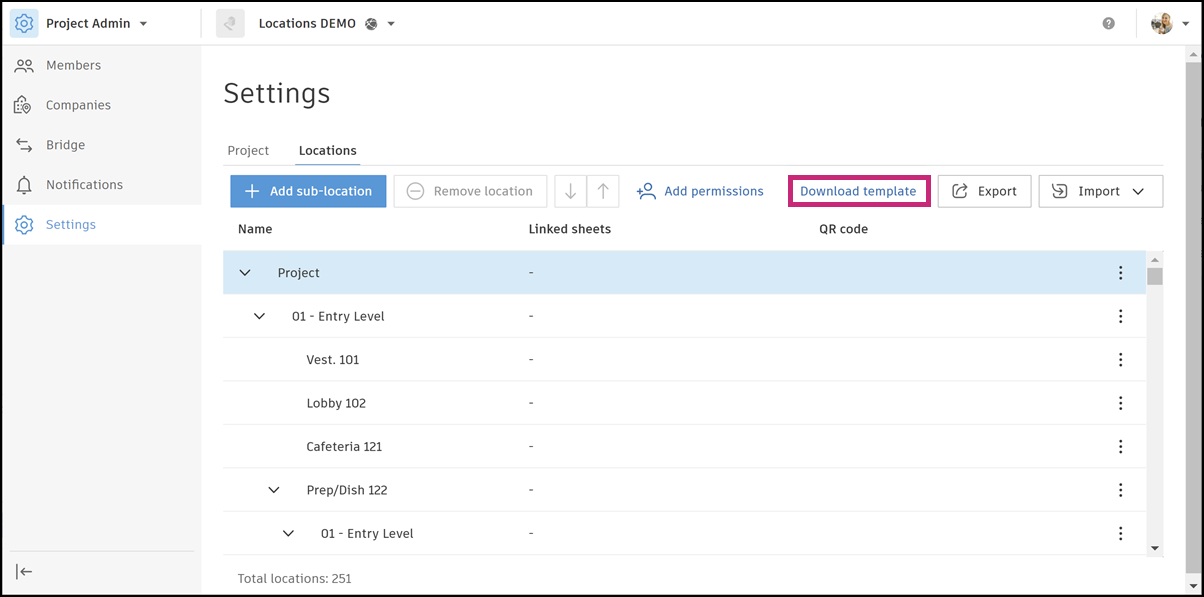
To access locations, in the Project Admin module, select Locations from the left navigation.
By default, the top tier is Project and this will be the only tier visible in a new project before you start adding or importing locations.
![]()
Import Locations
Locations must be correctly formatted to import correctly. In a new project, a typical process is to download the spreadsheet template, enter your locations in line with the guidance, and import the completed spreadsheet. You can then add, remove, or move locations manually as desired or export your current location breakdown structure, make any changes, then import the spreadsheet again.
You can't undo a removal. See What happens when you remove locations before you import to the root node.
Import Locations Using a Spreadsheet Template
To import locations using a default spreadsheet template:
Click Download template.
Open the downloaded XLSX file from your local downloads folder.
Read the formatting guidance provided in the second sheet onwards.
Enter your locations data in the first sheet in accordance with the guidance. See Fill Out Location Import Template for detailed instructions on how to complete the template.
Note: If you're using a tier, you need to put a space before and after the caret icon if you want to preset this location, as in the following example:- Autodesk Forma > Takeoff
Note: Only the first sheet of the template will be imported.Save the completed template.
Click Import and select the saved file
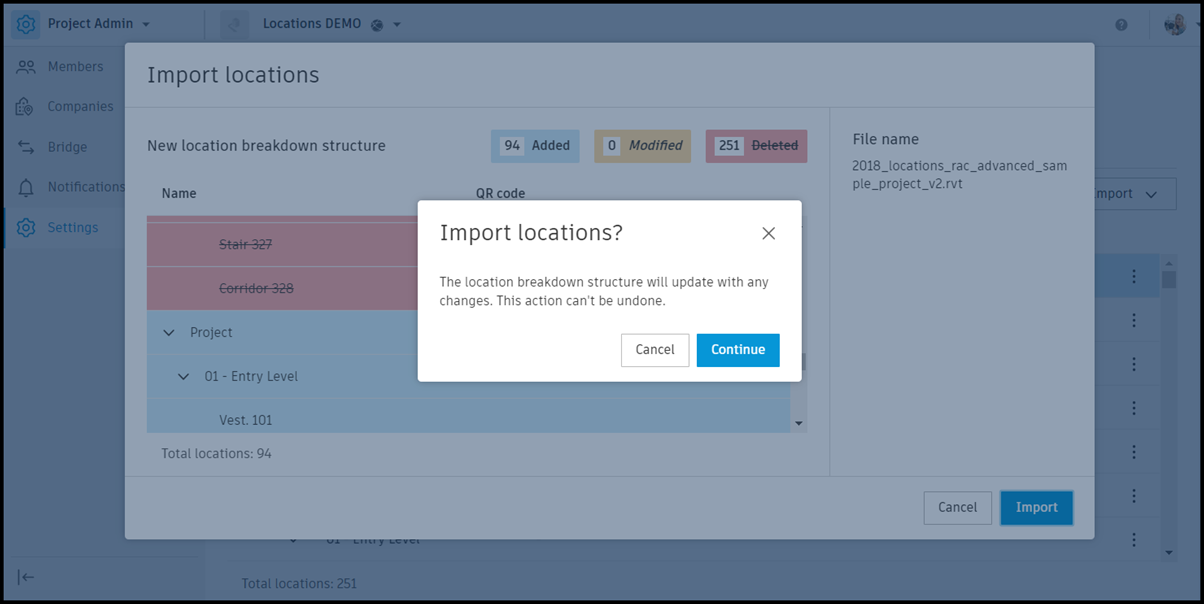
Review the Import locations screen to check that the locations which have been added, modified, or deleted are correct.
Click Import.

Click Continue to verify that the existing location breakdown structure will be overwritten.
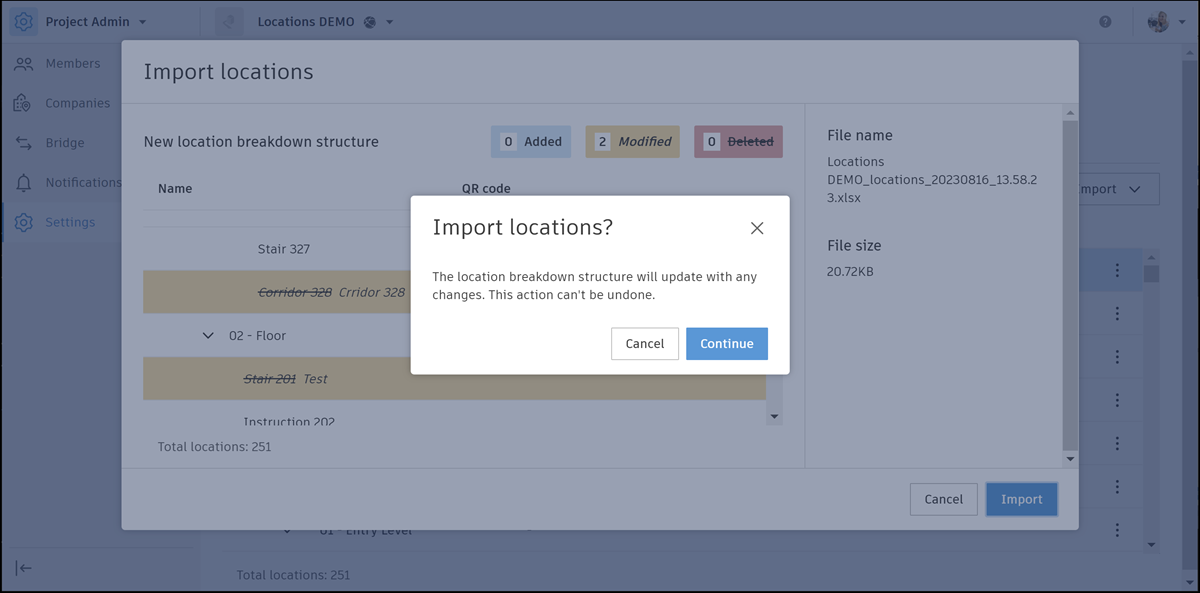 Note: An import to the root node removes existing locations and clears the locations assigned to items across the project. You can't undo this.
You can import locations from an Excel file (XLS or XLSX) any time, as needed. To do so:
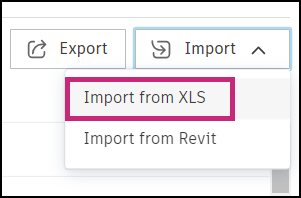
Click Import > Import from Excel at the top right of the Locations page.
Select an Excel file (XLS or XLSX) from your computer.
Complete steps 5-7 in Import Locations Using a Spreadsheet Template.
Import Locations From Revit
You can import an entire location breakdown structure from a Revit file if no locations have been configured in your project yet.
See What happens when you remove locations before you import to the root node.
See Import Locations to a Node to learn about importing locations to a branch node. Refer to Visual Workflow: Locations for an overview of the basic steps taken while working with locations.
To import locations from a Revit file:
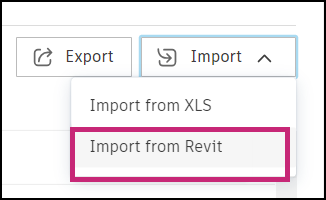
Click Import > Import from Revit at the top right of the Locations page.
Navigate to the Revit file that you want to upload.
Click Select file.
Click Import.
Review the Import locations screen to check that the locations which have been added, modified, or deleted are correct.
Click Continue to verify that the existing location breakdown structure will be overwritten.
Import Locations to a Node
In addition to importing an entire location structure as described in steps 1-5 above, you can import locations only to a node. In this way, only the branch structure is overwritten, not the entire existing location breakdown.
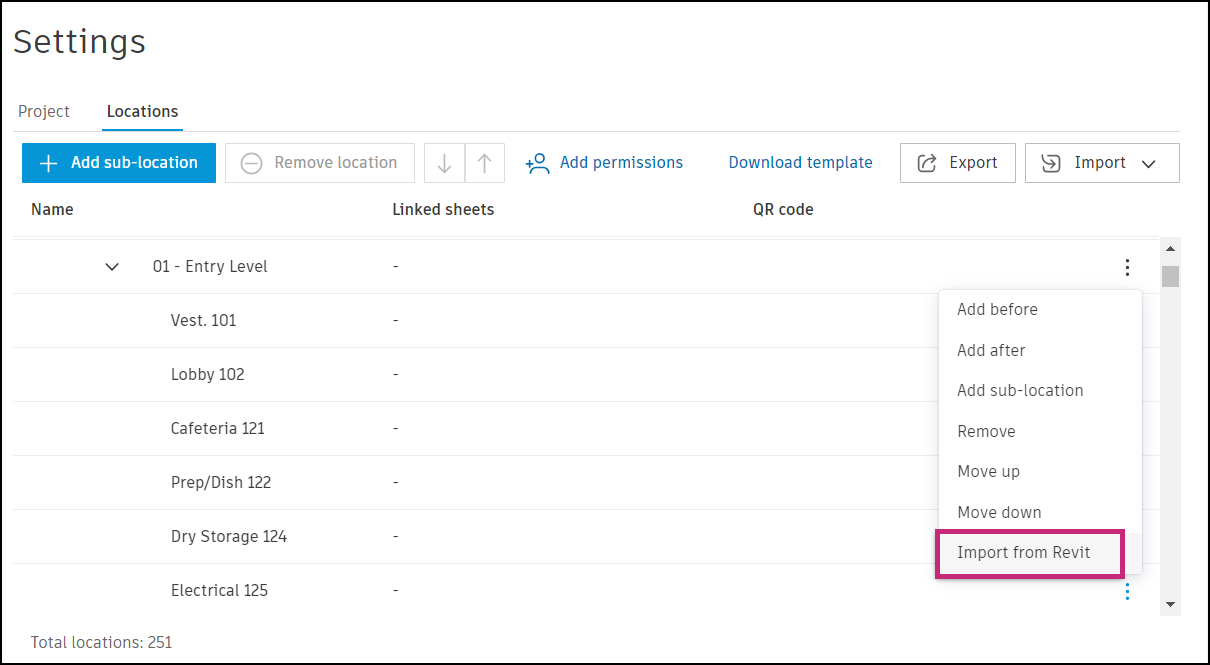
Click the More menu
 next to the node to which you want to import locations.
Click Import from Revit.
Follow steps 2-5 above.
Known Limitations for Importing Revit Files
- The import of your Revit file will fail if the file was saved in the UI using a language other than English. To prevent this problem from occurring, make sure you change the language into English before saving your Revit file. See Use Revit in Your Preferred Language to learn how to change language settings in Revit.
Export and Reimport Locations
Once your location breakdown structure has been created, you may want to export all your locations and make bulk changes instead of making individual changes use the settings menu.
Click Export.
Open the downloaded XLSX file of your current locations from your local downloads folder.
Make any changes in the first sheet in accordance with the guidance:
- Insert new rows
- Change location names
- Add new locations
- Move rows to change the order of locations (only supported within the same parent location)
- Delete a row to remove a location
Important:The software generates the location ID.
- The location ID must remain in the same row as the location data.
- Do not create location IDs for new items.
- You can't move an existing location to a new parent location.
Save the completed spreadsheet.
Complete steps 5 - 7 in Import Locations.
What happens when you remove locations
You remove locations in two ways:
- Importing to the root node removes the entire location breakdown structure.
- Removing a single location also removes the locations nested under it.
Both actions remove the links between locations and the items they're assigned to in all tools across the project. You can't undo this.
After you remove locations:
- Items in Issues, RFIs, Assets, Bid Packages, Photos, Schedule, Reports, Forms, and Takeoff keep their data, but their location field is empty.
- These items no longer appear in searches, filters, groupings, or reports that use locations.
- The previous locations and their links can't be restored, even if you reimport the same structure.
Before you remove locations, click Export to keep a copy of your current structure.
Location Menu Options
You can manually manage your project locations using:
 .
.
- Add Sublocation: Add a location below the selected location
- Remove location: Removes the selected location
- ↑ : Moves the selected location up
- ↓ : Moves the selected location down
The More menu has three options in addition to the ones explained previously:
- Add Before: Adds a location before the selected location at the same level
- Add After: Adds a location after the selected location at the same level
- Import from Revit: Imports a Revit file from Files