Organize Files with Folders
The Files tool lets you create folders which is essential for organizing project data, controlling access permissions, and enabling efficient, structured project workflows. A well-structured folder system helps establish a single source of truth for all team members.
Each new project starts with a Project Files root folder. Subfolders automatically inherit the permission level of the parent folder however, they can be changed later. If changed, subfolder permissions must either match, or have a greater permission level of the parent folder.
The following instructions show you how to manually create folders. However, if your organization uses a similar folder structure across different projects, you can use a project template to set up folders in the Files tool when the project is created.
Permissions Required to Create Folders
You need Edit folder permission or above to create folders.
Limitations
- The folder name can't be more than 255 characters.
- The folder name can't contain any of the following symbols: <>:"? /|*`
- The folder name can't be the same as another folder at the same level.
- Maximum of 25 tiers of subfolders for each folder.
How to Create Folders
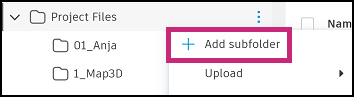
Hover your cursor over the relevant folder in the folder tree and click the More menu
 .
.Click Add subfolder.
Enter the name of the folder and press enter or click
 to add the folder.
Continue adding folders as needed to build out and organize your document structure.
Other Considerations
See Delete or Restore Files and Folders for informaion on how to delete folders.