Photos, Issues, and Measurement Markups
Feature markups either represent or link to other tools by allowing you to create an issue, or add an existing photo to your sheet. This can be useful to show what something looks like onsite or demonstrate a problem which needs fixing.
The measurement markup allows you to calibrate a sheet and create measurements for lines, rectangles, and free-form shapes.
Create Issue Markups
You can create issues and place them on a 2D file or 3D model.
Create Issues on 2D Files
Select the issues markup tool
 from the toolbar.
Select from the issue Types or Templates.
Types are preconfigured or created in the Types settings
Templates have an associated type and can contain prepopulated information to make creating issues faster. Templates are created in the Templates settings
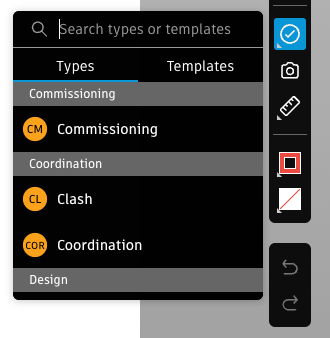
Types are preconfigured or created in Issues Settings
Templates have an associated type and can contain prepopulated information to make creating issues faster. Templates are created in Issues Settings

Click to place the issue pin and create the issue. Issues are automatically published by default.
Edit the fields on the right panel.
Tip: When an issue is selected, you can move the issue pin by dragging and dropping it to a new location.
Click the close icon
 in the panel to return to the file.
Create Issues on 3D Models
Select the issues markup tool
 from the toolbar.
Select from the issue Types or Templates.
Types are preconfigured or created in the Types settings
Templates have an associated type and can contain prepopulated information to make creating issues faster. Templates are created in the Templates settings
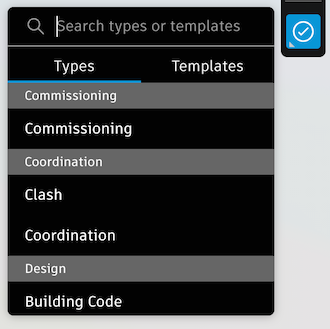
Types are preconfigured or created in the Types settings
Templates have an associated type and can contain prepopulated information to make creating issues faster. Templates are created in the Templates settings

Click to place the issue
 anywhere on the 3D model. Issues are automatically published by default.
 A screenshot of the current view with the issue pin will be uploaded as a thumbnail to the issue. On the issue panel that appears, you can click the thumbnail to open the full size image.
To add a markup to the thumbnail:
Click
 on the issue thumbnail.
Use the tools in the toolbar to create markups.
Note: The current view cannot be adjusted. Feature markups like adding photos or measurements are not available.Click Save thumbnail to save your markups to the issue thumbnail. The issue thumbnail on the panel will update accordingly.
To retake a thumbnail to clear or update the markups:
Click
 on the issue thumbnail.
 Click Take a new thumbnail.
The issue thumbnail will update accordingly. Click
 to add new markups.
Edit any issue fields.
Tip: When an issue is selected, you can also move the issue pin by dragging and dropping it to a new location. The issue thumbnail will update accordingly with the new view of the issue pin.
Click the close icon
 in the panel to return to the model.
To learn more about issues, see About Issues.
Create Photo Markups
Reference an existing or new photo by adding a photo markup.
- Select the photos markup tool
 from the toolbar.
 - Click to place and create a photo markup
 .
. - Click Add in the Photo References panel.
- Select existing photos or click Upload new.
- Click Add photo.
- Click Publish.
To learn more about photos, see About Photos.
Measurement Tool
To make plans, quick decisions, and understand quantity, accurate measurement is key to members. The measurement tool is used first to calibrate a PDF file to set up a scale and associated ratio measurement. Once calibration is published, members can then create measurements.
Calibrate Document
Select the measurement tool
 from the toolbar.
Click
 .
.You can select to either Set scale or make a 2 points calibration.
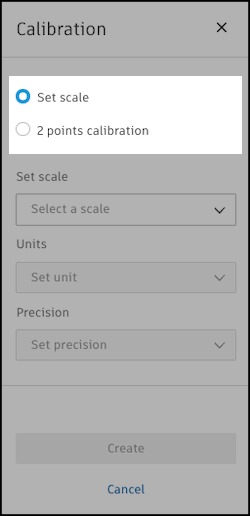
Set scale
You can select the desired scale for the whole drawing file. This can match the actual scale detailed on the drawing file.
Select Set scale.
For example, your drawing might have the following scale
 . You can therefore set the scale for any measurements to
  .
.Enter your options in the panel:
- Set scale: Select the desired scale.
- Units: Select your preferred unit of measurement.
- Precision: Set the precision of the calibration used for the measurements that you create.
2 points calibration
You can define two points to use as the basis of your calibration.
Select 2 points calibration.
Select two points to create a line to use for your calibration.
Enter your options in the panel:
- Set size: Add a size that represents the scale of your line in real life (For example, a 1-cm calibration line could represent 5 m on site).
- Units: Select your preferred unit of measurement.
- Precision: Set the precision of the calibration used for the measurements that you create.
Click Create.
You can also remove the calibration. This will permanently remove the calibration and affect any existing measurements that have been made.
Now that calibration has been created and published, members can create a measurement based on that calibration.
Add a Measurement
Select the desired measurement markup tool:
 Straight Line
 Polyline
 Freeform Line
 Rectangular Area
 Polygon Area
 Freeform Area
Draw your desired measurement.
Note: A number will appear in lines or freeform markups based on the actual length of the line or free-form and the calibration you have previously set. For rectangles, the number represents the area of the rectangle.Edit and style the markup using the available options in the Details tab and add any reference links in the Links tab.
Click Publish.