Create and Edit Approval Workflows
Project administrators can create, edit, and manage approval workflows. Approval workflows are used to initiate the review and approval of project files.
- Create an Approval Workflow
- General info
- Steps
- File Review Status
- Action Upon Completion
- Workflow notes
- Save Approval Workflows
- Edit and Manage Approval Workflows
Create an Approval Workflow
Click the Reviews tool.
Click Settings.
The reviews settings page contains two tabs:
- Approval workflow tab: Review workflows which are available to use.
- Draft approval workflow tab: Review workflows which are in draft status and are not available to use until they are finalized.
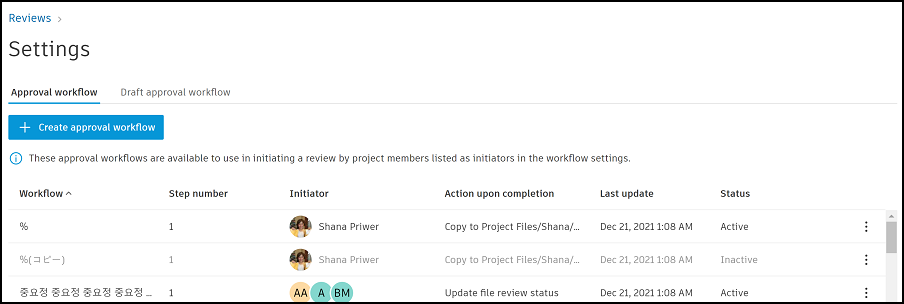
In the Approval workflow tab, click Create approval workflow.
Select an approval workflow template from the drop-down list.
Template Description One Step Approval A single approval step. Two Step Approval A review step and an approval step. Three Step Approval Two review steps and an approval step. Four Step Approval Three review steps and an approval step. Five Step Approval Four review steps and an approval step. Six Step Approval Five review steps and an approval step. Two Step Group Approval A group review step (multiple reviewers) and an approval step. Three Step Group Approval Two review steps, including a final group review (multiple reviewers), and an approval step. Four Step Group Approval Three review steps, including a final group review (multiple reviewers), and an approval step. Click Next.
On the Create an approval workflow page, project administrators can enter the details of the workflow in the following sections:
General info
Name: Enter a name for your workflow.
After you have entered a Name, you can click Save as draft to save the draft workflow in the Draft approval workflow tab. A draft workflow can be finalized and available for use once all the required fields are completed and any errors are resolved.
Description: Enter an optional description of your workflow.
Steps
The Steps section specifies the details for each step in the workflow:
Initiator: This determines who can use this workflow to start a review. Click the Initiator field to select individual project members, roles or companies. Initiators can be selected from both active or pending members.
You can also click More options for the following options:
Allow Initiators to edit the review: This allows Initiators to edit the review due date and review candidates (not including approvers) during the review process for reviews created after 19 March 2024.
Allow Initiators to edit the approvers: This allows Initiators to edit the review approvers.
For each step, you can edit the Step name, Reviewer Type and Time allowed for each review step.

Step name: Click the default step name and edit the name.
Reviewer Type: The number of Reviewer Type fields will depend on the steps in the approval workflow template you've chosen. Click the Reviewer Type drop-down to specify whether you want:
Single Reviewer: Only one reviewer needs to complete the review step. Click the Reviewers field and add candidate reviewers. Click More options to Enable review to be sent back to Initiator from the current step. This allows project administrators and reviewers to send the review back to the Initiator. If it's on the final step of the review, project administrators and approvers can send the review back to the Initiator.
Multiple Reviewers: Multiple reviewers are required in this group approval step.
Key Reviewers: You need to add one or more key reviewers. The default is that all key reviewers must review this step for the review to progress to the next step. Click More options to select from the following:
- Every key reviewer must review this step
- A minimum number of key reviewers must review this step: Click the number to edit.
- Enable key reviewers to edit the review: They can edit the current step due date and update candidate reviewers including key reviewers and optional reviewers.
- Enable review to be sent back to Initiator from the current step: Project administrators and key reviewers can send the review back to the Initiator. If it's on the final step of the review, project administrators and approvers can send the review back to the Initiator.
Optional Reviewers: You can also add optional reviewers for the step. Optional reviewers can't move a review to the next step.
Note: The same individual user can't be a key reviewer and optional reviewer at the same time.
The initiators, reviewers, and approvers can be:
- Individual users, including both active and pending project members.
- All members with a specified role, including empty roles.
- All members of a specified company, including empty companies.
Empty roles or companies can be useful when setting up your project. After members are invited to the project and added to a role or company, they'll be ready to start initiating, reviewing, and approving documents without the need to include users individually.
Note: When selecting a role or a company, if a minimum quantity isn't specified, the number of members in the role could grow. The maximum number of reviewers is limited to 30.Time allowed: Specify the time allowed for each step. You can also select either calendar days or work days (fixed at Monday to Friday).
File Review Status
Specify the file approval statuses to be used in the workflow.
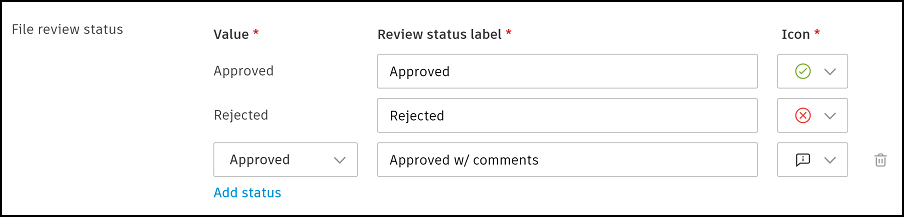
The default status values Approved and Rejected can't be deleted, however you can edit their labels and their icons. A suggested status labeled Approved w/ comments is also included which you can edit or delete. You can click Add status and add more statuses using the following options:
- Value: Choose from Approved or Rejected.
- Approval status label: Enter custom text to describe the status.
- Icon: Select an icon to represent the status.
Each file's approval status is updated automatically when the review is complete and the relevant icon and status label is displayed in the Review status column in the Files tool.
Action Upon Completion
Specify whether you want to copy approved files to another folder, add and update attributes, and require the approver to enter attribute values before submitting the review.

Copy approved files: Turn on if you want to copy the approved files to a folder upon completion.
When: Choose when the approved files are copied. Either when Any file in the review is approved or All files in the review have been approved.
Then copy approved files to: Select the folder you want the files to copy to. This can include a naming standard enforced folder.
Note: The folder the files are copied to must belong to the same top-level folder as their original location.Allow the initiator to change the target folder: Select to allow the initiator to change the folder the approved files are copied to. This is useful if, for example, a selection of files need to be moved to a different folder.
Include all published markups on approved files: Select so published markups on approved files copy to the target folder. This can be overridden if you allow the option below and the approver chooses not to include markups.
Allow approvers to change whether or not markups are included: Select to allow the approver choose whether or not published markups on approved files copy to the target folder.

Update attributes: Turn on if you want the displayed attributes, or the added attributes, to update on completion.
Update attributes only for target folder: Select if you only want the attributes in the target folder to update.
Update attributes both for target folder and source folder: Select if you only want the attributes in both the target folder and source folder to update. You can also choose to Allow approvers to choose whether the attributes of rejected files are updated for the source folder.
Allow reviewers to edit attribute values in the following steps: Select which steps reviewers can edit attribute values. You can select no steps, one or more steps, or all steps.
Add attributes: Click this text link to add custom or related attributes on completion of each review initiated from this approval workflow.
Note: If you have chosen a naming standard enforced folder as the target folder to copy approved files to, the Status and Revision related attributes are added automatically.Once attributes are added, you can turn on Required by approver so the approver must enter a value for the selected attributes to submit the review. When Auto-increment is turned on, this automatically updates the drop-down list attributes with the next value on the list.
Workflow notes
Optionally, add a custom note, such as a disclaimer, which will be visible to all reviewers.
Save Approval Workflows
Save
If you have created an approval workflow, completed all the required fields and there are no errors, you can click Save.
The approval workflow will display in the Approval workflow tab for an initiator to use and start a review available for use by the selected initiator.
Save as draft
After you have entered a Name for your workflow, you can click Save as draft to save the draft workflow in the Draft approval workflow tab. A draft workflow isn't available to use in the project, however it can be finalized and available for use once all the required fields are completed and any errors are resolved.
See Draft approval workflows below for more information on how to edit and finalize a draft workflow.
Edit and Manage Approval Workflows
- Click the Reviews tool.
- Click Settings
- Select either the Approval workflow or Draft approval workflow tab which lists your workflow.
- Click the More menu
 next to the workflow you want to work with and choose from the following options:
Approval workflows
Click the More menu next to your relevant workflow in the Approval workflow tab. Choose from the following options:
- Edit: Edit the workflow settings.
- Duplicate: Make a copy of the workflow. This is useful if you want to create a new workflow using settings similar to an existing one. Edit the copied workflow to give it a unique name and change other settings as required.
- Deactivate: to deactivate the workflow so it can't be used by an initiator to start a review.
Draft approval workflows
Click the More menu next to the workflow you want to work with in the Draft approval workflow tab. Choose from the following options:
- Edit: Edit the workflow. Complete all the required fields, resolve any errors and click Finalize workflow to move the approval workflow to the Approval workflow tab.
- Duplicate: Make a copy of the draft workflow. This is useful if you want to create a new workflow using settings similar to an existing one. Edit the copied workflow to give it a unique name and change other settings as required.
- Finalize workflow: This option is available once all the required fields are completed and any errors are resolved. Click Finalize workflow and the workflow will be finalized and moved to the Approval workflow tab and is ready to use.
- Delete: Delete the draft workflow.