Data Import
Forms provide a way for the system to execute logic using information provided by the user. Normally, this is done by the user manually filling in form fields and pressing "Submit", and this approach suffices perfectly if the user only wants to execute the routine a small number of times, to execute logic on only a few sets of information. But if a user needs to run a form thousands, or millions of times, it is not practical for him or her to manually input information into a form that many times. Fortunately, Fusion Connect provides a method for automating the execution of forms upon a large amount of data. The Manage > Import page allows users to upload a single file (typically a CSV file), with each row containing one set of information they want to input into a form, and the system will automatically execute a form upon each row of the file.
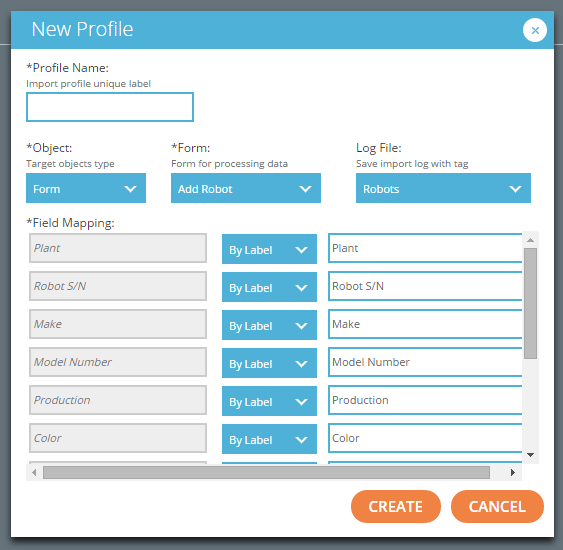
In order to properly execute this, the system must know which form to use, and how to take a comma-separated list of values and plug them into the proper fields of that form. To instruct the system on how to do this, a user must first define an Import Profile. The purpose of an import profile is to save a means of interpreting an uploaded file for future use, so users need not provide this information every time they want to execute a form upon a file of the same format. The "Add" button on the left filter of the Import page brings up the following panel to create a new profile.

On this panel, a user must select a form to use in processing each row of an uploaded file. Next, the user must define Field Mappings to inform the system of how to populate that form with each row. In order for the system to properly interpret an uploaded file, the first line of that file must contain field labels instead of actual data; these labels identify the data stored in the corresponding columns of each row of actual data included in the file. An example of the proper format of a file is shown in the screenshot below:

As a result, when defining field mappings, a user can identify which column of the file maps to which field of the form. In the above examples, the user could designate that the form field titled "Plant" should be populated by the value of the column labeled "Plant"; then, when the system processes the second row of the CSV file show above, it would fill the "Plant" form field with the value "Plant 1", the "Robot S/N" field with the value "45A678H23", and so on, then submit that form to the central processing engine and repeat for the next row. Beyond the form itself and these mappings, the must only assign the profile a name unique within the account, and then they can create the new profile. Once the profile has been defined, the user can download a CSV template of it containing only a single line, with all the column labels mentioned in the field mappings; for example, it would include only row 1 of the CSV shown above; this file is available using the "Template" button, as shown below.
The "Browse" button allows a user to select a file for upload. The system will inspect the file, and if it does not include all the column labels defined in the field mappings of the profile, the page will display an error message listing the missing columns. If the file adheres to the format described in the import profile, the system will immediately begin submitting the specified form for each row of the file. For each row, then, the system will execute all routines set to run on the submission of each form. As described on the Form Results page, routines can display result messages in response to the submission of a form. While these messages are normally displayed at the top of the Submit Form page, when using a form to import data in bulk, these form results are instead recorded in a log file titled

After the system processes the individual lines of the uploaded file using all "Form - Submit" routines for the import profile's form, it will then execute all routines with the "Form - Import Finale" origin event for the selected form, exactly once. Additionally, if the system experiences any errors during the processing of any rows, all routines with the "Form - Import Error" origin event for this form will be executed as well. The output of any routines of these types will appear in the data processing log as well.