Statuses for items in a life cycle must be configured to produce the end result which is a SIF file export. The SIF file is a text file containing updates to items status which is then imported into the main database so the complete item history can be displayed through management reports etc.
All SIF files from each station in the life cycle of an item are fed back to the main database. These SIF files contain time stamps enabling reports on drawing time, fabrication time, delivery and installation, for example.
To begin configuring Status Options:
- Click the General tab to set the main triggers for Tracker to execute.
Trigger key sequences are events which when keyed/scanned via bar codes, then process the relevant command.

- The Default Batch Trigger allows you to specify the batch trigger that is used by default. The Batch Trigger is the string that intiates the Batch Triggered event, so that when that trigger string is scanned, the actions associated with the “Setup Default Action” are executed.
- Set the Folder and Path for Database, Reports, Backup, and Project. For example, the reports that are available are determined by the Reports path on the General tab.
- Click the Status Options tab.
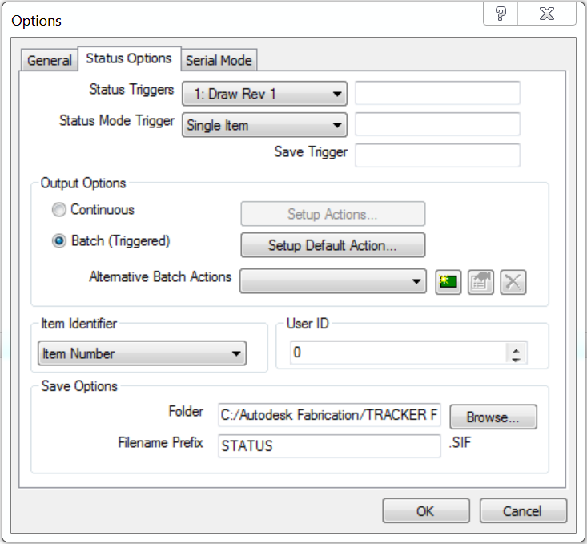
- Specify the Status and Trigger options as follows:
- Enter Mode Trigger relates to this tab's selection when scanning "Status Mode Trigger" from your scanner or entry. This trigger would normally be set to "STATUS".
- Status Triggers: You can specify a trigger for each status that exists in the database. These triggers allow selection of the status when entering the item's status change. The example above shows the Manufacturing status with a trigger of "MANUF". This trigger can be assigned to your printed worksheet so that when scanned/keyed, the status is changed in the Tracker Takeoff dialog. This works will all other statuses, as long as they have their unique trigger strings set. For example:
For this Status... The Trigger could be... Design DESIGN For Approval FORAPPV Approved APPV Issued for Manufacture ISSUEM Manufactured MANUF Assembled ASSEM Quality Control QUALI In Transit TRANS Delivered DELIV Installed INSTAL - Status Mode Trigger can be specified as follows:
- Single Item: Selects each item one at a time, and exports the SIF file containing individual items.
- Spool: Allows you to specify one item in a Spool Drawing for the software when the SIF file has been updated to the main database. Also to update all items relating to the same spool entry as that one item scanned in. (Item Spool) if continuously updating spooled drawings or combinations or items in the same run. Spool can be used to save entry/scanning of each individual item.
- Status: Specifies that status that is used for the trigger.
- Save Trigger: This is the trigger text that when scanned saves the current job.
-
Specify the Output Options as follows:
- Continuous: This option automatically prints the selected report each time an item is scanned. The report to print is selected from the Continuous drop-down box.
- Batch (Triggered): This option printing spools the scanned items until the order to print has been given via the trigger. Multiple reports can be selected via the Select Batch Printouts option.
- Alternative Batch Actions: Specifies alternative actions that can be used as triggers to update the statuses.
-
Setup (Default) Actions: Click the Setup Actions button or the Setup Default Action button displays the Setup Status Change Action dialog. This dialog lets you setup the actions that will trigger status changes.
The following options are available on this dialog: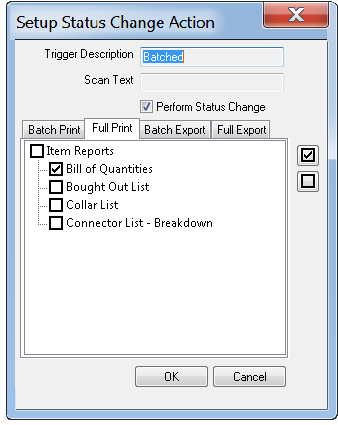
- Trigger Description: Displays Continuous or Batched, depending on what is selected.
- Scan Text: Specifies the text to be scanned.
- Perform Status Change: When this option is checked, the item's status is changed when scanned, if a status change has occurred.
- Batch Print: Prints all items currently held in Tracker (job by job) using the selected reports.
- Full Print: Prints all items in the job relating to the scanned item.
- Batch Export: Performs a batch data export using a pre-defined export format.
- Full Export: Performs a full data export using a pre-defined export format.
- In the Item Identifier section, specify the options as follows:
Item Identifier can be determined in three levels. The identifier is the criteria for how Tracker will find the items for then changing its statuses.
- Item Number: the number on the item allocated by the user at takeoff. The criteria would be Job Number and then Item number in the job.
- Item Handle: Handle is a hexadecimal entry automatically assigned per job against each item. Criteria would be Job Number and then Item Handle.
- Item GUID: Item GUID is a unique number assigned to the item that contains job and item. No GUID across jobs are the same, and these are automatically assigned to each item.
User ID: In situations where there are multiple scanning stations, and multiple people scanning on the shop floor, you can assign a unique User ID for each scanning device or station. This is useful for tracking and logging which user (scanner or station) has assigned each status change or scan.
- Save Options are determined so that Tracker can export the SIF file to a destination folder and prefix string for the SIF file.
-
Always Output Full Job and Database Exports: Can only be selected when in Batch (Triggered) mode, and will print/export all items in the job each time the trigger for Print is given.