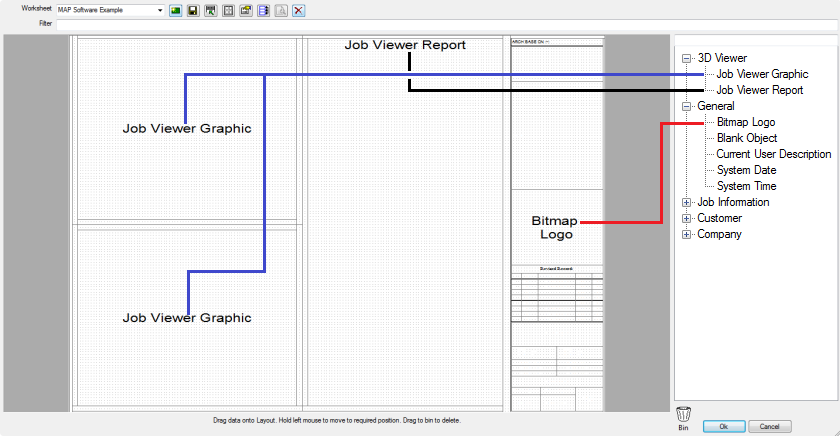
The following diagram illustrates a Paper Worksheet including pre-configured data fields applied within each window.

To customise appropriate data fields within a specific window:
- In the 3D Viewer Worksheet Builder, right click on the appropriate Data Field within the Worksheet Builder window, and select Properties.
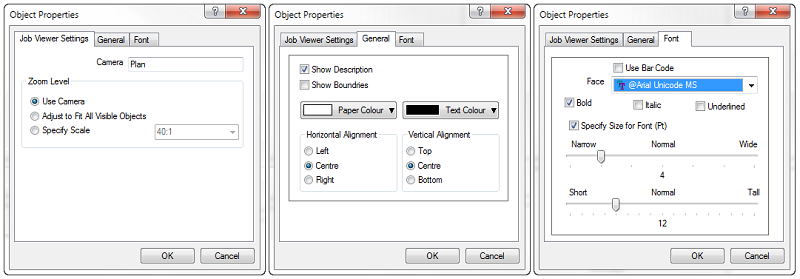
The Object Properties dialog displays.

- Configure the options on the Job Viewer Settings tab.
- Camera: Enables users to assign an elevation to the specific window within the model, for example: Plan, Bottom, Side, End, Isometric. Cameras applied within a model must be consistent with the Camera name settings within the Job Viewer Graphic Settings.
- Zoom Level: Enables users to apply a various pre-configured Zoom and Scales for each Window were the Job Viewer Graphic has been applied.
- Use Line Weights: When this option is selected, line weights are used in the Worksheet.
- Click the General tab, and configure those options as needed.
- Show Description: Enables a user to either show or not show the Description.
- Show Boundaries: Enables a user to either the Boundaries.
- Paper Color: Enables a user to configure the Paper Worksheet Color.
- Test Color: Enables a user to configure the Text Color.
- Horizontal Alignment: Enables a user to align the Data object in the Horizontal Axis.
- Vertical Alignment: Enables a user to align the Data object in the Vertical Axis.
- Click the Font tab, and configure those options as needed.
- Face: Enables users to configure the Font style.
- Bold: Enables users to enable or disable the Bold style.
- Italic: Enables users to enable or disable the Italic style.
- Underline: Enables users to enable or disable the Underline style.
- Specify Size For: Enables users to enable or disable this option Font (Pt).
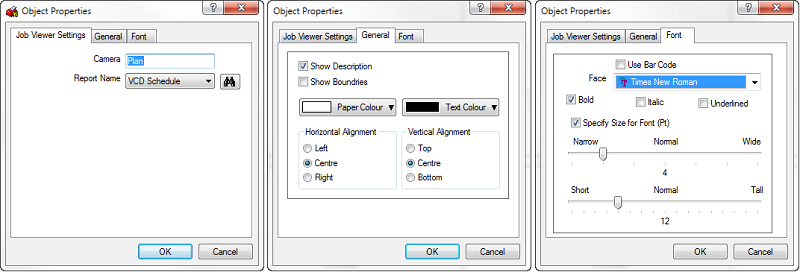
- To configure a Job Viewer Report , configure the options on the Job Viewer Settings tab.

- Camera: Enables users to assign an elevation to the specific window within the model for example (Plan, Bottom, Side, End, Isometric). Note Cameras applied within a model must be consistent with the Camera name settings within the Job Viewer Graphic Settings.
- Report Name: Enables users to apply a report schedule on to the Paper Space Worksheet Window.
- Configure the options on the General tab.
- Show Description: Enables a user to either the Description.
- Show Boundaries: Enables a user to either the Boundaries.
- Paper Color: Enables a user to configure the Paper Worksheet Color.
- Test Color: Enables a user to configure the Text Color.
- Horizontal Alignment: Enables a user to align the Data object in the Horizontal Axis.
- Vertical Alignment: Enables a user to align the Data object in the Vertical Axis.
- Configure the options on the Font tab.
- Face: Enables users to configure the Font style.
- Bold: Enables users to enable or disable the Bold style.
- Italic: Enables users to enable or disable the Italic style.
- Underline: Enables users to enable or disable the Underline style.
- Specify Size For: Enables users to enable or disable this option Font (Pt).
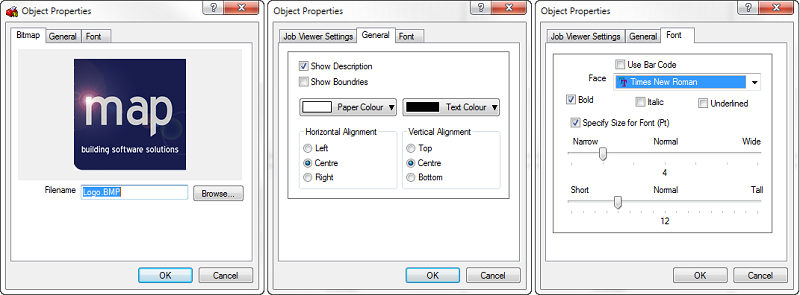
- To add a customised image (.bmp or .png) to the Paper Worksheet Window, right-click in the Bitmao Logo area and select properties.

- On the Bitmap tab, click the Browse button and navigate to and select the desired .bmp or .png file to import.
- Click the General tab and configure appropriate options.
- Show Description: Enables a user to either the Description.
- Show Boundaries: Enables a user to either the Boundaries.
- Paper Color: Enables a user to configure the Paper Worksheet Color.
- Test Color: Enables a user to configure the Text Color.
- Horizontal Alignment: Enables a user to align the Data object in the Horizontal Axis.
- Vertical Alignment: Enables a user to align the Data object in the Vertical Axis.
- Click the Font tab and configure appropriate options.
- Face: Enables users to configure the Font style.
- Bold: Enables users to enable or disable the Bold style.
- Italic: Enables users to enable or disable the Italic style.
- Underline: Enables users to enable or disable the Underline style.
- Specify Size For: Enables users to enable or disable this option Font (Pt).