The Item Statuses dialog allows for the different stages of a model or job to be identified by its Item Status property. For example, an Item Status set to "Design" means that the drawing is still under construction. An Item Status of "Approved" could mean that the model has passes all checks and is ready to be sent on to production.
In the Autodesk Fabrication products, you can setup Item Status descriptions, Layer Tags, and color to suit your needs. You can also configure an Item Status to be included or not included in CAM (*.MAJ file) output.
TIP: In addition to the information below, for more information on changing item statuses in CADmep, review the Exporting to CAMduct & ESTmep Fundamental Training video.
Editing Item Statuses
To edit item statuses in the Database dialog:
- Next to the Services drop-down menu, click the Edit Services Database button
 to display the Edit Services Database dialog.
- In the left pane, click Item Statuses.

- Click on any of the fields in the right pane to edit the Item Status information and settings.
- Click OK to save changes.
Add a New Item Status
To add a new item status:
- Click New
 in the ID column.
- Enter the new description and Layer Tag.
- Optionally, specify a color and Output setting for the new status.
- Click OK to save changes.
Remove an Item Status
To remove an Item Status from the database:
- To remove an existing Item Status from the database, on the database dialog, select the status and click Delete
 .
.
- Click OK to save changes.
Output Option
The Output option on the Item Statuses Database dialog allows the various Item Statuses to be marked as valid for output to CAM.
Any Item Status that does not have the Output option checked (enabled) will display the following dialog when creating the CAM output file:
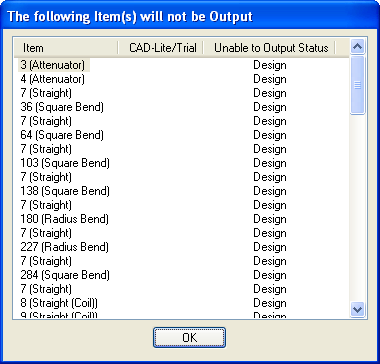
This dialog indicates that the items listed will not be output (included) in the resulting .MAJ file.
Add a Status to an Item
To add a status to an item:
- In the model, right-click on the relevant item and then do one of the following:
- In CADmep, click CADmep Properties.
- In ESTmep and CAMduct, click Edit.
- On the Item Properties dialog, click the Item tab.

- Select the required Status from the drop-down menu.
- Click OK to save the change.
Automatically Change Item Statuses after Export to CAM
The steps below describe how to automatically change an item's status when exported to CAM.
- Select the global Database (Database
 Takeoff
CAD Settings).
Takeoff
CAD Settings).
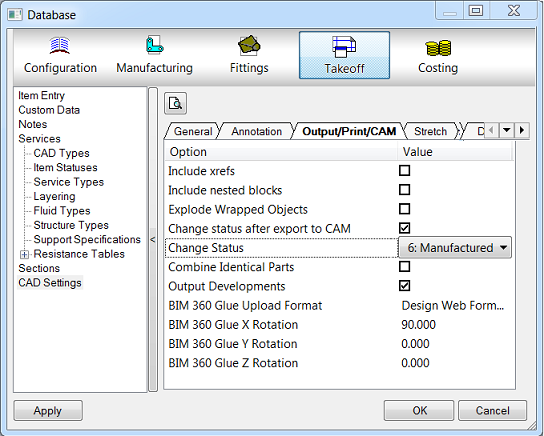
- Click the Output/Print/CAM tab.
- Check the Change Status after Export to CAM option.
When you select this option, the Change Status option becomes active (editable).
- For the Change Status option, select the desired status from the drop-down list.
This option can be useful when sending sections of a completed model for manufacture. If the Status is changed from "Design" to "Manufactured" and the Item Statuses - Output for Manufacture is unchecked, it would not be possible to output duplicate items for those items who's status is now "Manufactured".