Profiles can be used to create individual system configuration settings that can be applied to separate jobs or projects. Creating a new profile lets you create separate services, sections and\or items relating to the specification of the job or project.
When a new profile is created by clicking
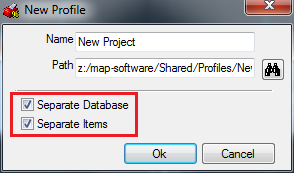
 , the New Profile dialog is displayed:

Copying/Amending Global to a New Profile
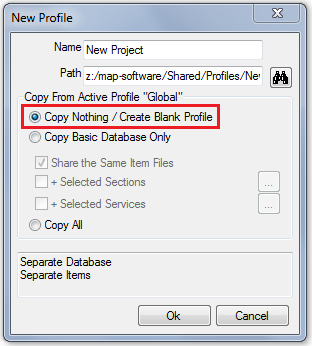
Creating a copy of the global profile allows the current database (services) to be mirrored to the new profile. Create a copy of the global profile when you want to keep the default global data separate, so any modifications to services, specifications a project may require can be isolated within the new profile.
- Enter the profile name.
- Select the Copy Basic Data Only and Share the Same Item Files options.
- Select the + Selected Sections and + Selected Services options if you want to restrict the list of services and sections for the new profile.
- Click OK.
- The Copy Basic Database and Share the Same Item Files options are made available, however, depending on the nature of the project, these options may not always be necessary. Consider the following:
- Copy Basic Database Only: In most cases the Separate Database option is needed.
- Share the Same Item Files: When this option is unchecked (not selected), large quantities of data are duplicated when selecting Separate Items (approx. 300Mb). This is not recommended in most scenarios.
- Click OK.
Creating a Blank Profile
Creating a blank profile allows the content to be added by importing the project data, the services, specifications etc., create a blank profile when project data has been provided in the format of: service, specification export files (*.iez, *.mst), Installation Folders\Files (usually supplied *.ZIP format).
- Enter the profile name.
- Select the Copy Nothing / Create Blank Profile.
- Click OK.
Creating a Duplicate of the Global Profile
This creates a complete copy of the installation (Global) under the new profile name. To create a duplicate of the Global Profile:
- Enter the profile name.
- Select Copy All, and click OK.

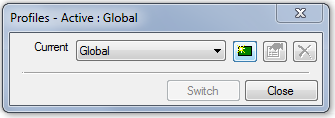
- Switching Profiles: When multiple profiles are available:
- ESTmep and CAMduct: File
 Profiles
Setup
Profiles
Setup
- CADmep: Right Click Menu: CADmep
Profiles
Select from directly from the list (or enter the Setup dialog)
- ESTmep and CAMduct: File
- Enter the profile name.
- Select the desired profile from the drop-down list.
- Click Switch.
All drawings are saved with the current active profile. Whenever the project drawing is opened, the program checks to see if the profile is available.
- When found, a dialog prompts to switch to the correct profile.
- If not found, a warning dialog notifies the user of the missing profile name.
Best Practices
- If profiles are in use and drawings\job files are transferred between users or other third parties, it is best practice to supply the user with the profile that the file has been created with to ensure the projects' data integrity (see Exporting \ Importing profiles below).
- Include the "Profiles" folder in regular backups of the CAD/CAM/EST software.
Exporting Profiles
| ESTmep, CAMduct |
File
|
| CADmep |
Right Click Menu: CADmep
|
| Commands | mapprofiles, mapprofilesout, mpout (Export) |
To export profiles:
- Select the profile(s) to export.
- Choose the desired export file location.
- Enter the export file name.
Importing Profiles
| ESTmep, CAMduct |
File
|
| CADmep |
Right Click Menu: CADmep
|
| Commands | mapprofiles, mapprofilesin, mpin (Import) |
To import profiles:
- Browse to the (*.pez) file location.
- Select the profile(s) to Import.
Editing Profiles
- Allows changing the profile name.
- Changing the profile location.
Method to assign or re-assign Profiles
- Within a blank drawing, make the desired profile active.
- Open the drawing you wish to update the profile .
- If prompted the profile is missing, click OK.
- If prompted the drawing uses the incorrect *Profile Name* - Switch?", click No.
- Saving the drawing.
The drawing will now be updated to use the active profile.
Additional Notes for CADmep
- When a profile has been selected and objects are inserted into the drawing, the profile cannot be switched to an alternative as the object already containing data relating to the existing profile.
- If multiple drawings are open using different profiles, switching between windows will automatically select the profile relating to the current drawing.