Some users may need to enter customised data during pattern input. This is accomplished using the Custom Data tab within the Main Database. This enables the user to set up information for both individual fittings and a job itself. This information can either be letters, numbers, or both, or it can be indexed input.
To access Custom Data settings, click Database
 Takeoff
Custom Data. The following dialog displays.
Takeoff
Custom Data. The following dialog displays.
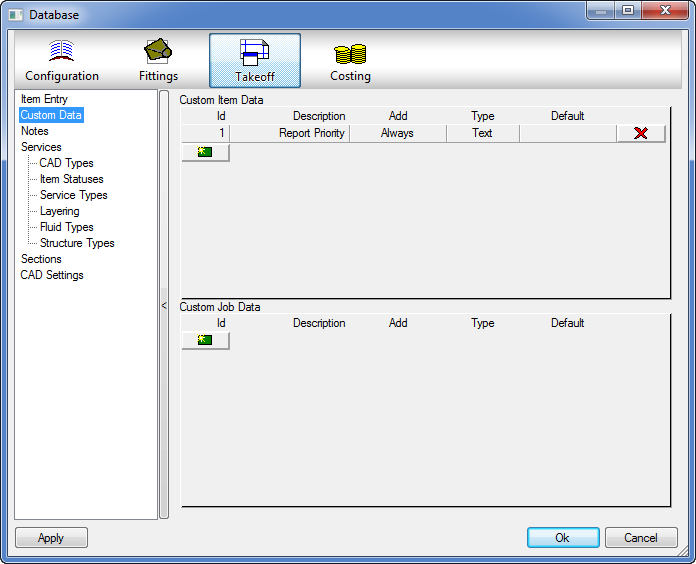
This dialog is organized into two sections: Custom Item Data and Custom Job Data. These are explained below.
Custom Item Data
The Custom Item Data section allows the user to set up a field where specific information can be entered during the pattern takeoff. The user can then carry this information to reports so that the information entered can be used elsewhere at a later point. There are several things that need to be done before the Custom Item Data field can be used. These are explained below.
Setting Up a Custom Item Data Field
- Click the New icon
 underneath the Id field in the Custom Item Data section and the following fields become active.

- The Id field allows the user to give this particular field of Custom Item Data field an Id number.
- The Description field allows the user to enter an actual name for the data field to be created. The name entered here displays on the Item tab during pattern takeoff.
- The
Add field offers two choices: Always or User.
If Always is selected, this data field will automatically be added to the Item tab for every pattern that is added by the user. If this field is set to User, this data field must be set on a fitting by fitting basis (instructions of how to do this will be detailed later). The user can set this field simply by clicking in the text field, toggling between the two options.
- The Type field offers the user several choices via a drop-down menu. This determines what type of information will be input during pattern takeoff. These are None, Text, Index and Value. Although None is available, it should never be selected. If Text is selected, the user can enter either letters or numbers in the field during takeoff. Index allows the user to enter a numerical figure which can also altered using up and down arrows. If Value is selected, the user can only enter a numerical value in the data field during takeoff.
- The Default field allows the user to set the default information that will automatically appear when this data field is used during pattern takeoff. This can be changed at the point of takeoff.
Applying a Custom Data Field to a Fitting
If the Add field of the Custom Data field has been set up as User, as described above, the user must determine which fittings need to have this field attached to it.
- Within the Item Folders, locate a relevant fitting that will be have the data field applied.
- Right-click on the icon and select Takeoff Information and the following dialog displays.

This dialog is organized into two sections. The window on the left shows the customised data fields available for selection, and the window on the right hand side shows the customised data fields currently applied to this particular fitting. In this example, this is empty.
- Click on the Custom 1 field, then on the button with right arrow.
This moves the custom field from the left to the right pane, and will therefore be applied to the fitting, as shown in the image below.
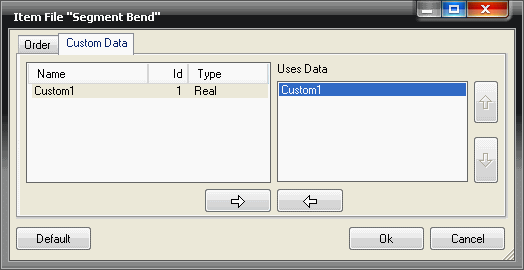
The customised data field is now ready to use.
- Click OK.
Note: If the Custom Data field had been set up initially with the Add field set to Always, it will have automatically have appeared in the right hand window above for this fitting, and all of the fittings that the user has set up.
Enabling the Item tab to show Custom Data
Once the custom data field has been set up and applied to a fitting, it is then necessary to customise the fitting's Item tab to show this information. This can be done in two ways: individually, on a fitting by fitting basis, or globally, on all the fittings in the same time action.
Globally
To configure all of the Item tab information for all of the fittings in one action:
- Double-click on the relevant fitting icon as if it were about to be added to the job.
- Select the Item tab and note that the Custom Data field does not appear.
- Click Takeoff
Customise
Item Information and the following dialog displays.
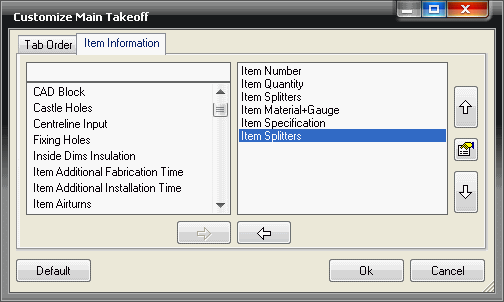
Once again, this is split into two windows. The window on the left shows all of the information available to be viewed on the item tab. The window on the right shows all of the information currently enabled on the item tab.
- In the left hand window, locate the Item Custom Data Field and highlight it.
- Then click on the right pointing arrow to add the field to the right hand window.
- The position of the new field within the item tab is determined by its position in the right hand window. This can be changed by clicking on the Up or Down arrow on the right. In this case, to make it appear at the bottom on the Item tab, move it all the way down to the bottom, as shown in the image below.
- Then click the
 icon in the middle of the up and down positioning arrows and select "Display date for index #" and the set the value to 1. The description should change to "Custom1", the name of our custom data field.

-
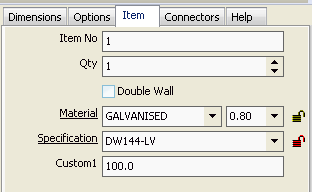
Click Ok to confirm the changes. Notice that on the Item tab that the new Custom 1 field now appears at the bottom of the list, ready to use.
These changes will also be applied to all other fittings.
Individually
It is also possible to specifically configure the item input information for individual patterns. If this is done, it overrides the global settings detailed previously.
- In Item Folders, right-click on the relevant icon, select Takeoff Information, and the following dialog displays.
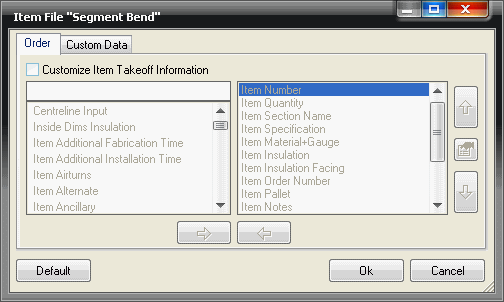
Notice that all of the Order tab is 'greyed out'. Since this is the information that needs to be configured, it needs to be enabled.
- Click in the Customize Item Takeoff Information box. This enables all of the Order tab to be used.
- Once this is done, the configuration of the information is done in the same way as the global customisation.
Custom Job Data
This allows the user to create their customised data fields that can be a applied to a job as a whole, rather than on individual items, as previously described.
- In Item Folders, right-click on the relevant icon and select Takeoff Information. The following dialog displays.
Notice that all of the Order tab is 'greyed out'. Since this is the information that needs to be configured, it needs to be enabled.
- Click in the Customize Item Takeoff Information box. This enables the whole of the Order tab to be used.
Once this is done, the configuration of the information is done in the same way as the global customisation.
- Click File
Setup
Main Database
Custom Data and the following dialog displays.
Setting up a Custom Job Data field
- Locate the Custom Job Data section and click on the New icon
below the Id field.
- Configure the following fields:
- The Id field allows the user to give this particular field of Custom Job Data field an Id number.
- The Description field allows the user to enter an actual name for the data field to be created. The name entered here will actually appear on the Job Information tab when the job has been created. The user can also create a Custom Job Form, which can also have this field attached.
- The Add field will remain blank throughout the set up of the custom job form as it doesn't apply.
- The Type field offers the user several choices via a drop-down menu. This determines what type of information will actually be input during pattern takeoff. These are, None, Text, Index and Value. Although None is available it should never be selected. If Text is selected, the user can enter either letters or numbers in the field during takeoff. Index allows the user to enter a numerical figure which can also altered using up and down arrows. If Value is selected, the user can only enter a numerical value in the data field during takeoff.
- The Default field allows the user to set the default information that will automatically appear when this data field is used during pattern takeoff. This can be changed at the point of takeoff.
Once the this has been created, it is now ready to use.

Using the Custom Job Data field
Once the Custom Job Data field has been created, it is then possible to use the field to enter relevant information to each job.
- Click File
Job Information
Custom Data and the following dialog displays.

The user is now free to enter any information they require in the field that has been set up.
The main purpose of using these fields is to enable the reporting of any additional specific information that may be required by the user.
For more information, see the Help topics on Reports and Creating Customised Job Information Forms.