Fusion has a single API that can be used from several different programming languages. In most cases, the API is used in a very similar way from each of the programming languages with just small language specific syntax changes. However, in some cases there are significant differences in how the API is used because of a particular language. This topic discusses the differences that are unique to C++ and covers the subjects listed below. For differences unique to other languages, see the Python Specific Issues or TypeScript Specific Issues topics.
When creating a new C++ script or add-in using the “Scripts and Add-Ins” command a single cpp is created and both Visual Studio (.vcxproj) and Xcode (.xcodeproj) projects are created that use the single cpp. In most cases the same code can be used on both Windows and Mac unless you’ve chosen to use an external library that is OS specific. Even though it’s usually possible that the same source code can be used for both Mac and Windows, the binary that’s used by Fusion is OS specific. This means you need to use Windows and Visual Studio to compile your script or add-in for Windows and OS X and Xcode to compile it for Mac.
Most of the discussion below is about the code of your script or add-in and is platform agnostic so it applies to both Mac and Windows. The last topic describes debugging your script or add-in which is OS specific.
Object Declaration
Variables declarations and function arguments that use a Fusion defined type should always use the Fusion defined Ptr template to create a smart pointer. A smart pointer will automatically handle adding and removing references, deleting the reference when it’s no longer needed (i.e. when the variable goes out of scope or is explicitly set to nullptr), and casting.
In the C++ implementation of the Fusion API, all errors are reported through error codes. There are not asserts fired so a try catch statement will not work. In most cases this means one of two things. First, if a function is expected to return an object, it will either return the expected object or some other documented result (usually null) indicating the function failed. This is demonstrated below.
Ptr<SketchLine> ln = lines->addByTwoPoints(p1, p2);
if (!ln)
    return false;
If the function failed you can obtain additional information about the failure by using the getLastError method of the Application object. This is demonstrated below:
Ptr<SketchLine> ln;
ln = lines->addByTwoPoints(p1, p2);
If (!ln)
{
    // get error message
    std::string errorMessage;
    int errorCode = app->getLastError(&errorMessage);
    if (GenericErrors::Ok != errorCode)
        ui->messageBox(errorMessage);
    return false;
}
The second error reporting method is for functions that return a Boolean indicating success or failure, as demonstrated below. Again, you can use the getLastError method to get more information about the error.
bool isOK = sk->isComputeDeferred(false);
if (!isOK)
    return false;
Properties
C++ doesn’t support properties in the way they are defined in the API and as they are used by Python. The Python sample below illustrates using the read-write name property of the Component object to get the existing name of a component and then set it.
// Python
if comp.name == "Test":
    comp.name = "New Test"
In C++, properties are implemented using two overloaded functions where the read version of the property is implemented as a function that doesn’t have any arguments and returns the value of the property. Setting the property’s value is done through a function that takes a single argument, which is the new value of the property and returns a bool indicating success or failure. Both of these are demonstrated below.
// C++
if (comp->name() == "Test")
    bool isOK = comp.name("New Test");
Object Types and Casting
Unlike Python, C++ is a strongly typed language and variables must be declared as a specific type and assignments must match the type. As described above, when declaring a new variable you should always use the Ptr template to create a smart pointer of a specific type. To check the type of object being referenced by a variable you can use the objectType property, which is supported by all Fusion objects. This function returns a string that is the actual type of the object, not necessarily the type the variable is declared as. For example, the code below gets the entity that is currently selected, (which could be anything so the variable is declared as Base), and checks to see if it is a sketch line.
Ptr<Selection> selection = ui->activeSelections()->item(0);
Ptr<Base> selectedEnt = selection->entity();

if (selectedEnt->objectType() == adsk::fusion::SketchLine::classType())
    ui->messageBox("Selected entity is a sketch line.");
else
    ui->messageBox("Selected entity is NOT a sketch line.");
A SketchLine object is derived from the SketchCurve class and it derives from the SketchEntity class which finally derives from the Base class. If you want to know that the selected entity is one of the types that that derives from SketchCurve you can use the following.
Ptr<Selection> selection = ui->activeSelections()->item(0);
Ptr<Base> selectedEnt = selection->entity();

if (Ptr<SketchCurve>(selectedEnt))
    ui->messageBox("Selected entity is a sketch curve.");
else
    ui->messageBox("Selected entity is NOT a sketch curve.");
The code above takes advantage of one of the features of the Fusion smart pointers in that they automatically handle casting. It uses the automatic casting performed by the Ptr template to cast selectEnt to a SketchCurve and if it is successful this results in the statement being true. Below is another example of a common case where casting is used where the active product is obtained as the base class Product class. It’s then assigned to a variable declared as Design. If the active product is a design this will be successful and the variable “des” will reference the active design. If the active product is a CAM or Drawing product then the variable “des” will be null because the casting failed.
Ptr<Product> prod = app->activeProduct();
if (!prod)
    return false;

Ptr<Design> des = prod;
if (!des)
    // A product is not active.
    return false;
Events
Implementing events in C++ is similar to how it’s done in Python. Although the concept is the same for both languages they each have their own unique requirements. Below is a list of the steps to implement an event in C++ and some sample code that illustrates these steps.
Get a reference to an object that supports the event, (line 13).
Get the event object, (line 18).
Call the add method on the event object, passing in the event handler class, (line 19). Notice that the variable being passed in is declared as part of the event handler class definition on line 56.
Create an event handler class that derives from the appropriate Fusion class, (line 21).
Implement the notify function with the appropriate signature, (line 24).
Add code in the notify function that’s to be run when handling the event, which can also include connecting to other events (lines 25-52).
1 extern "C" XI_EXPORT bool run(const char* context)
2 {
3      _app = Application::get();
4      if (!_app)
5          return false;
6
7      _ui = _app->userInterface();
8      if (!_ui)
9          return false;
10
11     // Create a button command definition.
12     Ptr<CommandDefinitions> cmdDefs = _ui->commandDefinitions();
13     sampleCmdDef = cmdDefs->addButtonDefinition("sampleCmdID", "Sample",
14                                                 "Sample tooltip",
15                                                 "./Resources/Sample");
16
17     // Connect to the Command Created event.
18     Ptr<CommandCreatedEvent> commandCreatedEvent = sampleCmdDef->commandCreated();
19     commandCreatedEvent->add(&_cmdCreated);
20 }


// CommandCreated event handler.
21 class CommandCreatedEventHandler : public adsk::core::CommandCreatedEventHandler
22 {
23 public:
24     void notify(const Ptr<CommandCreatedEventArgs>& eventArgs) override
25     {
26         if (eventArgs)
27         {
28             Ptr<Command> cmd = eventArgs->command();
29             if (cmd)
30             {
31                 // Define the inputs.
32                 Ptr<CommandInputs> inputs = cmd->commandInputs();
34
35                 // Add an input to have a sketch curve or edge selected.
36                 Ptr<SelectionCommandInput> curveInput;
37                 curveInput = inputs->addSelectionInput("curveInput", "Curve",
38                                                        "Select the sketch or edge curve.");
39                 curveInput->addSelectionFilter("SketchCurves");
40                 curveInput->addSelectionFilter("Edges");
41
42                 // Add an input to get a true/false input.
43                 Ptr<BoolValueCommandInput> trueFalseInput;
44                 trueFalseInput = inputs->addBoolValueInput("trueFalseInput", "Yes or No",
45                                                       true, "", true);
46
47                 // Connect to the command executed event.
48                 Ptr<CommandEvent> onExec = cmd->execute();
49                 bool isOk = onExec->add(&onExecuteHandler_);
50             }
51         }
52     }
53
54 private:
55     OnExecuteEventHander onExecuteHandler_;
56 } _cmdCreated;
Header Files
The C++ interface to the Fusion API is described by many .h files that are provided as part of the Fusion installation. There is a separate .h file for each class and they’re organized into folders in the “…/API/CPP/include” folder. There are two top-level folders called “Core” and “Fusion”. The “Core” folder contains functionality that is not Fusion specific, (UI, Materials, Geometry, etc.) and “Fusion” contains Fusion specific functionality (Sketch, Features, Components, etc.). Within each of these are folders grouping specific functionality. To write a simple program that creates a profile of lines and extrudes you will use classes that require the following header files to be included.
It’s not always obvious which folder you would look in to find the .h file for a specific class. The help topic for each class, method, property, and event lists which .h file you need to include to use that functionality. Although it's not standard C++ practice, you can avoid the necessity of adding a #include statement for every class used in your program by using the “CoreAll.h” and “FusionAll.h” files. These two files include every Fusion related .h file that is available. This results in longer compile times, but because of compiler optimizations results in the same runtime.
To also simplify the use of the API you can use the “using namespace” statements to reference the core and fusion namespaces so you don’t have to specify the full namespace when declaring variables. By using the two statements below you don’t need to find out if a class is defined in Core or Fusion.
using namespace adsk::core;
using namespace adsk::fusion;
When declaring a variable of type “Application” you can use:
Of course, in both cases of using the CoreAll.h and FusionAll.h or the using namespace statement, the choice is yours to use these shortcuts or to use more standard C++ practice.
Iteration
You can use standard C++ iteration methods to iterate through the contents of Fusion collections. For example, the following code will iterate through all of the faces in a body.
for (Ptr<BRepFace> newFace : selectedBody->faces())
{
    // Do something with the face.
}
Object Equality
It’s often useful to be able to compare two variables to see if they reference the same Fusion object. Every C++ API function that returns an API object that references an entity in Fusion will create the C++ wrapper with the same pointer. This means you can directly compare the pointers of two variables to see if they reference the same object. For example the following compares two variables to see if they reference the same face.
If (face1 == face2)
    ui.messageBox(“Faces are the same.”);
Utility Functions
The C++ interface also supports a few utility functions defined in Core/Utils.h that are useful in some special cases.
adsk::doEvents() – This pauses execution of your script or add-in and allows Fusion to process all messages currently in its queue. There are cases when you’re driving Fusion using a program that Fusion won’t keep up graphically. Calling doEvents gives Fusion a chance to catch up and refresh the display.
adsk::autoTerminate() – When a C++ script is executed, it is automatically terminated. In most cases this is the desired behavior because scripts typically are executed, they perform their function, and they're done. If you want a program to continue to running and not automatically terminate it's best to create an add-in rather than use a script. However, it is possible to have a script that continues to run and doesn't automatically by using the autoTerminate property. Using this property you can check the current auto termination state and set it.
adsk::terminate() – The terminate function forces a script or add-in to immediately terminate. This is particularly useful is you've used the autoTerminate with a script so that it didn't automatically terminate. Using the terminate function you can determine when the script will terminate.
Debugging a Windows Script or Add-In
You can debug your C++ script or add-in using Visual Studio on Windows. The following describes the steps for debugging.
First you must be able to successfully compile your script or add-in.
Add whatever break points you need. Additional break points can be added while debugging but you’ll want to have at least one break point that will halt execution in the portion of code you want to examine. Otherwise it will just run through the code without giving you a chance to debug it.
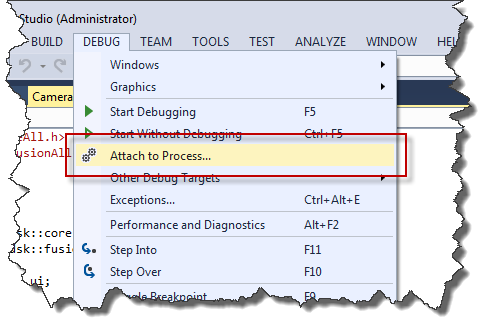
In the Debug menu, run the “Attach to Process…” command, as shown below.
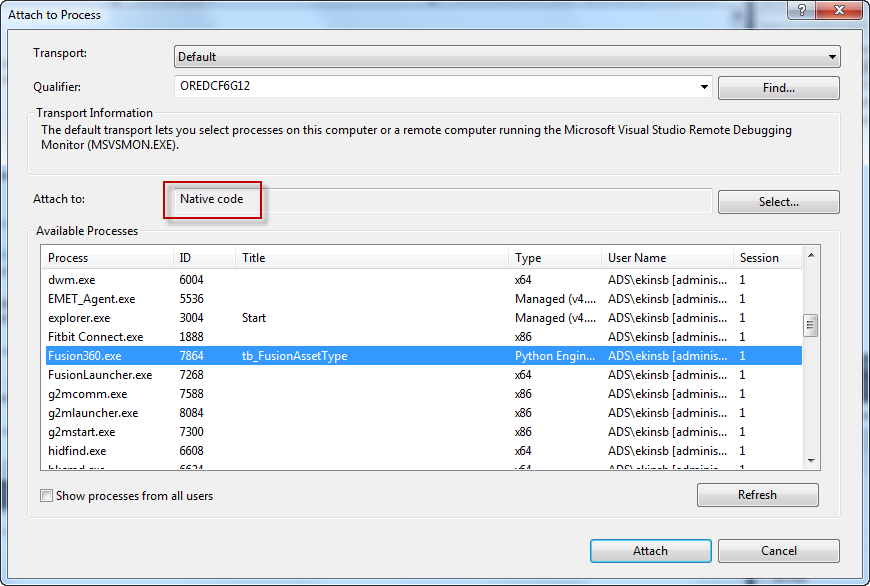
In the Attach to Process dialog, make sure the "Attach to" option is set to “Native code” and choose “Fusion360.exe” from the list, as shown below, and click “Attach”.
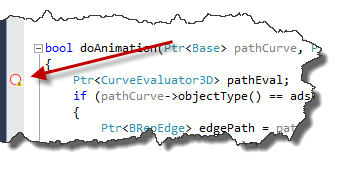
At this point, your script or add-in is attached to Fusion but it’s not running. You’ll see an indication of this in Visual Studio because all of your break points are disabled, as shown below.
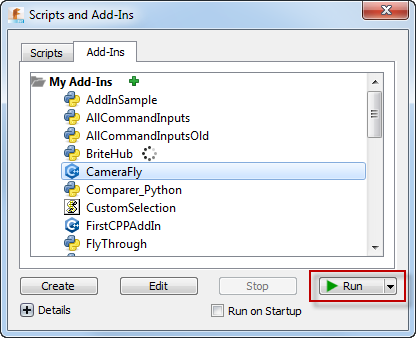
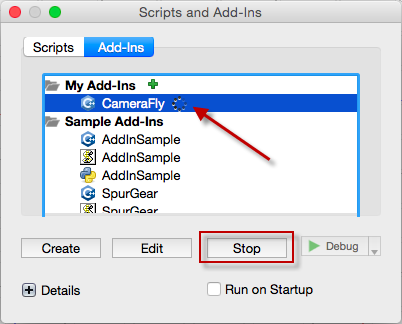
To begin running your script or add-in in Fusion you need to use the “Scripts and Add-Ins” command as shown below. Select your script or add-in and click the “Run” button. While initially writing and debugging an add-in you should not enable the “Run on Startup” capability but only manually run your add-in as part of the debugging process.
The run function in both scripts and add-ins will now be called and any break points in that function, or functions called from there, will be hit. If the break points are in other areas of your code then you need to exercise your add-in in a way to cause those portions of code to be executed. For example, if your add-in creates a command and your break points are in code specific to that command, you need to run the command by clicking the command’s button in the user interface.
In any case, once you’ve hit a break point you can now step through your code and perform standard debugging operations.
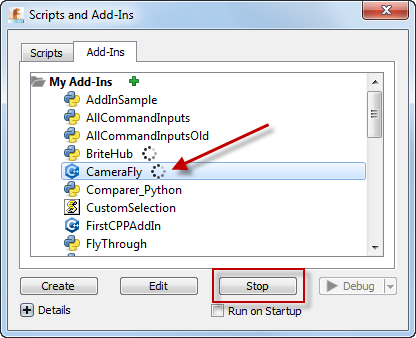
To stop debugging you need to stop the script or add-in from running using the Scripts and Add-Ins command.
And you also need to stop debugging from Visual Studio which you can do by using the “Stop Debugging” command. This will stop debugging and detach from Fusion. You can now edit code, recompile and go back to step 3 to begin the debugging process again.
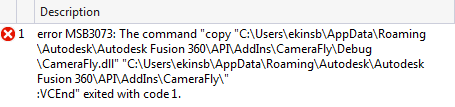
If you see an error similar to that shown below when compiling your script or add-in, it typically means that the script or add-in is still running in Fusion and you need to stop it as shown above.
Debugging a Mac Script or Add-In
You can debug your C++ script or add-in using Xcode on a Mac. The following describes the steps for debugging.
First you must be able to successfully build your script or add-in.
Add whatever break points you need. Additional break points can be added while debugging but you’ll want to at least add a break point that will halt execution in the portion of code you want to examine. Otherwise it will just run through the code without giving you a chance to examine it.
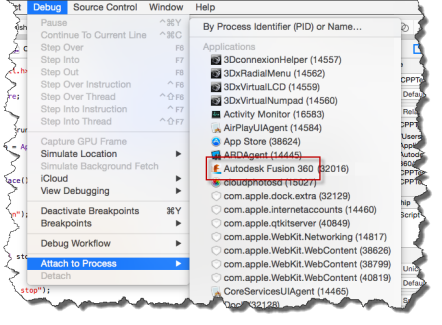
In the Debug menu, choose “Attach to Process” and select “Autodesk Fusion” from the list, as shown below.
At this point, your script or add-in is attached to Fusion but it’s not running.
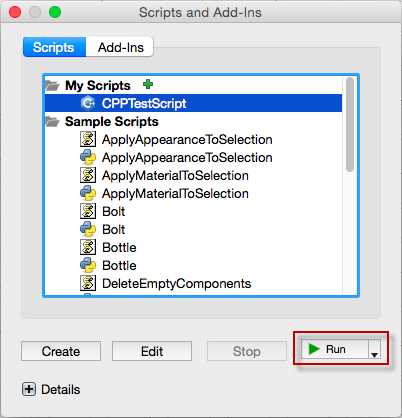
To begin running your script or add-in in Fusion you need to use the “Scripts and Add-Ins” command as shown below. Select your script or add-in and click the “Run” button. While initially writing and debugging an add-in you should not enable the “Run on Startup” capability but only manually run your add-in as part of the debugging process.
The run function in both scripts and add-ins will now be called and any break points in that function, or functions called from there, will be hit. If the break points are in other areas of your code then you need to exercise your add-in in a way to cause those portions of code to be executed. For example, if your add-in creates a command and your break points are in code specific to that command, you need to run the command by clicking the command’s button in the user interface.
In any case, once you’ve hit a break point you can now step through your code and perform standard debugging operations.
To stop debugging you need to stop the script or add-in from running using the “Scripts and Add-Ins” command.
And you also need to stop debugging from Xcode which you can do by using the “Detach” command in the Debug menu. This will stop debugging and detach from Fusion. You can now edit the code, recompile and go back to step 3 to begin the debugging process again.