The functionality described here is provided as a preview of intended future API capabilities. You are encouraged to try it and report any problems and offer suggestions using the "Custom Feature" pinned topic near the top of the Fusion API and Scripts forum.
Because this is a preview of future functionality, it will probably change before it is released. Changes will possibly break any existing programs that use this functionality. Because of that, you should never deliver any programs that use any preview capabilities.
Throughout this topic, known issues are highlighted in yellow. There will likely be significant updates to this documentation and the sample programs as the API is improved as we consider your feedback.
The creation of custom features is considered an advanced use of the API, and you should have previous experience using the API and creating custom commands.
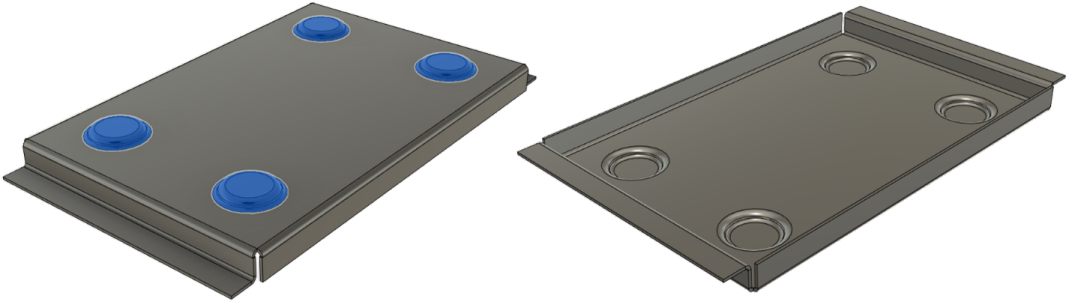
Through the API, you have been able to create and edit models ever since Fusion first introduced its API. You can automate the creation of the Fusion standard features, and the result is the same as if you created them interactively. Here is an example of an add-in that models a round emboss that you might see on a sheet metal part and fabricated using a punch and die operation.
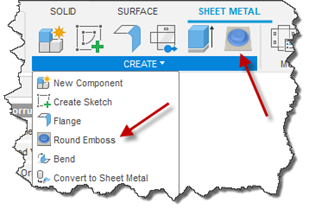
The add-in creates a button in the user interface that the user executes to run the command, as illustrated below.
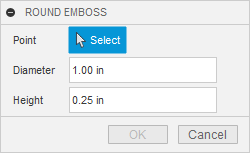
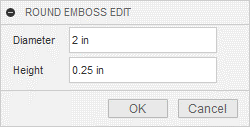
When the command runs, it displays a dialog to gather the input needed to define the emboss, as shown below.
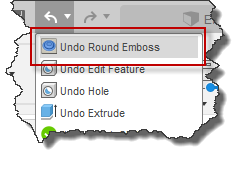
To the user, creating this round emboss "feature" is the same as creating any other Fusion feature. They run the command, interact with a dialog to provide the required inputs, and then Fusion modifies the model in an expected way. The results of the command are grouped into a single undo operation, as shown below. The capabilities described so far are all part of the API's custom command capabilities, which have been available since the beginning of the Fusion API.
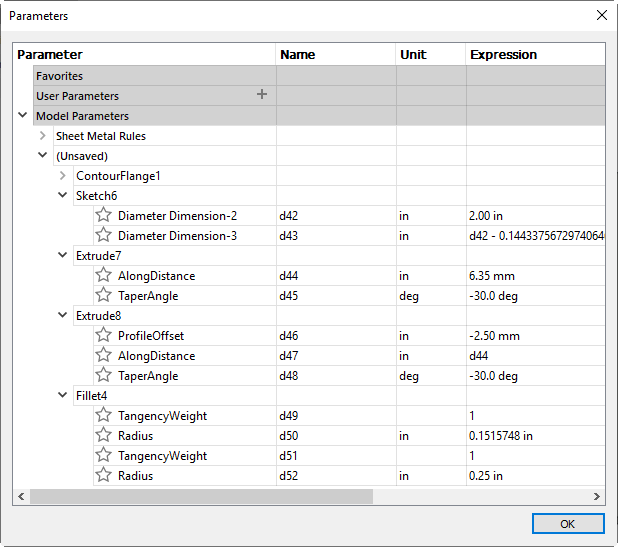
Creating custom commands and automating geometry creation is very powerful and provides this ability to make logical "features." However, after the "feature" has been created, and we start examining the results, we see the result is not a standard Fusion feature. The first difference is that after running the custom command to create the round emboss "feature," we see four new features in the timeline, as shown below, where a standard feature will have one. There is not anything in the user-interface that indicates a round emboss feature exists besides the part's geometry.
Editing the round emboss "feature" is also tricky because of the fact there are multiple features. It is not obvious which standard features in the timeline correspond to the round emboss "feature." And because the round emboss consists of numerous features, multiple parameters control those features. Even simple changes are difficult because it may not be obvious which parameters to edit to get the desired result. You can easily destroy the logical feature's desired behavior by editing the wrong parameters or modifying them outside of an expected range. You can see below all the parameters controlling the four features that make up the round emboss "feature."
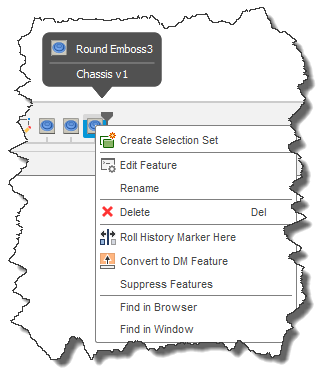
Because the user-interface does not have a single item representing the round emboss "feature," even something as simple as deleting it is difficult because it is not apparent which features in the timeline you need to delete.
Because the round emboss "feature" was created using standard Fusion parametric features, when the model changes, the features will automatically compute, and in many cases, this is good enough. However, there can also be cases where the custom command calculates information during the initial creation of the feature. For example, a custom command that creates a "feature" relative to the center of gravity of a selected body can correctly calculate the feature. That logic is part of the command, and if the body changes, the standard features will compute using their built-in logic and not the special command logic used during the initial creation.
Custom Feature Overview
Geometry
A custom feature solves the issues described above. For geometry creation, custom features do not provide any additional functionality. You are still limited to whatever functionality Fusion currently provides; standard features and the API's temporary B-Rep functionality. As a result, the custom feature functionality does not offer any additional modeling capabilities beyond what is already available.
Timeline Grouping
The new functionality that the custom feature functionality does provide is the ability to group several features under a single node in the timeline. This is similar to the Create Group command in the timeline but has some big differences. A custom feature timeline node has its own icon, name, and behaves like all other feature nodes, which allow you to delete, suppress, reorder, rename, and edit the feature. Also, the user cannot expand the custom feature timeline node to access the features it is grouping.
The picture below shows an example of the round emboss as a custom feature. Instead of seeing the sketch and three features, you now see a single timeline node. It has its own icon and supports all of the standard feature functionality available in the context menu.
Custom Parameters
Another capability unique to custom features is the ability to have associated custom parameters. In the emboss feature, there are two values input by the user when the feature is created: Diameter and Height.
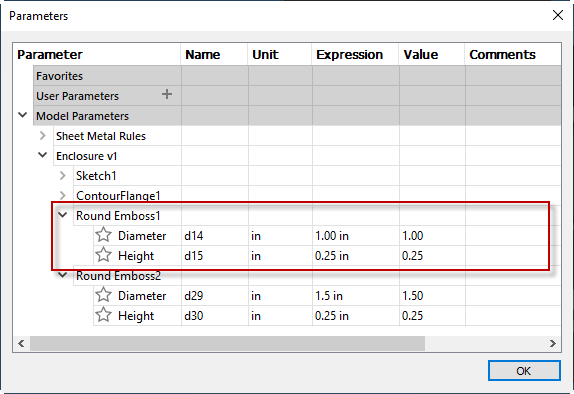
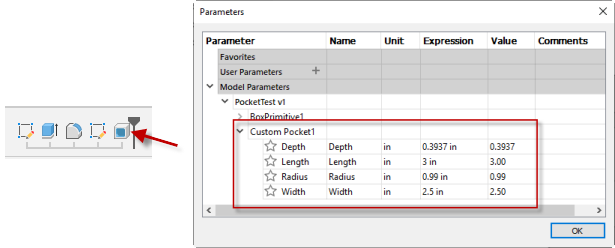
Without the custom feature capability, we see all eleven parameters associated with the sketch and features created for the round emboss "feature." With a custom feature, we see the "Round Emboss" feature in the parameters dialog and see the "Diameter" and "Height" parameters associated with it, as shown below. The user can edit these parameters just like any other model parameter, and if the custom feature is deleted, these custom parameters are automatically deleted with it.
Geometry Dependencies
Besides being dependent on the parameters, most custom features are also dependent on existing model geometry. When creating a custom feature, the user will be presented with a command dialog and typically pick geometry that defines how the custom feature will be computed. For example, with the Boss command, a point is selected to specify the boss's location. The geometry the custom feature is dependent on is referred to as its dependencies, and there is a formal way to capture these as part of the custom feature definition.
The dependencies are critical to the behavior of the custom feature. They are used both by Fusion and by the add-in to compute and edit an existing custom feature. Fusion uses this to determine when the custom feature needs to be computed, and Fusion will have the custom feature compute if any of the entities the feature depends on are modified, or any of the associated parameters are edited.
You also use the dependencies in the add-in to get the geometry. You need them to recompute and edit the custom feature based on the current state of the entities.
Custom Named Values
When creating a feature, there are three types of inputs; selected entities, values, and settings. Entities that are selected are saved as dependencies of the feature. Values are saved as custom parameters to allow the user to edit them easily. Finally, settings are various options or states the user specifies when creating the feature. These need to be remembered because they change how the feature is computed and edited.
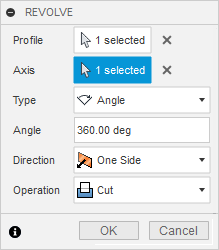
An example of where custom named values would be used is for a command like the Revolve command. The profile and axis are geometric dependencies, the angle is a parameter, and the type, direction, and operation are settings within the feature. For a custom feature, these can be saved as custom named values of the feature. These are what the name indicates; values that are named and because they are named, you can quickly look them up later.
Custom Compute
When you use the user interface to create a standard Fusion feature, you run the feature command, which collects the required input, and when you click "OK," the command calls an internal function (known as a "request") to create the actual feature. The input that was gathered is passed to the request, and all the logic to create or modify the B-Rep data is in the request. Fusion calls a similar request any time the feature needs to re-compute. A feature might need to compute any time a parameter value is modified or something created earlier in the timeline is modified. Each feature specifies the dependencies it has on other geometry and parameters, and Fusion figures out from that if the feature needs to compute. As part of the re-compute, the request can get the dependency geometry and any other inputs, re-create the geometry, and incorporate it into the model.
For example, let us look at the fillet feature. When you initially create the fillet, you select the edges you want to fillet, specify the radius, and other settings. The command then takes that input and calls the feature request, which creates new faces representing the fillet geometry and integrates the faces into the model. The fillet feature tells Fusion it is dependent on the edges that were selected and the radius parameter. If any of those change, Fusion will ask the fillet to re-compute itself. The request gets the current state of the edges it depends on, the radius from its parameter, and any other settings specific to that instance of the feature, re-creates the faces and re-integrates them into the model. All the logic about creating the fillet faces and integrating them back into the model is in the fillet feature request. Each time you edit an existing feature or edit a parameter, all the features impacted by those changes are re-computed to fully update the model.
Custom features also provide this capability. When you create a custom feature, you define existing geometry the feature is dependent on, and Fusion will fire an event notifying you when the feature needs to compute.
This re-compute functionality is currently limited to one specific case. This custom compute functionality should not be used for any other cases and will likely fail. The case where it is supported is where the custom feature consists of only base features, sketches, and combine features. Typically, a custom feature that supports custom compute will have a base feature with one or more B-Rep bodies and a combine feature that uses a Boolean operation to combine the base feature bodies into the parametric model.
Custom Edit
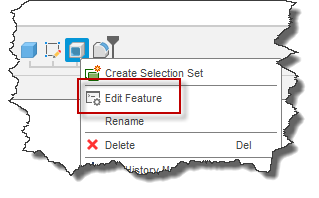
The other functionality provided by a regular feature is the ability to edit it. You can edit a feature by either choosing "Edit Feature" from the timeline node's context menu or double-clicking on the timeline node. Typically, the same dialog you used when you created the feature is displayed, allowing you to change any of the various inputs.
A custom feature can provide the same type of interaction. Fusion notifies your add-in when the user has chosen to edit your custom feature, enabling the add-in to do whatever it needs to do for an edit. For the round emboss custom feature, editing displays the dialog shown below, allowing you to change the input parameters. Implementing editing is described in more detail below.
When you edit a standard Fusion feature, notice all the nodes to the right of the edited feature are disabled. Fusion has effectively rolled the timeline to just before the edited feature to put the model in the state it was in when the feature was created. When making changes to a feature where you are changing geometric inputs, the API has always required you to roll the timeline to just before the feature being edited. For example, if you edit a fillet, you must roll the timeline to just before the fillet, so all the original edges are available again.
Because a custom feature combines several features into a single timeline node, it is impossible to move the timeline before one of those features. However, you can work around this limitation by temporarily remove all of the features from the custom feature, moving the timeline marker and editing the desired features and then putting them back into the custom feature.
Custom Feature Examples
Below are two examples that demonstrate two different approaches to using the custom feature capabilities. There are pros and cons to each approach.
Round Emboss Example (Grouping standard Fusion Features)
This example of the round emboss feature creates all its geometry using standard Fusion modeling entities (sketches and features in this case). It uses the custom feature functionality to group these into a single timeline node and provide a simpler user-interface when editing the feature by only showing the parameters it wants to expose in the Parameters dialog and supporting an edit command; both are shown below. The source code for the Round Emboss Feature add-in can be downloaded here.
This type of custom command does not take advantage of the custom compute capabilities supported by custom features because of the limitations described in the compute and custom edit sections. However, even without a custom compute, you can still create useful features. This custom feature combines standard Fusion features, but because the Fusion features are parametric, they automatically update when the model changes, so the compute comes for free.
Also, because of the limitations described in the "Custom Edit" sections above, you are very limited to the types of edits you can perform, essentially just editing the parameters of the features that are grouped within the custom feature. As you can see in the dialog above, when you create an emboss feature, it prompts for a point to be selected to define the location of the emboss. Because the edits required to switch to a different sketch point are not supported for a custom feature, you will not be able to choose a new point during an edit. For an edit, the dialog has no longer has the selection input but only supports changing the two values. Even with this limitation, providing this functionality as a custom feature is a considerable improvement.
Editing a custom feature is done by implementing a second command. There is one command for the creation and a second command for edit. You create the edit command and indicate which type of client feature it should be used for. When the user double-clicks the feature node in the timeline or chooses Edit Feature in the context menu, Fusion executes your edit command; the command dialog is displayed, and the user can make changes. In this example, the types of edits that are allowed are limited to editing the parameters. All the edit command does is display the dialog to let the user specify new values, and then the command updates the parameters with the new values to update the model.
Custom Pocket Example (Temporary B-Rep and Custom Feature Compute)
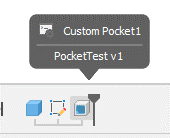
Here is an example that fits within the limitations so it can use all the capabilities of custom features. It creates a custom pocket. An add-in defines the Custom Pocket command during the add-in start-up and adds the command to the user-interface, as shown below. The source code for the Custom Pocket Feature add-in can be downloaded here.
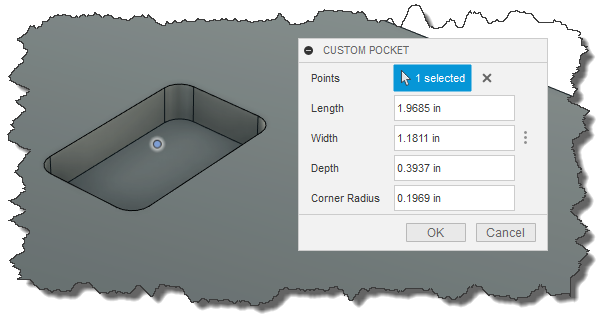
When the user clicks the command button, the command is created and defines the dialog shown below to gather the needed input; a sketch point and four values. A preview is displayed in the graphics window as the user makes changes to the input values.
When the user clicks "OK" to execute the command, the add-in creates the pocket's shape as a B-Rep body. It does this by using the API's temporary B-Rep capabilities and creates two boxes and four cylinders and uses Boolean operations to combine them into a single temporary B-Rep body. It then makes a base feature and uses the temporary B-Rep body to create a new body in the base feature. A body in a base feature is a real body and can be seen in Fusion, but it is static and not parametric. Finally, it creates a Combine feature to subtract the pocket body from the part body.
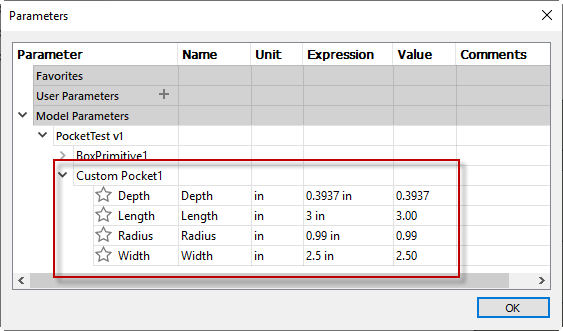
At the end of the execute, the command creates a custom feature, grouping the Base Feature and the Combine feature into the custom feature. The command also creates four custom parameters for the length, width, depth, and radius. Once the creation has finished, there is a new pocket feature in the timeline and the Parameters dialog, where the four parameters can be seen and edited, as shown below.
During the creation of the custom feature, the command also specifies that the custom feature has a dependency on the selected sketch point. When Fusion loads the add-in, the add-in defines the custom feature and adds a handler for the compute event for this type of custom feature. Whenever the user edits any of the custom parameters associated with this custom feature, or any of the dependencies change (the sketch point in this example), Fusion will fire the compute event to allow the add-in to update the feature.
When the compute event is fired, Fusion is in the middle of computing everything in the model impacted by the change the user has made. When the compute is fired, the model is in the state it was when the custom feature was initially created. This means that geometry that may have been consumed by features later in the timeline will be available during the compute because the timeline has essentially been rolled to just before the custom feature. This is critical because you need access to all the geometry that existed at the time of creation.
For example, your custom feature might depend on a selected edge, and a fillet operation might have consumed that edge. When the feature computes, it needs that edge to be able to successfully re-compute. After the custom feature is finished computing, Fusion continues computing any other impacted features, including the fillet feature. After the compute finishes, the model will be as the user expects it.
As mentioned earlier, the custom feature editing is done through a separate command that the add-in implements. When you define a custom feature, you declare which command is the edit command for that feature. When the user edits the feature, Fusion executes the edit command. In the edit command, you can get which custom feature is being edited and display the command dialog to allow the user to make changes. This example pocket custom feature stays within the limitations of only having a Base Feature and a Combine feature so it can do more in the edit than the previous example. For example, during the edit, you can choose a new point to reposition the pocket anywhere on the model.
Implementing a Custom Feature
Let us now look at the details of how to create a custom feature along with the code. The Custom Pocket example above is used for the discussion because it demonstrates all the custom feature capabilities. You can compare the code for the Round Emboss custom feature to see the differences in the two uses of the custom feature functionality.
Creating the Custom Feature Command
The first step in supporting a custom feature is to define two new commands: one for the creation and one for the edit. These commands are no different than any other custom commands you might create using the API. You create a new CommandDefintion object and then add a new button to the user-interface. Because the edit command is never directly executed by the user, it does not need an icon and is not added to the user interface. Instead, Fusion executes the edit command when the user specifies they want to edit an existing custom feature.
Like any other command, you also connect a handler function to the command created event of each CommandDefinition.
Below is a portion of the code from the commandCreated event of the create command. It creates the command definition, adds a button to the user interface, and connects to the commandCreated event. If you have used the API to create commands before, there is nothing new here.
# Create the command definition for the creation command.
createCmdDef = _ui.commandDefinitions.addButtonDefinition('adskCustomPocketCreate',
                                                          'Custom Pocket',
                                                          'Adds a pocket at a point.',
                                                          'Resources/CustomPocket')

# Add the create button to the UI.
panel = _ui.allToolbarPanels.itemById('SolidCreatePanel')
panel.controls.addCommand(createCmdDef, 'EmbossCmd', False)

# Create the command definition for the edit command.
editCmdDef = _ui.commandDefinitions.addButtonDefinition('adskCustomPocketEdit',
                                                        'Edit Custom Pocket',
                                                        'Edit custom pocket.', '')

# Connect to the command created event for the create command.
createCommandCreated = CreatePocketCommandCreatedHandler()
createCmdDef.commandCreated.add(createCommandCreated)
_handlers.append(createCommandCreated)

# Connect to the command created event for the edit command.
editCommandCreated = EditPocketCommandCreatedHandler()
editCmdDef.commandCreated.add(editCommandCreated)
_handlers.append(editCommandCreated)
Defining a Custom Feature
When using custom features, there is a new step you need to do in the run function of your add-in, which is to create a new CustomFeatureDefinition object. The CustomFeatureDefinition object is similar in concept to a CommandDefinition. It is not a custom feature but defines information about a specific type of custom feature and is used whenever you create a custom feature of that type. The code to create a new CustomFeatureDefinition is shown below. It uses the static create method on the CustomFeatureDefinition class. The first argument is the ID of the custom feature definition, which should be unique with respect to ALL custom feature definitions. All custom features of the new type are tagged with this ID. Because of that, you need to make sure the ID is unique. We suggest including your company name as part of the ID to help with uniqueness. The second argument is the name the user will see in the timeline for all custom features of this type. If you want to use a localized name, you can use the userLanguage property of the GeneralPreferences object to determine the current language and use a name in that language. The last argument is the path to a folder that contains the icon to show in the timeline for this type of custom feature. You should provide 16x16.png and 32x32.png files. It is common to use the same images used for the feature create command so you can reference the same folder used for the command definition.
# Create the custom feature definition.
global _customFeatureDef
_customFeatureDef = adsk.fusion.CustomFeatureDefinition.create('adskCustomPocket',
                                                               'Custom Pocket',
                                                               'Resources/CustomPocket')

_customFeatureDef.editCommandId = 'adskCustomPocketEdit'
There is no support to query for existing CustomFeatureDefinition objects; however, if you attempt to create a CustomFeatureDefinition using an ID that already exists, the create method will return the existing CustomFeatureDefinition instead of creating a new one. The sample add-in creates and assigns the CustomFeatureDefinition in a global variable to use later when the custom feature is created.
After creating the CustomFeatureDefinition object, you should specify the ID of the CommandDefinition object to use when the custom feature is edited. That is demonstrated in the last line of the code snippet above.
The final work that needs to be done in the run function is to connect a handler to the customFeatureCompute event of the CustomFeatureDefinition object
# Connect to the compute event for the custom feature.
computeCustomFeature = ComputeCustomFeature()
_customFeatureDef.customFeatureCompute.add(computeCustomFeature)
_handlers.append(computeCustomFeature)
Creating a Custom Feature
When the command that creates the custom feature is executed by the user, all the work the command does before the user clicks the "OK" button is the same as any other custom command. The difference between a command that creates standard features and one that creates a custom feature is what happens in the execute event handler of the command. The code below is the Execute event handler for the sample custom feature. The first thing it does is pass the inputs the command collected to a function called CreatePocketBody. This function creates a temporary BRepBody object that represents the tool body needed to create the pocket. Next, it creates a new base feature and creates a regular body in the base feature.
A base feature has a place in the timeline like other features, but a base feature's contents are not parametric. When a base feature is active, and you create features, it is the same as working in a design that is set to not capture design history. Any bodies you create in a base feature are static and will not change in response to the model's changes.
# Event handler for the execute event of the create command.
class CreateExecuteHandler(adsk.core.CommandEventHandler):
    def __init__(self):
        super().__init__()
    def notify(self, args):
        try:
            eventArgs = adsk.core.CommandEventArgs.cast(args)

            # Create the body of the pocket.
            skPoint: adsk.fusion.SketchPoint = _pointSelectInput.selection(0).entity
            pocketBody = CreatePocketBody(skPoint.worldGeometry, _lengthInput.value,
                                          _widthInput.value, _depthInput.value,
                                          _radiusInput.value)

            # Subtract the pocket from the parametric body.
            face = GetFaceUnderPoint(skPoint.worldGeometry)
            paramBody = face.body
            comp = paramBody.parentComponent
            baseFeat = comp.features.baseFeatures.add()
            baseFeat.startEdit()
            comp.bRepBodies.add(pocketBody, baseFeat)
            baseFeat.finishEdit()

            # Create a combine feature to subtract the pocket body from the part.
            combineFeature = None
            toolBodies = adsk.core.ObjectCollection.create()
            toolBodies.add(baseFeat.bodies.item(0))
            combineInput = comp.features.combineFeatures.createInput(paramBody, toolBodies)
            combineInput.operation = adsk.fusion.FeatureOperations.CutFeatureOperation
            combineFeature = comp.features.combineFeatures.add(combineInput)
With the code below, we are finally seeing some custom feature specific functionality where the add-in is creating the custom feature. The process of creating a custom feature is the same as any other feature; you create an input object, define all the required input, and provide the input object as an argument to the add method. The createInput method used to create a CustomFeatureInput object has three arguments. The first is the CustomFeatureDefinition object for the type of custom feature being created. Remember, the CustomFeatureDefinition object was created in the run function when Fusion loaded the add-in. Next, the code defines four custom parameters. Custom parameters are defined using an ID, the visible name the user will see in the Parameters dialog, the value, the units, and if the parameter should be visible in the Parameters dialog. Currently, all parameters are visible, so the last argument is ignored.
Next, it adds the selected sketch point as a dependency. When creating a dependency, you assign an ID and provide the entity that the custom feature is dependent on. The ID's of the parameters and the dependencies only need to be unique with respect to the custom feature and are used to reaccess them later easily. You will see this used in the discussion about the compute and edit process.
Finally, it creates the custom feature by calling the add method and passing in the CustomFeatureInput object.
At this point, you will see the newly created custom feature as a single node in the timeline.
You will also see the feature and its custom parameters in the Parameters dialog.
Computing a Custom Feature
When a change is made to the design, Fusion looks at the dependencies and determines which features are impacted by the change, and begins computing each affected feature. When creating a custom feature, you can declare its dependencies so that Fusion will include the custom feature as part of the compute. The CustomFeatureDefinition object supports the customFeatureCompute event, and the handler is connected to the event in the run function of your add-in after you have created the CustomFeatureDefinition. Fusion fires the compute event anytime a custom feature of the type defined by the CustomFeatureDefinition needs to be computed.
When the customFeatureCompute event is fired, Fusion is in the middle of a large compute and pauses when it reaches your custom feature in the list of features to compute to allow it to compute. The event arguments passed by the event provide the specific custom feature being computed. Fusion is in a fragile state at this point, and you are limited in what you can do. It is currently limited to modifying the bodies in a base feature, editing the contents of a sketch, and editing parameter values owned by the custom feature or features within the custom feature. Any other changes will cause problems and most likely fail.
Below is the event handler for the customFeatureCompute for the custom pocket. It is like the code that initially created the feature, but instead of getting geometry and values from the user via command inputs, it gets them from the defined dependencies and the associated custom parameters. If there were other settings, it would get them from the custom named values. It uses these current geometries and values to create a new temporary B-Rep body. It then gets the base feature associated with the custom feature, gets the BRepBody it contains, and updates the existing body with the new geometry. Updating the body is accomplished using the BaseFeature.updateBody method. Once you finish whatever you need to do to update the feature and finish the compute handler's execution, control returns to Fusion, and it completes the full compute.
# Event handler to handle the compute of the custom feature.
class ComputeCustomFeature(adsk.fusion.CustomFeatureEventHandler):
    def __init__(self):
        super().__init__()
    def notify(self, args):
        try:
            eventArgs: adsk.fusion.CustomFeatureEventArgs = args

            # Get the custom feature that is being computed.
            custFeature = eventArgs.customFeature

            # Get the original sketch point and the values from the custom feature.
            skPoint = custFeature.dependencies.itemById('point').entity
            length = custFeature.parameters.itemById('length').value
            width = custFeature.parameters.itemById('width').value
            depth = custFeature.parameters.itemById('depth').value
            radius = custFeature.parameters.itemById('radius').value

            # Create a new temporary body for the pocket.
            # This can return None when the point isn't on a face.
            pocketBody = CreatePocketBody(skPoint.worldGeometry, length, width, depth, radius)
            if pocketBody is None:
                # Add a failure status message because it failed to create the pocket.
                eventArgs.computeStatus.statusMessages.addError('DRPOINT_COMPUTE_FAILED', '')
                return

            # Get the existing base feature and update the body.
            baseFeature: adsk.fusion.BaseFeature = None
            for feature in customFeature.features:
                if feature.objectType == adsk.fusion.BaseFeature.classType():
                    baseFeature = feature
                    break

            # Update the body in the base feature.
            baseFeature.startEdit()
            body: adsk.fusion.BRepBody = baseFeature.bodies.item(0)
            baseFeature.updateBody(body, pocketBody)
            baseFeature.finishEdit()
        except:
            showMessage('CustomFeatureCompute: {}\n'.format(traceback.format_exc()))
An important point to understand here is that to maintain associativity; you need to update existing geometry rather than delete and re-create. That is the reason for replacing the geometry in the body rather than deleting and re-creating. A parametric system depends on things being able to find what they are dependent on to compute successfully. Making significant changes to a feature or sketch can cause downstream features to fail because the geometry they are dependent on no longer exists.
If the compute should fail for some reason, you can add a status message using the computeStatus property of the CustomFeatureEventsArgs object passed in as the event's argument. Adding a status message causes the feature icon in the timeline to be shown with a red background for an error or a yellow background for a warning. The context menu shows the "Review Warning" option, which will display the Error dialog, as shown below. You are currently limited to a small set of pre-defined messages. For example, in the custom pocket code above, if the CreatePocketBody function fails, it returns None. The code checks for this and adds an error to the status messages.
Let us look at a typical example of creating a new part by importing a STEP file. When you set the design to be parametric (Capture Design History), you will see that Fusion creates a Base Feature, and the body is owned by it. You can create parametric features on the non-parametric body outside the base feature. Typically, the body remains static, but you can make changes by activating the Base Feature and use direct modeling commands to modify the body's faces and even create non-parametric features. When you exit the base feature, the parametric features added to the body will compute if they can successfully find their dependent geometry.
When the body is first imported, each face, edge, and vertex is tagged with an ID. Downstream features use those IDs to find those faces, edges, and vertices when the feature computes. Changes made to the body through direct modeling maintain these IDs even if the face or edge is geometrically changed.
When you use the temporary B-Rep functionality to create a temporary body and then create a real body in a base feature using the temporary body, Fusion will automatically assign ID's to the faces, edges, and vertices of the new non-parametric body. If you create a new temporary body and replace the non-parametric body in a base feature, Fusion will assign new ID's to the faces, edges, and vertices of the body. However, you construct the temporary BRepBody in the same way, the ID's assignment should be consistent, so logical faces, edges, and vertices will end up having the same ID as before.
In the custom feature sample of the custom pocket, the pocket is built the same way each time the temporary B-Rep body is created; the size of the geometry changes but not how it is built. This results in the faces, edges, and vertices have the same ID after the body is replaced, and downstream features that are dependent on these faces, edges, or vertices can find successfully find them and compute.
If you use the BRepBodyDefinition functionality to create a new B-Rep body from scratch, you can assign the ID's to the faces, edges, and vertices using the associativeID property of each of those objects. If you are consistent in assigning this associative ID, the downstream features should successfully compute when you update the body.
Editing a Custom Feature
The final piece of fully implementing a custom feature is supporting edit. When the user chooses Edit Feature from the context menu or double-clicks the timeline node, Fusion will execute the command specified earlier as the edit command for this custom feature. This was done when the CustomFeatureDefinition was created in the run function of the add-in.
CommandCreated Event and Custom Feature Edit
When handling the commandCreated event, a command creates the needed command inputs and connects to the command related events. A command that is serving as the edit command of a custom feature performs these same actions and has one other thing it needs to do; it needs to get the custom feature the user is currently editing. Fusion will only execute the edit command when a custom feature of the type it is associated with is being edited. Still, you need to get the specific instance of that type the user has chosen to edit. For example, you can create many of the custom pocket features in a model, but the user indicates a specific instance to edit by choosing its node in the timeline. When the user right-clicks the node to access the context menu or double-clicks the node, the feature is selected. The code below is from the notify function in the event handler; it gets the selected entity and assigns it to a global variable to be used in other functions.
class EditPocketCommandCreatedHandler(adsk.core.CommandCreatedEventHandler):
    def __init__(self):
        super().__init__()
    def notify(self, args):
        try:
            eventArgs = adsk.core.CommandCreatedEventArgs.cast(args)
            cmd = eventArgs.command
            inputs = cmd.commandInputs
            des: adsk.fusion.Design = _app.activeProduct
            defLengthUnits = des.unitsManager.defaultLengthUnits

            # Get the currently selected custom feature.
            global _editedCustomFeature
            _editedCustomFeature = _ui.activeSelections.item(0).entity
            if _editedCustomFeature is None:
                return
The next section of code is creating the SelectionCommandInput. The creation of selection inputs is the same as the initial creation, but we will do something special for selections in the activate event, as we'll see later.
# Create the selection input to select the sketch point.
_pointSelectInput = inputs.addSelectionInput('selectPoint', 'Point',
                                             'Select point to define pocket position.')
_pointSelectInput.addSelectionFilter('SketchPoints')
_pointSelectInput.tooltip = 'Select point to define the center of the pocket.'
_pointSelectInput.setSelectionLimits(1, 1)
The code below creates the ValueCommandInputs for the four values that define the pocket's size and shape. There is a difference in how they are created for the edit command compared to the create command. The first line below is getting the CustomParametes collection associated with this feature. Each custom parameter's current value is obtained and used as the initial value for the corresponding ValueCommandInout. Notice it is using the expression of the parameter rather than the value. The expression of a parameter is what the user sees and edits in the Parameters dialog. It is a string and can define more than a simple value. For example, you can specify units as part of the expression and can use equations.
params = _editedCustomFeature.parameters

# Create the value input to get the length.
length = adsk.core.ValueInput.createByString(params.itemById('length').expression)
_lengthInput = inputs.addValueInput('length', 'Length', defLengthUnits, length)

# Create the value input to get the width.
width = adsk.core.ValueInput.createByString(params.itemById('width').expression)
_widthInput = inputs.addValueInput('width', 'Width', defLengthUnits, width)

# Create the value input to get the depth.
depth = adsk.core.ValueInput.createByString(params.itemById('depth').expression)
_depthInput = inputs.addValueInput('depth', 'Depth', defLengthUnits, depth)

# Create the value input to get the fillet radius.
radius = adsk.core.ValueInput.createByString(params.itemById('radius').expression)
_radiusInput = inputs.addValueInput('cornerRadius', 'Corner Radius', defLengthUnits, radius)
The last section of code connects the event handler functions to the command-related events you need for your command. Some of the event handler functions used are the same handlers used for the create command, and some are unique for the edit command. For example, the execute event handler for the edit command is different than the execute handler for the creation command. In contrast, the same preSelect handler is used for both the create and edit commands. It depends if the logic is the same in both the create and edit.
When Fusion is starting a command, it calls the commandCreated event first so the dialog can be defined and then calls the Activate method as the command is starting. For a custom feature, there are several things you need to do in the Activate method.
Earlier, it was discussed how when a standard feature is edited, the model changes to the state it was in just before the edited feature was created. For the user to edit a custom feature, the same thing needs to happen. You do this by manipulating the timeline. The code below finds the timeline marker's current position and gets the TimelineObject to the left of the marker, and assigns this to a global variable to use later. The timeline marker can be at the very beginning of the timeline, so there is no marker to its left. But to edit anything in the timeline, the marker has to be to the right of the feature being edited, which means if the marker is at the beginning, there is nothing available to edit.
The next section of code rolls the timeline to just before the custom feature being edited. It also sets a global flag indicating that the timeline has been rolled back.
class EditActivateHandler(adsk.core.CommandEventHandler):
    def __init__(self):
        super().__init__()
    def notify(self, args):
        try:
            eventArgs = adsk.core.CommandEventArgs.cast(args)
            des: adsk.fusion.Design = _app.activeProduct

            # Save the position of the timeline by getting the object before the marker.
            timeline = des.timeline
            markerPosition = timeline.markerPosition
            global _restoreTimelineObject, _isRolledForEdit
            _restoreTimelineObject = timeline.item(markerPosition - 1)

            # Roll the timeline to just before the custom feature being edited.
            _editedCustomFeature.timelineObject.rollTo(True)
            _isRolledForEdit = True
To understand the next action, you need to understand the concept of transactions. If you have written a command, you have unknowingly used transactions. You see the result of your command's transaction as an item in the undo list. If you create a basic script without a command that creates a sketch, draws some geometry, adds constraints, creates an extrusion, and adds a fillet to some edges, you will see many items in the undo list. One undo item will be listed for every API call made that created or edited something because internally, each one of those actions is a transaction. However, if you write a command and do the same actions in the command's Execute event, those transactions are wrapped into a single transaction that you see as an undo item in the list.
The transaction functionality is also used with the ExecutePreview event of a command. Whatever you do in the ExecutePreview event handler is grouped into a transaction, but each time the ExecutePreview function is called, the transaction is aborted, which sets the state of Fusion back to the beginning of the command. We see this with the custom pocket command. When the user selects a point to define the pocket's position, a preview of the pocket is displayed in the graphics window. The preview is created by the same code that creates the actual pocket. Suppose you edit the Length value in the dialog. In that case, the ExecutePreview event is fired again, and Fusion aborts the current transaction, returning the model to the state it was in before the pocket was modeled. The code in the ExecutePreview is rerun, re-creating the pocket with the new values.
Rolling back the timeline is an action that modifies the model, so it has an associated transaction. We do not want the rolling back of the timeline to be part of the transaction aborted each time there is an edit. To avoid that, we can do something in the Activate to cause this not to be aborted. When the command is started, there is an overall transaction started for the command. When the ExecutePreview is called a "step", or marker is defined within that transaction. All actions performed now are after that step. When the ExecutePreview is executed again, Fusion aborts back to that step, losing any changes made since the step was defined. In the code below, the beginStep method of the Command is called, which sets a new step. Now, when the ExecutePreview event is fired, and Fusion aborts any changes that have been made in the previous ExecutePreview, the abort will only go back to the most recent step. Because of the new step after the timeline rollback, the rollback will not be aborted. When the user clicks OK and the Execute event handler finishes, the command transaction is completed, including the rollback and whatever work was done in the Execute event.
# Define a transaction marker so the the rollback is not aborted with each change.
eventArgs.command.beginStep()
When a command is created, and the CommandCreated event is fired, Fusion is not in a state that you can manipulate selections. There is a selection input for the custom pocket command to allow the user to select the center point of the pocket. When the edit command is started, the point initially selected at creation should be selected, but that cannot be done in the CommandCreated event handler. We can wait until the command has started and the Activate event is fired to work around that limitation. That is what is happening below in the final lines of the Activate event handler. The point it is adding to the selection input is gotten from the list of dependencies defined for the feature.
# Get the point and add it to the selection input.
skPoint = _editedCustomFeature.dependencies.itemById('point').entity
_pointSelectInput.addSelection(skPoint)
When a command is created, and the CommandCreated event is fired, Fusion is not in a state that you can manipulate selections. There is a selection input for the custom pocket command to allow the user to select the center point of the pocket. When the edit command is started, the point initially selected at creation should be selected, but that cannot be done in the CommandCreated event handler. We can wait until the command has started and the Activate event is fired to work around that limitation. That is what is happening below in the final lines of the Activate event handler. The point it is adding to the selection input is gotten from the list of dependencies defined for the feature.
execute Event and Custom Feature Edit
The final step of editing a custom feature is to handle the execute event for the edit command. It gets the point and the various values from the command inputs and updates the expressions of the custom parameters. It then updates the pocket geometry by calling the UpdatePocket function which calculates a new body based on the current point and sizes and then replaces the body in the base feature. It then resets the entity associated with the dependency for the point in case the user has chosen a new sketch point. Finally, it positions the timeline marker back to its position before the edit was started.
class EditExecuteHandler(adsk.core.CommandEventHandler):
    def __init__(self):
        super().__init__()
    def notify(self, args):
        try:
            global _editedCustomFeature
            eventArgs = adsk.core.CommandEventArgs.cast(args)

            point = _pointSelectInput.selection(0).entity

            # Update the parameters.
            params = _editedCustomFeature.parameters
            lengthParam = params.itemById('length')
            lengthParam.expression = _lengthInput.expression
            widthParam = params.itemById('width')
            widthParam.expression = _widthInput.expression
            depthParam = params.itemById('depth')
            depthParam.expression = _depthInput.expression
            radiusParam = params.itemById('radius')
            radiusParam.expression = _radiusInput.expression

            # Update the feature.
            UpdatePocket(_editedCustomFeature)

            # Update the point dependency.
            dependency = _editedCustomFeature.dependencies.itemById('point')
            dependency.entity = point

            # Roll the timeline to its previous position.
            global _isRolledForEdit
            if _isRolledForEdit:
                _restoreTimelineObject.rollTo(False)
                _isRolledForEdit = False

            _editedCustomFeature = None
        except:
            showMessage('Execute: {}\n'.format(traceback.format_exc()))
Q&A
Q: What happens when the add-in that created the custom feature is not loaded?
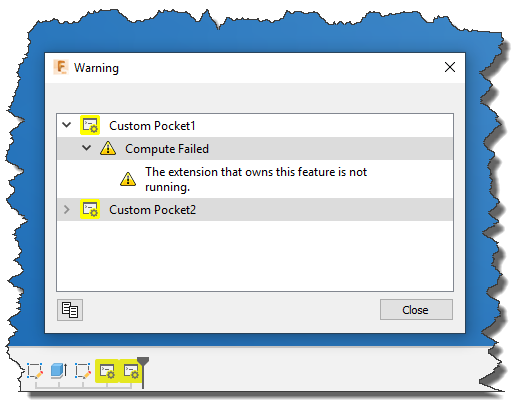
A: The add-in defines the icon for the custom feature when it creates the CustomFeatureDefinition object when the add-in is started. If the add-in isn't present, the icon hasn't been defined. As a result, opening a design that contains a custom feature where the add-in is missing, Fusion uses a generic custom feature icon in the timeline. Hovering the mouse over the feature, you see it still has its original name because the name was saved with the feature. The Edit Feature command is still available in the context menu, or the user can double-click the feature. Still, the dialog shown below will appear, notifying the user the add-in that created the custom feature is not loaded in both cases.
A custom feature groups standard Fusion geometry (sketches, features, base features, etc.), and because it wraps standard features, Fusion will re-compute the geometry when the add-in is missing. In some cases, like the round emboss feature discussed earlier, the feature can correctly compute because the features it groups rely on standard Fusion logic to compute. However, even though the geometry might correctly compute, the timeline node has a yellow background, and there is a warning that the add-in is missing. You can see this in the picture below for the custom pocket feature.
For custom features that use a custom compute, like the custom pocket example, Fusion computes and rebuilds the feature when one of its dependencies change. However, the result will typically not be what you expect. Remember, the custom pocket add-in creates the pocket geometry using temporary B-Rep capabilities and its own logic and then subtracts this body from the model using a combine feature. Suppose the user edits the parameter controlling the radius of the pocket. In that case, the custom feature will re-compute, but the geometry won't change because the add-in isn't present to rebuild the pocket body and replace the existing body in the base feature.
It would be nice for Fusion to store more information about an add-in to use when the add-in is missing—for example, possibly saving a message provided by the add-in including a link where the user can go to get the add-in. This, and other enhancements are being considered for the future.
Q: When will custom features be released?
A: There is no planned date when Fusion will release the custom feature functionality. Custom features will move out of preview when it's believed the functionality is stable and the functionality delivered provides enough capabilities to be useful.
 The functionality described here is provided as a preview of intended future API capabilities. You are encouraged to try it and report any problems and offer suggestions using the "Custom Feature" pinned topic near the top of the Fusion API and Scripts forum.