Work with a manufacturing model
Create, edit, and delete a manufacturing model and associate a manufacturing model with a setup.
Create a manufacturing model
In the Manufacture workspace, click Milling > Setup > Create Manufacturing Model.
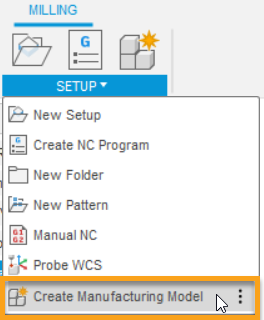
A Manufacturing Model node appears in the Browser containing a manufacturing model.
Edit a manufacturing model
In the Browser, right-click the manufacturing model and select Edit Manufacturing Model.
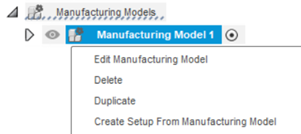
A contextual environment opens, where you can use common design tools and make changes to the model.
To import components and control how many instances are used for manufacturing—without changing the original design—use Component Manager:
On the Solid tab, open Components and click Component Manager.
The Component Manager dialog opens.
Click Import Model to import components from the selected design in your hub into the manufacturing model.
In the Component column, review the list of components from the imported or active design.
In the Quantity column, set the number of instances for each component. Click the quantity value to change it, enter an amount, then click anywhere on the dialog to confirm. When confirmed, the components are created in the manufacturing model.
Note: In this dialog, you can only increase a quantity before the components are created. To remove instances after they are created, in the Browser, right-click the components and click Delete.Click OK.
Delete a manufacturing model
In the Browser, right-click the manufacturing model and select Delete.
If the manufacturing model is associated with a setup, all references to it (such as geometry selections) are removed.
Create a setup from a manufacturing model
In the Browser, right-click the manufacturing model and select Create Setup from Manufacturing Model.
The Setup dialog opens and the manufacturing model is automatically selected as the model to be considered for toolpath calculation.