Clearance geometry
This feature is part of an extension. Extensions are a flexible way to access additional capabilities in Fusion. Learn more.
For Multi-axis 3D toolpaths with 4-, 5-axis machining, you can control how the tool moves between cuts by setting Clearance Geometry on the Heights tab of the toolpath dialog. The same clearance options are available when you edit Leads and links for a toolpath.
Plane - Standard Z-plane clearance area. The tool moves to a fixed Z height between positions. Use this when a single height gives safe clearance between moves.
Cylinder - Cylindrical clearance area around a defined axis. The tool moves along the surface of a cylinder between positions. Use this on cylindrical parts or when you need clearance around a rotary axis.
Sphere - Spherical clearance area that provides clearance in all directions. The tool moves within a spherical boundary between positions. Use this when you need maximum clearance flexibility or when working with complex part geometry.
Box (only for 5-axis) - Rectangular clearance area defined by a bounding box. The tool creates linking moves around the perimeter of the workpiece within the box boundaries. Use this when you need to control tool movement within a defined rectangular region. On the canvas, use the drag handles to resize the box. Use the Symmetrical option to keep the box centered as you scale it, or clear it to resize asymmetrically.
| Plane clearance area | Cylinder clearance area |
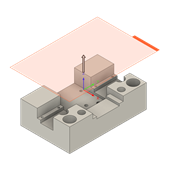 |
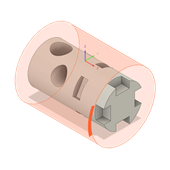 |
| Sphere clearance area | Box clearance area |
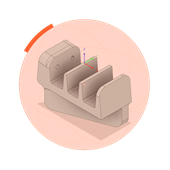 |
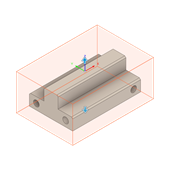 |
Clearance Geometry Direction
Specifies the direction that sets the clearance shape’s orientation in 3D space. Doesn’t change the tool’s orientation.
Rotary axis - Uses rotary axis as a centerline of the cylinder clearance area.
Automatic - Selects the most suitable direction based on the current tool orientation and model geometry.Updates automatically when the tool orientation changes.
Selection - Lets you choose a direction from model geometry, such as a face or an edge.
Setup X axis - Uses X axis of the current setup as the clearance direction.
Setup Y Axis - Uses the Y axis of the current setup as the clearance direction.
Setup Z Axis - Uses the Z axis of the current setup as the clearance direction.
Tool Orientation X Axis - Uses the X axis defined by the Tool Orientation setting. Useful when clearance should align with the tool’s tilt rather than the setup axes.
Tool Orientation Y Axis - Uses the Y axis defined by the Tool Orientation setting. Helpful when a side direction relative to the tool provides safer linking moves.
Tool Orientation Z Axis - Uses the Z axis defined by the Tool Orientation setting. Ideal when “up” follows the tool orientation, such as in angled 3+2 positions.
Direction Selection
Selects an edge to use its normal direction for the clearance direction.
Flip Direction
Reverses the current direction vector of clearance geometry.
Clearance Geometry Origin
Defines the location of the work coordinate system (WCS) origin for spherical and cylindrical clearance area types.
Setup WCS origin - Uses the WCS origin defined in the current setup.
Model origin - Uses the model’s WCS origin.
Selected point - Uses a selected reference to define the WCS origin.
Model box point - Uses a selected point on the model’s bounding box to define the origin.
Stock box point - Uses a selected point on the stock’s bounding box to define the origin.
Origin Selection
Selects a vertex, an edge, or an arc or circle center to set the origin for clearance.
Origin Model Point
Specifies key points on the model’s bounding area to set the WCS origin for clearance. You can choose extremes in X, Y, and Z of the top, center, and bottom of each side.
Origin Stock Point
Specifies key points on the stock’s bounding area to set the WCS origin for clearance. You can choose extremes in X, Y, and Z of the top, center, and bottom of each side.