Insert configurations
Learn how to insert Configurations into other design documents, switch configurations, customize, and create configurable assemblies in Fusion.
Insert a Configuration as a Configured Component
In the Data Panel, right-click a Configured Design.
Click Insert Into Current Design.
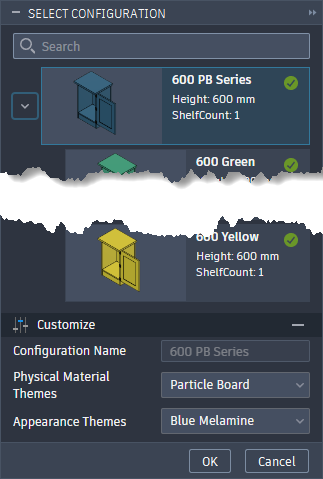
The Select Configuration dialog displays.
Optional: In the Select Configuration dialog, search for a configuration name, key parameter value, or custom aspect value.
Select a configuration from the list.
Each existing configuration from the source Configured Design displays as a card. Each parent configuration card expands to display its custom configurations nested beneath it.
If the source Configured Design contains Custom Aspects, the
 Customize section displays. The values from the selected card are populated.
In the
Customize section, adjust values for each Custom Aspect:- If the combination of values already exists as a row in the source Configuration Table, Fusion references the existing configuration.
- If the combination is new, enter a Configuration Name. Fusion creates a new Custom Configuration when you click OK. The next time you save the assembly, Fusion saves the new custom configuration to the source Configured Design and nests it beneath its logical parent in the source Configuration Table.
Click OK.
The Move/Copy dialog and a preview of the component display.
Optional: Adjust the component location:
- In the Canvas, use the manipulators handles.
- In the dialog, enter specific values.
Click OK.
The Configuration is inserted into the design as a Configured Component. It displays in the Browser as an external component and in the Timeline as an Insert feature.
Replace a Configured Component with a different Configuration
In the Browser, right-click a Configured Component.
Click Switch Configuration.
The Select Configuration dialog displays.
Optional: In the Select Configuration dialog, search for a configuration name, key parameter value, or custom aspect value.
Select a configuration from the list.
In the
Customize section, adjust values for each Custom Aspect.Click OK.
The Configured Component switches to the new Configuration you selected. It updates in the Browser, Timeline, and Canvas.