Activity 6: Optimize the set up, solve, and review the results
In this activity you generate the contacts, then optimize the contact conditions to reduce the analysis time. You want enough friction in the contact that the roller pulls the steel slab along after the pusher block has stopped moving.
Contact is generated, initially, between all bodies. To reduce the analysis time you can suppress unlikely contacts, such as, in this case, self-contact. Since the pusher block and the roller never contact each other, you also suppress that contact pair. With the setup optimized, you solve the analysis and review the results.
In this activity you:
- Generate contacts with sufficient friction to move the steel slab under the roller
- Review the contact conditions and suppress those that are unlikely to occur in this analysis, to reduce the solve time
- Review the set up pre-check to ensure the analysis is ready to solve
- Solve the analysis
- Review the results
Prerequisites
- Activity 5 is complete.
Steps
Generate contact between all the bodies, using a Default Friction Coefficient of 0.3.
- Click
 (Simulation workspace > Setup tab > Contacts panel > Global Contacts) to open the Global Contacts dialog.
 - In the Global Contact dialog, set the Default Friction Coefficient to 0.3.
- Click Generate to close the dialog and generate the contacts.
- Click
Suppress self contacts and contact between the pusher block and the roller.
In the Browser, hover over
 Contacts, then click
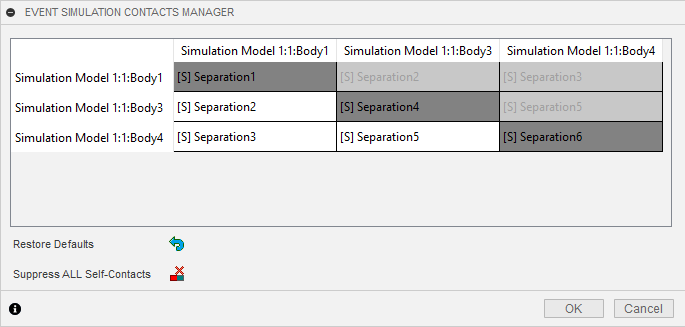
  Edit to open the Event Simulation Contacts Manager dialog. This displays a matrix of all the contact pairs between all the bodies in the model
 Note: There are three bodies in this model, so the matrix is 3x3. Since the relationships are symmetric, the cells in the upper half of the matrix cannot be selected.
Click
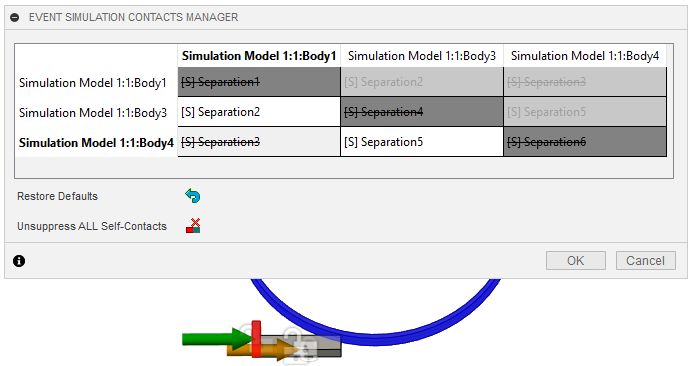
 Suppress ALL Self-Contacts
Notice that a line is drawn through each of the diagonal contacts that represent self-contact.
Click on each of the remaining three cells, to highlight in the canvas the bodies that each contact represents, then, for the contact representing the pusher body and the roller, right click in the cell and click Suppress Contact.

Click OK to close the Event Simulation Contacts Manager dialog, and suppress the selected contact pairs.
Review the Pre-check status and determine if the analysis is ready to run.
Click
 (Simulation workspace > Setup tab > Solve panel > Pre-check) to open the Pre-check dialog.
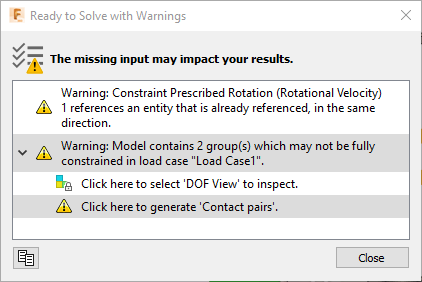
Fusion Simulation supports multiple implicit simulation study types which require that the model be fully constrained. That is, all parts of the model must be constrained so that there are no rigid modes. Event Simulation is an explicit technique that allows rigid body modes, and the nature of the contact constraints between parts typically restrains these modes. In this model, although the steel slab has a set of boundary conditions that allows it to move freely in the X-direction, the contact between the steel slab and the roller, and the contact between the pusher block and the steel slab, fully constrain this rigid body mode.
Note: These issues do not affect an explicit formulation as found in Event Simulation, so you can ignore them and solve the analysis.Click Close to close the precheck dialog.
Solve the analysis.
Click
 (Simulation workspace > Setup tab > Solve panel > Solve) to open the Solve dialog.
Confirm that the study is selected, then click Solve 1 Study.
When the analysis has completed, click Close to close the Job Status dialog.
Review the strain results.
Activity 6 summary
In this activity, you
- Generated contact pairs
- Reviewed the contact conditions and suppressed those that are unlikely to occur in this analysis
- Reviewed the set up pre-check to ensure the analysis was ready to solve
- Solved the analysis
- Reviewed the results.