Create splines in a sketch
Learn how to use the Fit Point Spline, Control Point Spline tools to create different types of splines in an active sketch in Fusion.
Fit Point Spline
Create a spline by placing fit points that define the path for the spline to follow.
- On the Sketch contextual tab, select Create > Spline > Fit Point Spline
 .
. - In the canvas, click to place the first end point of the spline.
- Click to place the next point for the spline to pass through.
- Continue placing points as needed.
- Complete the spline:
- Click the start point to create a closed sketch profile.
- Click the Check icon
 .
.
- Optional: Repeat steps 2-5 to create another spline.
- Press
Enterto complete the tool.
The splines display in the canvas.
Control Point Spline
Create a spline by placing control points that define the control frame that shapes the spline.
On the Sketch contextual tab, select Create > Spline > Control Point Spline
 .
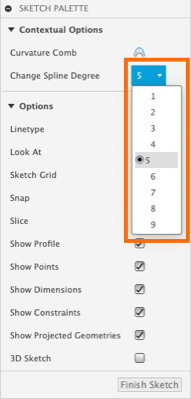
.Optional: In the Sketch Palette, select a Spline Degree type.
- Degree 5: Recommended for general modeling workflows.
 Degree 3: Recommended for use in the sculpt environment.
In the canvas, click to place the first end point of the spline.
Click to place the next point to shape the path of the spline.
Continue placing points to define the control frame.
Click the Check icon
to complete the spline.Optional: Repeat steps 2-5 to create another spline.
Press
Enterto complete the tool.
The splines display in the canvas.
Edit splines
Select the spline to display the curvature handles.
Drag the end points of a Curvature Handle to adjust the curvature of the spline.
Select the spline, right-click, then choose one of the following options:
- Open/Close Spline Curve (fit point splines only)
- Insert Spline Fit Point (fit point splines only)
- Insert Spline Control Point (control point splines only)
- Toggle Curvature Display
- In the Setup Curvature Display dialog, adjust the Density and Scale of the curvature comb display.
Optional: For a Fit Point Spline, select a Curvature Handle, right-click, then choose one of the following:
- Activate Curvature Handle
- Deactivate Curvature Handle
Optional: To change the number of degrees for a Control Point Spline, in the Sketch Palette, select an option from the Change Spline Degree drop-down.
Increase the degree to add more control points for finer control of the spline shape.
Decrease the degree to lower the number of control points. Note: This will alter the shape and simplify the curve.
Tips
- Click the end point of any line, arc, or spline and drag the pointer away from it to create a tangent constraint between the spline and other sketch geometry. The tangent constraint displays in the canvas once the spline is complete.
- As you move the pointer, object snap symbols display near the geometry when you snap to the sketch grid or other geometry in the design. If you snap to a specific point, the logical constraints are automatically added to the sketch.
- While the Move/Copy tool is activated, select any spline point to show or hide all of the spline manipulator handles so that you can edit them.
- After you use the Move/Copy tool to drag a spline point using the manipulator handles, the point remains on the plane.