Spline degree control reference
At a technical level, the degree of a spline describes the complexity of the equation used to describe its shape. A high-degree spline is defined by a high-degree equation, which results in a spline that is typically smoother than a lower-degree spline. The downside of high-degree splines is that more control points are required to define a given shape, so lower-degree splines tend to be easier to work with.
Degree options when you create a Control Point Spline
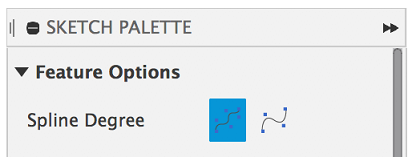
When you create a Control Point Spline in Fusion, you can choose from the two most commonly used spline degrees - Degree 5 ![]() or Degree 3
or Degree 3 ![]() . To choose a Spline Degree option, navigate to the Sketch Palette while the Control Point Spline tool is active.
. To choose a Spline Degree option, navigate to the Sketch Palette while the Control Point Spline tool is active.

Degree 5
 is the default option, and gives the best results for most scenarios. This provides an optimal balance of geometry smoothness and ease-of-use. Their high degree of smoothness makes degree 5 splines perfect for defining primary surfaces on your model, and building transition surfaces between existing geometry.
Degree 3
 splines usually require fewer control points, so can be easier to work with. They are technically less smooth than degree 5 splines - degree 5 splines ensure G4-continuity internal to the curve, while degree 3 splines only guarantee G2-continuity internally.

If you create a degree 3 spline with a large number of control points, you may observe some sharp turns/bumps in the curvature comb: these represent points on the curve that are not G3-continuous.
Degree options when you edit a Control Point Spline
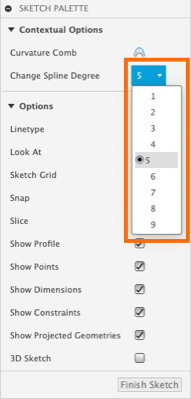
When you edit a sketch, you can use the Change Spline Degree to increase or decrease the number of control points on a Control Point Spline.
To change the degree, select a Control Point Spline in the canvas. Then in the Sketch Palette, choose an option from the Change Spline Degree drop-down.
- Increase the degree to add more control points for finer control of the spline shape.
- Decrease the degree to lower the number of control points.
