Custom Animation Transitions
Custom transitions provide a way to ensure transitions between motions only happens at the best timing, regardless of when a trigger is activated.
They can be created from the Maya Attribute Editor by selecting the arrow between two animation behaviors (Motion, Locomotion or SyncMotion).
You can take a look at the Animation Transitions Main Concepts for a detailed description of the interface
![]()
The Custom Animation Transition panel
When and why using / not using custom animation transitions?
Use custom transitions when
- You want to avoid blending by providing custom in-between motions clips animations (e.g. stand-to-walk, walk-to-run…)
- There are specific timing in your animations which will allow a better transitions AND you can allow the motion to run to reach this time after the Stop Trigger was activated
- To synchronize a specific motion (jumping over a river, final animation when reaching target...) with before or after a Locomotion Behavior
Do not use custom transitions when
- The blending quality will be overall the same whenever the transition happens (because a simple transition is just enough or the quality of your animations do not enable a nice transition)
- You do not want any lag between stop trigger activation and blending with the next motion (which is often the case with complex navigation behaviors)
How to setup custom animation transitions
This video explains the basics of the custom transitions User Interface and give an overview of how to build a simple stand => walk => stand transition setup
Using Custom Animation Transitions with Locomotion
It is also possible to create Custom Animation Transition between Locomotion Behaviors.
In this case, we will not add Custom Animation Transitions between each motion clip of the first Locomotion and each one of the second Locomotion, but just one which enable the feet to be synchronized (for example make sure transition happen when left foot is up, right one is down in each Locomotion Behavior).
See here for more details
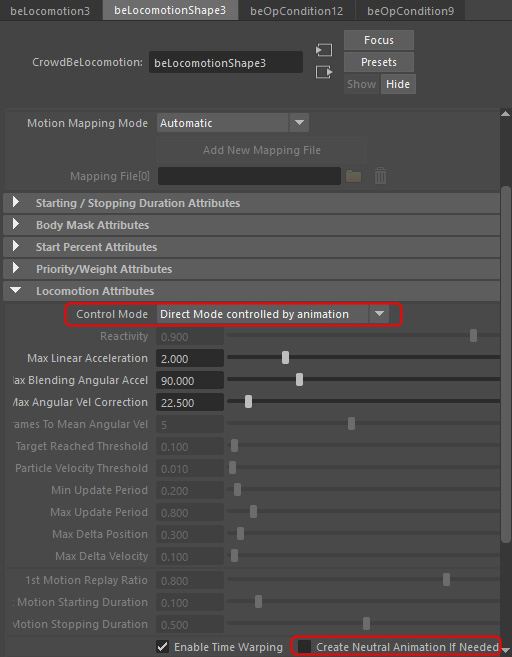
When using Locomotion Behaviors with Custom Animation Transitions, one must take care to set the following attributes on each Locomotion Behavior:
- Set Control Mode to "Direct Mode Controlled by Animation", this ensures the best possible navigation as it makes sure the character particle always sticks with the character even if the Locomotion does not exactly follow the Navigation results (to preserve a better animation)
- Uncheck "Create Neutral Animation if Needed" for Locomotion Behavior where the character will already be moving when they start (most likely anything except Stand), otherwise, if you feed only one walk motion for example, a fake stand motion will be created and both motions will be blended all the time which is not what you want
Then you need to determine how you will set the triggers for each Locomotion Behavior in your graph.
- For the "transition" Locomotions (stand-to-walk, walk-to-run...), that's easy, we just want them to be played once, so just set a TRUE stop trigger, as with Motion Behaviors
- For the other Locomotions (stand, walk, run...), you need to determine a range of speed for which each Locomotion would be the best and setup stop triggers accordingly. You should also add a Behavior Time trigger because you do not want to switch from one behavior to the following one too fast.
Another trick is to make sure that your triggers are not based on the same speed values, otherwise your character will keep going back-and-forth between behaviors. For example in the below screenshot, the Walk behavior will only stop when character speed is less than 0.4, but the Stand behavior will only stop if the speed is more than 0.5. This ensures that when you go to Stand, you do not have to switch to Walk at once.
Note that the used expression is "this.entityVelocity", because this will give you a 2D velocity, not taking into account the motion up-and-down deltas of the character pelvis for example.
![]()
Differences between Custom Animation Transitions and Triggers
When and how Custom Animation Transition happens?
Usually a behavior is executed until its stop trigger is activated. Then, for sequenced motion/locomotion behaviors, they keep being executed for a time determined by start/stop duration to allow blending (see graph on the Simple Transitions page)
The custom animation transitions add one more step. Once the stop trigger is activated, the first motion keep being played until a custom transition point is reached, then the blending is done and its duration is determined by the size of the transition bar, not by start/stop duration set on each behavior.
![]()
Graph showing the difference between Stop Trigger / Blending time when
using a Custom Animation Transition
Reducing lag between trigger activation and transition by setting multiple transitions
The above graph explains why when using Custom Animation Transitions, even if the Stop Trigger has been activated the Behavior can continue to be played.
In some cases, we do not care about this, but when dealing with timing sensitive behaviors (e.g. navigation) we may need to reduce this delay.
If there are multiple points in the animation where a transition could happen with good animation quality, it's possible to set multiple transition points.
For example in the following screenshot, 2 Custom Animation Transitions have been set, so there are two points in the s_Walk motion where transition could start, hence reducing the time between when Stop Trigger is activated and the transition actually starts.
Note that when a motion could transition anytime with another motion (typically between a stand and a stand-to-walk motion), instead of setting an infinity of Custom Animation Transitions, it is better to just not use Custom Animation Transitions and let a Simple Transition happen anytime.
![]()
Multiple transitions set for the same couple of motions
![]()
![]()
Because s_WalkShape is a looping motion, these transitions are actually
exactly the same
Fine-Tuning Custom Animation Transitions duration
When to change the transition duration?
When the blended animations match nearly perfectly, it is best to have the shortest possible transition.
However, when blending animations that don't match perfectly, it's preferable to increase the transition as long as possible in order to blend the difference over a longer period of time and make it less noticeable.
Mixing custom and simple transitions
For the same behavior with multiple transitions from/to other behaviors, it is also possible to use the simple blending based on start/stop duration for some behaviors (when no custom transition is set) and the custom transitions for others.
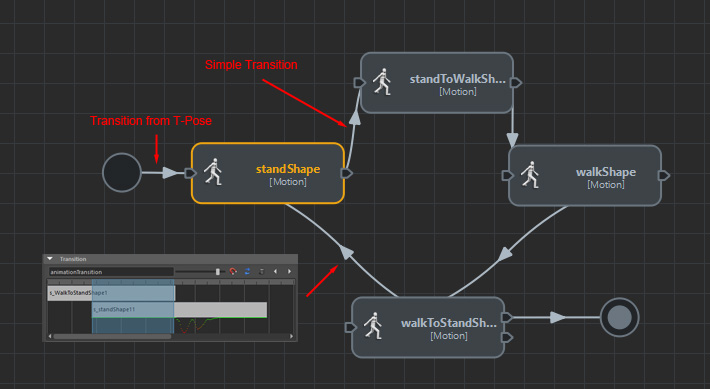
For example, in the following setup, standShape will
- Use a Simple Transition to standToWalk (which duration can be influenced by its stop duration attribute)
- Be used in a Custom Animation Transition from walkToStand
- Be used in a Simple Transition from the T-Pose at the beginning of the simulation (which duration can be set using its start duration attribute)
Note that the start/stop durations defined for Simple Transitions will have no effect at all during the Custom Animation Transition
Custom Animation Transitions For Behaviors with Multiple Motions
No need to synchronize each motion clip within a Locomotion Behavior
When creating Custom Animation Transitions with a Locomotion, there is no need to create a transition per motion inside this Locomotion Behavior.
Indeed, the Locomotion is a special behavior which already synchronize all the motion clips together (make sure the feet in contact with the ground are the same when blending) and rarely play only one motion but a blending of up to 3 motions instead.
So that's just enough to choose one motion inside this Locomotion Behavior and create the Custom Animation Transition based on this one. If the feet are correctly synchronized between this motion and the next one, they will also be correctly synchronized with all other motions within the Locomotion Behavior.
Obviously, you should not choose a standing rest motion as the main source for synchronizing your motion as there is usually not change in feet contacts in this kind of motions, therefore making it impossible to synchronize it with other motions like walk, run...
To choose which motion will be used as the reference, just right-click on the motion bar and choose one from the list.
![]()
If your Locomotion contains motions that are too different to ensure a Custom Animation Transition this way, it means that you need to split this Locomotion Behavior is several ones and add transitions between them (see above in this article)
The case of Motion Behavior with multiple motions
When a motion behavior include multiple motions, it is also possible to choose from which Motion you can can create transitions.
However, as for the Locomotion Behavior, whatever the motion you choose,
the transitions will be created for ALL motions in the Motion
Behavior.
It is currently not possible to create a custom transition for a
particular motion in the list.
To do so, use the Random Operator and create one Motion Behavior per Motion like in the screenshot below. It will enable you to customize the transition per pair of motions.
![]()