You can upload time series data via CSV for any data sets not in your live data connection.
You can upload any data you want to use in a report, workspace, or analytic in Info360 Insight. For example, data collected from field samples, rainfall data from an external weather service, salinity or ground water sampling information, etc.
Once you have imported the data following the steps below, it can be used just as live sensor data can. Info360 Insight will build data tables for the uploaded data just as it does for live data. See Data Sampling.
 Upload Sensors in Bulk with Static Data
To upload time series data
- Prepare your time series data CSV file. Format it as shown in this example file:
Example Time Series Sensor Data.csv
- Make sure the first column in your CSV file is in one of the following date-time formats:
- YYYY-MM-dd HH:mm:ss
- YYYY/MM/dd HH:mm:ss
- M/d/YY H:m
- MM/dd/YYYY HH:mm:ss
- The following columns should contain the Sensor ID in the first row.
- Do not include quotation marks or colons in your CSV file. Use underscores instead.
- File size should be maximum 20MB.
- Make sure the first column in your CSV file is in one of the following date-time formats:
- Go to Admin
 Sensor Configuration.
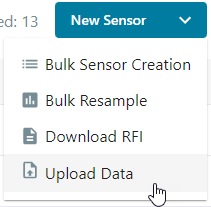
- Click on the drop-down arrow beside the New Sensor button and select Upload Data.

- Drag and drop your CSV file to begin the upload.
- Select the Time Zone your data is in.
- Click Upload Data.
-
If the sensors do not already exist, a new sensor will be created for each data set in the CSV.
You will need to open the new sensors and configure the sensor type, source unit, and location.
Sensors created in this way are considered virtual sensors and they have an interval of 300 seconds and a data source of Bulk Upload.