You can create a new workspace from scratch, as explained below, from a template, or using the Save As option in an existing workspace to duplicate it and modify.
To create a new workspace from scratch
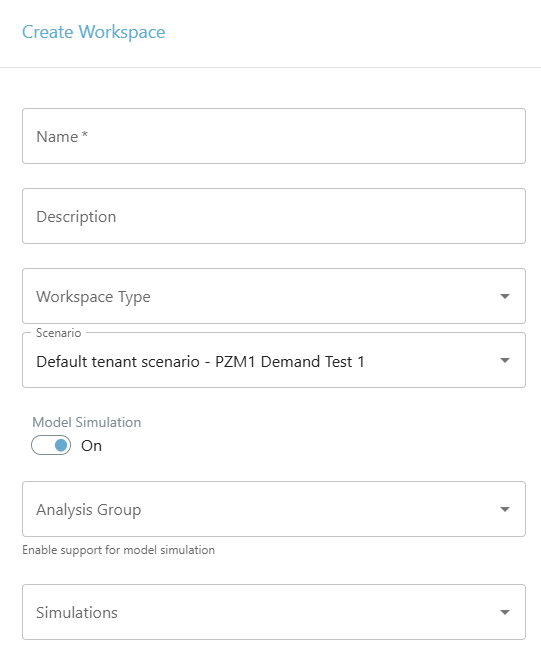
- Go to Workspaces and click Create Workspace.
- Select the Blank workspace option.
- Enter a name and description.
- Workspace Type: Select the category you want your workspace to show up in.
- If you have Machine Learning models available, you can select the scenario (schedule) to use for the workspace. Otherwise, leave this empty.
- Decide if you want to set a specific time range for the workspace. This workspace time range will apply to all the charts you include, unless you set a specific time range for a chart. If you don't select a workspace time range, each chart will start from the most recent data point and go backwards.
The Time Offset option allows you to specify how many days back you want the start date to be. For example, if you enter 7 days, the workspace time range will be for the last week and will be dynamic. This can be useful for regular check-ins on performance metrics.
- Click Create.
- Next, add components to your workspace using the Add Component button. Each component type has its own configuration settings. See the corresponding page for more information.
- Arrange and size your components.
- If you want to ensure you are always seeing the latest data in your workspace charts, click the drop-down arrow beside the refresh icon and set it to auto refresh every 5 minutes.

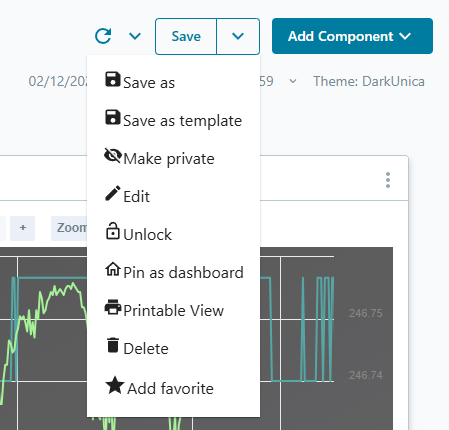
- Save your workspace. Any time you make a change to the workspace, remember to click Save at the top.
Create workspaces for examining InfoWaterPro Model Simulation results
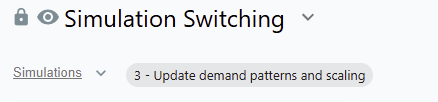
You may toggle simulations by using the drop-list on the left. If you switch a simulation, all dashlets in the workspace that referenced the existing simulation will be updated to reference the newly selected simulation.
Lock or unlock a workspace
By default, workspaces are locked upon creation. This means that non-Admin users are not able to modify the workspace. Admin users can edit all workspaces, locked or unlocked.
To lock or unlock a workspace, select the drop-down arrow beside Save and select Lock or Unlock.

Private workspaces
Enabling this option will hide the current workspace to all other viewers. This is a useful feature when you may be doing temporary testing or other operations that would clutter the workspace list for other viewers.
To make a workspace private, select the drop-down arrow beside Save and select Make Private.
Related links
You can add links to other related workspaces so you can easily navigate between them. Any related workspaces will be displayed together at the top of the list. You can right-click on a related workspace to open it in a new tab.

To add related links, select the drop-down arrow beside Save and select Edit.
Change chart themes
You can choose from a selection of color themes for your workspace charts. Click on 'Theme: Default' and choose the theme you want to apply.

You can also choose a theme for each chart by clicking on the three dot menu
 on the chart and then selecting 'Theme (Default)'.
Edit or Delete an existing workspace
- To edit a workspace, the workspace needs to be unlocked. Admins can unlock workspaces.
- To edit a workspace's name, select the drop-down arrow beside Save and select Edit.
- To delete a workspace, you must be an Admin or the owner of the workspace. Select the drop-down arrow beside Save and select Delete.