Multiple background images can be loaded in to act as a background to the design. Images can be loaded from a variety of standard image formats: .bmp, .jpg/.jpeg, .png, .wmf, .emf, .gif, and .tif/.tiff.
Loading Data
Images can be loaded from a file using the 'Images' option from the Site Ribbon. Alternatively you can use the Tree View to load the data by selecting 'Load Data' from the 'Images' node Right-Click menu.
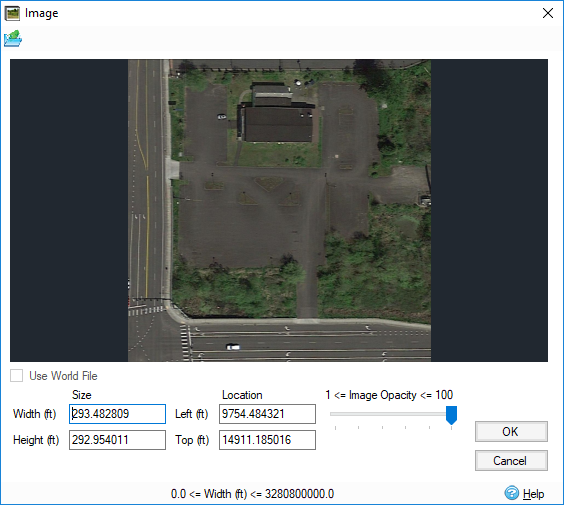
The first step will be to locate the Image you wish to load using the Open dialog. Once selected you will be presented with the Image Import form, which shows a preview of the image together with the location and dimension. These locations can be automatically populated via the use of a World File that is associated with the Image to provide Geo-referenced data.

Dimensions
Width - The width of the image when drawn on plan. By default this will be set to fill the current plan view.
Height - The height of the image when drawn on plan. By default this will be set to fill the current plan view.
Left - The left of the image when drawn on plan. By default this will be set to the left of the current view on Plan.
Top - The top of the image when drawn on plan. By default this will be set to the top of the current view on Plan.
Use World File
If a World Files is found when an image is loaded, its details will be used to populate the Size and Location fields in the image import dialog. The World File details will be used by default, however it is possible to overrule them by clearing this box and manually entering the values.
Opacity
Set the opacity of the image. This will allow to handle overlapping images as as well as making it easier to see CAD/GIS data if needed.
Viewing the Data
Once loaded, the image will be shown in the Tree View under the Images node. The filename is shown to make it easy to distinguish each file. It is possible to adjust the visibility of each file using the checkbox shown next to the Images name.
It is also possible to adjust the visibility of all of the images at once using its checkbox. This will have the effect of turning on/off all of the images as one for ease.
Editing an Image
To edit an individual image, highlight its node in the tree. This changes the mouse pointer to a four-pointed cursor
 that will allow you to drag and graphically manipulate the background image within the Plan View. The background can then be adjusted using the block grips or moved by click on and then dragging the image.
To stop editing an image, either click outside the image on the Plan or select another node in the Tree. In addition to graphically editing the image on the Plan, you can also perform other sets of operations via the right-click menu for the node via the Tree view:
Image Properties
The Image Import form opens to allow you to re-set the dimensions of the image.
Rotate Image - Rotate left/Right 90° - Selecting either option will rotate the image around its center.
Flip Image - Flip Vertically/Horizontally - Selecting either option will flip the image about the given axis.
Draw Order - Bring to Front/Send to Back - Adjust the draw order for the given image so that images are either drawn on top, or behind, other images.
Deleting Images
It is possible to remove all images by right-clicking the Images node on the Tree View and selecting Clear All.
Alternatively, each image can be removed individually by right-clicking the node for the image on the Tree View and selecting Clear.
Displaying an imported Image file in Windows Explorer
The location of an imported image file can be displayed by selecting the filename under the Images node in the Tree View. Right-click to show its menu, and select Open Containing Folder.