This topic outlines the approach taken by the Manhole Sizing Engine and how it can be controlled.
The auto size process is completed based on the Network Design specified for the phase as long as Manhole Sizing has been selected. Some aspects, such as applying an offset can only be used if turned on. However, the auto sizing engine will always look to ensure that a manhole is big enough for the incoming and outgoing connections connected to that manhole. The auto sizing engine will only size manhole's that are unlocked, this is determined by the Lock combo box on the manhole data form. If "Elevations " are locked the sizing will take place but the Invert Elevation will not change, if "All " is locked then no sizing or elevation changes will occur.
Sizing will begin at the head of the selected flow path, which acts as the mainline. Typically, the head of a flow path will normally be an Inflow (Area or Hydrograph). The sizing engine will then move down each Pipe/Channel in the network sizing the Pipe/Channel in turn. Once Pipe sizing has completed the engine will then look to size each manhole in the flow path. Note: Simple Junctions cannot be sized so will be ignored. This sizing is completed as follows:
- Finding the Connections for each Manhole - For each manhole the incoming and outgoing connections are found.
- Find the largest Incoming or Outgoing Connection from the Manhole
- To ensure the manhole is sized to fit the biggest connection diameter/width coming into/from the manhole based on the following rules:
- Closed connections only (Pipe, Box Culvert and Closed Custom Connection): The largest connection diameter/width is calculated.
- Combination of closed connections and open (Channels and Open Custom Connection): The maximum width for the channel is used.
- Only open connections (Channels and Open Custom Connection) - The manhole is automatically set to be a Simple Junction and then not sized.
- Notional connections (No Delay and Lagged Flow) - These are purely conceptual and have no dimensions, so will not be used in a sizing.
- Size the manhole based on the Connection Diameter/Width or Junction Depth
- Now the biggest connection diameter/width has been calculated, the manhole can be sized from this or its depth by comparing to the
Manhole Size Library
.
- The max connection width is compared to the diameter/width values in the Manhole Size Library to find the required manhole diameter and width. The value always rounds down (Note: This means even if the max connection diameter/width is set to the maximum, it will still map to the biggest value in the Manhole Size Library).
- The depth of the manhole is then compared to the Manhole Size Library to find the required manhole diameter and width. Note: The value always rounds down.
- The largest size from the two calculations is then considered going forwards.
- If Additional Sizing has been selected, the largest incoming diameter is compared against the Additional Sizing Connection parameter. If the incoming diameter exceeds this parameter the manhole size is then updated to the incoming diameter plus the Additional Sizing Diameter and Width values.
- If the manhole is circular and a width is specified the manhole will be changed to rectangular and vice versa, if the manhole is rectangular and no width has been specified the manhole is made circular.
- If Offset is needed - If the checkbox for Apply Offset was selected then the engine will attempt to offset any manhole that meets the following requirements:
- Access Required checkbox has been selected on the manhole - only available on circular manholes.
- There is exactly one incoming and one outgoing connection - this is so the engine can ensure there is enough space in the manhole.
- Both connections are Pipe Connections - again this is due to ensuring there is enough space which may not be possible when other connections are used.
- Intersection easting and northing have not been user edited - if they have been user edited the engine will avoid changing these.
- The angle between the two connections is greater than 90 degrees - this is to ensure there is enough space on both sides of the manhole for an offset to take place.
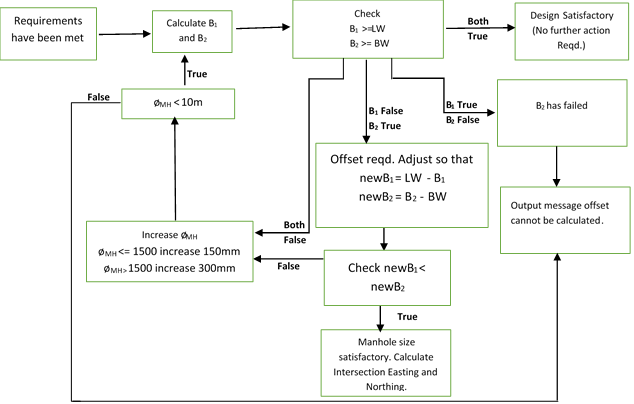
- Offset Calculated - If the above requirements are met then the offset is calculated and applied if possible. The offset is calculated using a routine seen in the flow chart below:
Key
ø MH Diameter of Manhole (mm)
ø OUT Maximum diameter/width of connection entering or exiting manhole (mm)
Ɵ Angle between incoming and outgoing connections
L Ladder Protrusion (mm)
LW Landing Width (from Manhole Size Library) (mm)
BW Benching Width (from Manhole Size Library) (mm)
B1 Base Landing Width (mm) = ø MH/2 - L - ø OUT/2
B 2 Base Benching Width (mm) = ø MH/2 - ø OUT/2Cos( Ɵ/2)

As seen by the above routine the offset either fails and outputs a message, does not require an offset as there is already enough space or calculates a new Intersection Easting and Northing as the offset has been successful.