The Meter Assignment dialog box allows you to assign and view which meters are currently assigned to which pipes and junctions. For example, suppose you want to see which meters are currently assigned to a junction. Simply, specify the Junction ID Field that contains the junction ID's in the meter shapefile layer, and click Select Junction ![]() to select a junction node. Once this is done, a dashed line will be shown from the junction to each meter that is currently assigned to the junction. This dialog box also allows you to re-assign which meters to different junction nodes.
to select a junction node. Once this is done, a dashed line will be shown from the junction to each meter that is currently assigned to the junction. This dialog box also allows you to re-assign which meters to different junction nodes.
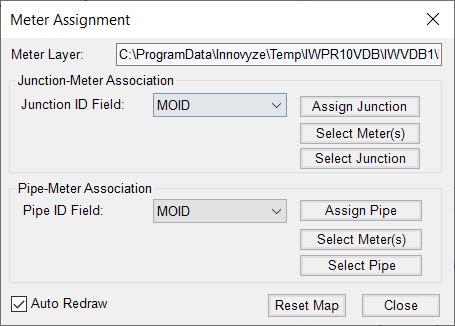
Junction-Meter Association
Meter Layer - Specify the shapefile layer that contains the meter data to be used during the allocation process.
Junction ID Field - Select the field in the meter shapefile that contains (or will contain) the junction ID's.
Assign Junction - Use Assign Junction
 button to assign meters to a selected junction. Once the command is initialized, first select the target junction, then select the meters that are to be assigned to the target junction.
Select Meter(s) - This button allows you to graphically see how meters are currently assigned. Simply click on Select Meter(s)
 button and select one or many meters in the system. Once selected, right-mouse click and select the Enter command. A red dashed line will now be shown, illustrating which facility/meter assignment.
Select Junction - Like the Select Meter(s)
button, use this button to see which meters are currently assigned to a specific junction node.
Pipe-Meter Association
Pipe ID Field - Select the field in the meter shapefile that contains (or will contain) the pipe ID's.
Assign Pipe - Use Assign Pipe
 button to assign meters to a selected pipe. Once the command is initialized, first select the target pipe, then select the meters that are to be assigned to the target junction.
Select Meter(s) - This button allows you to graphically see how meters are currently assigned. Simply click on Select Meter(s)
button and select one or many meters in the system. Once selected, right-mouse click and select the Enter command. A red-dashed line will now be shown, illustrating which facility/meter assignment.Select Pipe - Like the Select Meter(s)
button, use this button to see which meters are currently assigned to a specific pipe.
Auto Redraw - When you select (checked) Auto Redraw  checkbox, the map display will automatically be drawn for each display option selected.
Reset Map - Click on the Reset Map ![]() button and this function will return all graphics back to their default state, removing all dashed lines of connection from the H2OMAP display.
button and this function will return all graphics back to their default state, removing all dashed lines of connection from the H2OMAP display.
Close/Cancel - Close the dialog box.