Shared Views
With Shared Views, drawings can be shared straight from InfraWorks to the browser-hosted Autodesk Viewer platform.

Collaboration sits at the foundation of every successful infrastructure design project. With people working remotely more today than ever, teammates often encounter hiccups in their workflow. In this month’s Have You Tried article, we’ll take a closer look at the Shared Views feature in InfraWorks. Shared Views isn’t new, but if you have never used it, you might want to find out how it helps improve collaboration with project stakeholders.
Each month, we profile a useful feature or workflow in InfraWorks. We look across what's new, what's been around for a while, and identify features that could improve your experience with InfraWorks while making you and your team more productive.
Have a feature you want to see covered? Tell us about it in the comments.
What Is It?
With Shared Views, drawings can be shared straight from InfraWorks to the browser-hosted Autodesk Viewer platform. Using the Autodesk Viewer, teammates and clients can easily comment, measure, and markup on any section of the shared view allowing rapid exchange of ideas.
Why Should I Use It?
At its core, Shared Views removes silos in the design workflow. With Shared Views, designers can efficiently share ideas and progress by copying and sharing a link. This means that anyone with the link can view and comment on the shared view without needing to have Autodesk InfraWorks installed.
How to Share Views - Video Overview
How to Share Project Views
To use Shared Views, open the model you want to share a view of.
Click
 (Shared Views) in the Toolbar.
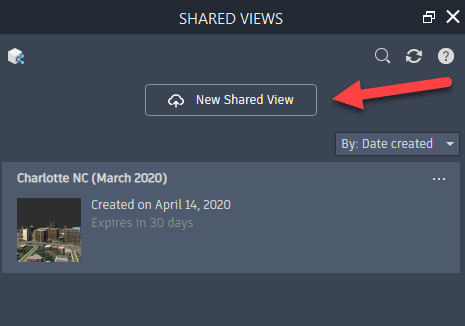
In the Shared Views list, click New Shared View.

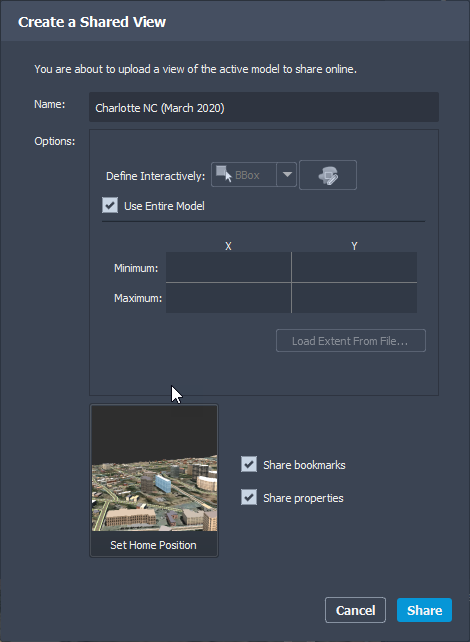
Enter a Name for your shared view.
Define the extent of the Shared View. You can use the entire model, define minimum and maximum X and Y coordinates, interactively define the extent in canvas, or load extents from a file.

- Navigate to the desired view and click Set Home Position, or accept the default.
- Choose whether to share bookmarks and properties in the shared view.
Bookmarks: If you checkmark this option, bookmarks from your model that are within the extent of the shared view will be included.
Properties: If you checkmark this option, properties of model assets within the shared view extent will be included. Anyone with access to your shared view will be able to review this data.
Note: The compressed file generated for a shared view cannot be larger that 2GB. A message displays if the shared view for the specified model extents is too large. To reduce the size of the generated file, modify the extents of the view in the model, and try creating the shared view again.
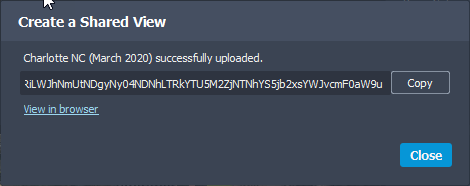
- Select Share to create a link to a visual representation of the model in Autodesk Viewer. A link to the shared view in Autodesk Viewer can be accessed using the panel as well.
A pop-up window provides the link to the shared view in Autodesk Viewer, making it easy for you to send the link to your collaborators. You can also copy the link by clicking the ellipses on your Shared View in the Shared View panel.

How to collaborate using Shared Views
Shared Views allows designers to share a snapshot of a selected portion of their InfraWorks model, enabling better collaboration with teammates and other project stakeholders. The exported shared view can then be accessed via a shareable link, and pasted into a browser. After opening it, stakeholders can add comments and markups to the drawing that will automatically sync to the Shared Views panel in InfraWorks.
It's important to note that an Autodesk account is not needed to access a shared view with the Autodesk Viewer.
To comment and markup an existing Shared View, follow these steps:
- After entering a Shared Views link in your address bar, the Autodesk Viewer will load the Shared Project View in your browser. Tip: You may want to bookmark the link for easy access to the shared view.
- While in the Autodesk Viewer, you can navigate the project by using the bottom toolbar. This toolbar features ‘Pan’, ‘Orbit’, and ‘Zoom’ navigation tools. When a navigation tool is selected, you can move around the project by clicking and holding your mouse while moving your cursor.
- The bottom toolbar also provides additional functions such as measurement tools, first-person views, and project markups.
- You can leave a comment in the Comment Panel on the right of the display. To comment on a Shared View you must have an Autodesk Account and be signed in. When you comment, the person who created the Shared View will receive an email notification.