To create a camera path from a component road
Select a component road to use as a camera path for your presentation. This way you can simulate driving along the selected component road, or apply offsets for customization.
Open the desired model.
Click Present/Share
 Present
 (Storyboard Creator).
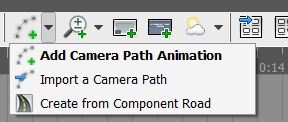
In Storyboard Creator, display the pull-down menu for Add Camera Path Animation, and select Create from Component Road.

When prompted, select the design road in the model.
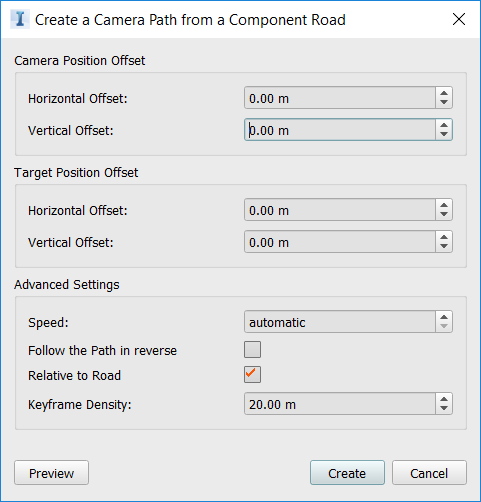
Adjust camera and target offsets for the camera path in the Create a Camera Path from a Component Road dialog.
Hover over individual fields in the dialog for a tooltip. Click Create when finished.

The Storyboard panel
 Paths and Animations row displays the selected road as a series of keyframes within your camera path.
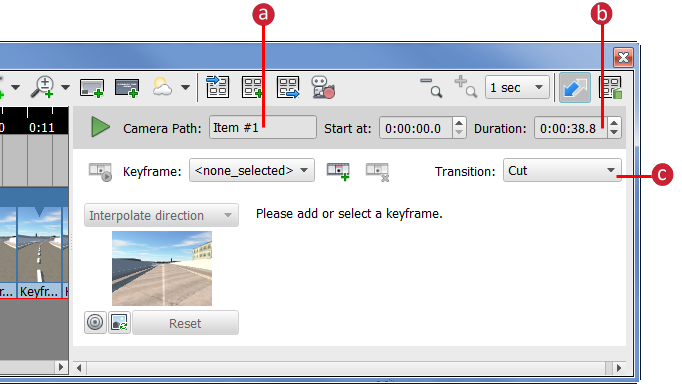
a. Enter a name for the camera path
b. Specify a duration for the camera path animation
c. Specify whether to cut or fade when entering and exiting the camera path frame.
If you specify Fade From Black or Fade From White, specify how long the transition should last.
Select a desired keyframe from the Keyframe list to specify its settings.

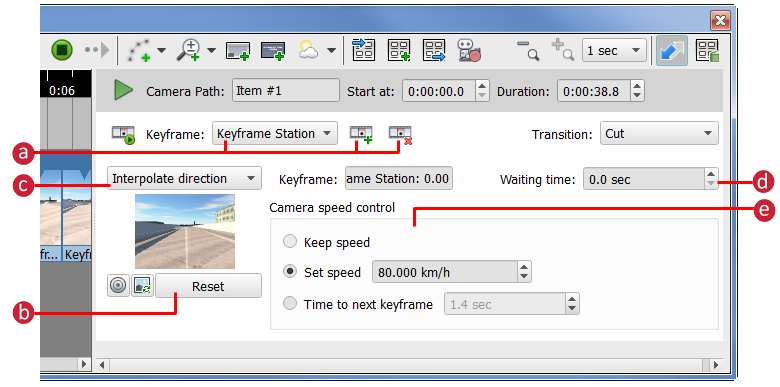
a. Select the desired keyframe. You can click
 to create a new keyframe or click
  to delete the selected keyframe.
b. Navigate in your model to the desired view for the selected keyframe then click Reset in the Storyboard Creator. This will set the current model view for the selected keyframe.
c. Specify the camera behavior for the selected keyframe.
- Look Along Path — Keeps the camera facing straight ahead.
- Interpolate Direction — Smooths out the transitions between different camera angles.
- Interpolate Focus Point — Remains focused on a central point as the camera moves.
d. Specify the Waiting Time in seconds.
e. In the Camera Speed Control group, specify how the camera is controlled between shots (keyframes) in the sequence. For details, see "Advanced Tips," below.
Repeat step 5 to specify settings for another keyframe.
To play the selected keyframe from its start, click
 .
.To play the entire camera path, do the following:
- Select the camera path header or an empty area within the camera path.
- Click the green play arrow at the top of the settings pane.
The keyframes of the camera path play in order, using transitions that you specified.
Advanced Tips
Camera speed options include the following:
- Keep Speed — Smooths out the transitions between shots when the distance varies greatly. The camera movement between shots that are geographically closer together is smoother than shots that are further apart. You can set Keep Speed for all but the initial shot in a sequence.
- Set Speed — Maintains the same speed, regardless of distance. Set a speed in kilometers per hour. Changing this setting affects the overall duration of the sequence.
- Set Time To Next Key Frame — Specifies the time you want it to take to get from the current shot to the next. You can vary the speed between each shot to exactly the amount of time desired. Changing this setting affects the overall duration of the sequence.
You can import a point data source to use as a camera path. Each point in the data source becomes a keyframe.