To add or modify a parcel or easement
You can draw a new parcel or easement, and then modify its shape and dimensions, including converting a straight-line edge to a curve for better alignment with an existing feature.
- Also see To add or modify a right of way.
- Model Explorer lists these three types (parcel, easement, right of way) under Area of Interest assets.
- You can import a SHP or SDF data source file containing data for the location and extents of existing parcels, easements, or right of ways.
To add a parcel or easement
Click Create
 Environment, then expand the drop-down menu.
Click the Area of Interest tool you want to use:
 Parcel,
  Easement.
The drawing cursor and Stack panel display.
Click to place each point for the parcel or easement. Double click to finish sketching, or choose End Draw from the right-click menu.
In-canvas guides will display length and area values. Click the blue length label to input values directly.
Note: Press Ctrl + L while sketching to lock a length value.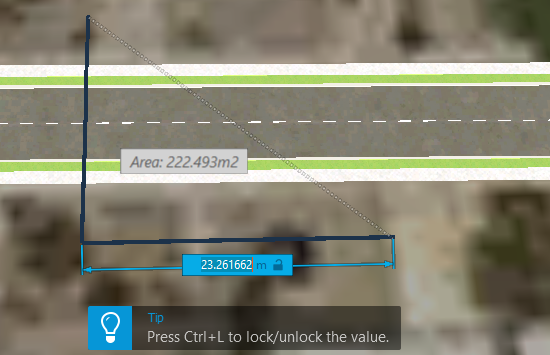 Note: Optional: Before drawing, check the Stack panel for the settings that you may want to change; for example, name or current feature display style.
To Modify a Parcel, Easement, or Right of Way
| Modification | Method |
|---|---|
| Adjust the length and direction of an Area of Interest edge-line. | In edit mode, select the asset and use gizmos; or enter new values in editable, coordinate fields. |
| Change a straight-line edge to a curve or a curve to a straight-line | Select the asset, choose Change to Curve (or Change to Line) from right-click context menu. |
| Change a vertex (point where two lines meet) to an arc, and adjust the radius of the arc | Select the asset, click the point, and choose Convert to Arc from right-click context menu. Adjust the radius using the floating bar or enter a value in the Radius field. 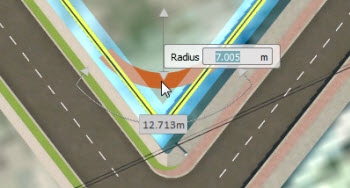 |
| Change an Area of Interest's asset type; for example, from Parcel to Right of Way | Select the asset, choose Change to type from the context menu. |
| Delete an Area of Interest | Select it and press the Delete key. |