To edit building facade styles
Users can edit the building blocks that form the appearance of each floor in a building facade. Specify desired facade styles, layouts, block sequences, floor arrangements, vertical and horizontal patterns, as well as roof decorations.
Click Manage
 Content
 (Style Palette).
Display the style to edit.
- On the left side of the Style Palette, click the Facade tab.
- Select a style catalog from the drop-down list.
Select the style and click
 to duplicate an existing style before you edit it.
It is a good idea to copy an existing style instead of changing the original version.
Double-click the new copy of the style to edit its properties.
You can also select the style and click
 .
.Add any desired Layouts.
A Layout is a version of a facade. For example, you might have one layout for the front of a building and a different layout for the sides and back. The front might have doors, while the sides do not. To add a layout, click Add, just to the right of the Layout list.
Select a layout to edit its Block Sequence.
A Block Sequence shows the elements of the layout, in the order in which they appear. For example, the Achilles style has a layout called Arrangement1. This arrangement has blocks called fl00, fl01, fl02+fl03. Each block is a pattern for a floor or a set of floors. The floors are listed in order, from the ground up.
Use a plus sign (+) if the pattern should appear at least one time and will be duplicated as many times as needed to create the facade height.
Use parentheses in combination with the plus sign to apply this to groups. For example (fl01, fl02)+ means that level 1 and level 2 appear at least once. If you raise the facade height, those two floors will be duplicated together.
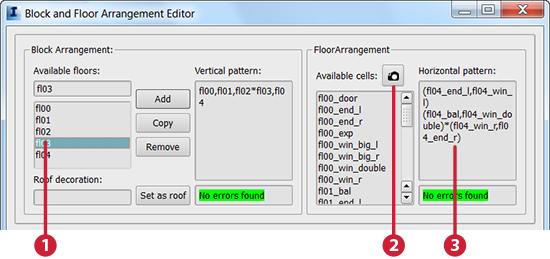
To edit a Block Sequence, double-click it to see the Block And Floor Arrangement Editor.

Available floors are listed on the left, in the Available Floors list. The current arrangement of floors appears in the Vertical Pattern list.
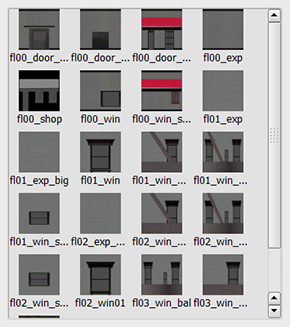
Click the Camera icon to see thumbnails of the available cells.

The current arrangement of cells for the selected floor appears in the Horizontal Pattern list.
To add a floor, click Add and name the new floor. Specify its position in the vertical pattern by manually editing the Vertical Pattern entry.
If you decide not to use that floor, delete it manually using the Delete or Backspace key. If the current style has a roof element, you can select it and click Set As Roof. If you decide you do not want to use the roof element, manually delete the entry from the Roof Decoration field.
To edit the horizontal cells in a floor, do the following:
- Select the floor to edit in the Available Floors list.
- Double-click in the Horizontal Pattern list to edit it.
- Place your cursor at the point where you want a new cell to appear.
- Click the Camera icon to view the thumbnails of the available cells. Determine the name of the cell to add. Click Camera again to hide the list.
- Double-click the cell name in the Available Cells list to add it to the Horizontal Pattern entry at your cursor position.
- The alert at the bottom of the list turns red if the syntax of the pattern is incorrect. This can happen if, for example, the commas are in the wrong place, or you have too many commas. Use the Delete and Backspace keys to correct the problem. As soon as you do, the alert turns green again.
To see how the vertical and horizontal elements are applied to buildings of different sizes, move the Width and Height sliders in the Preview area. Each tick on the Height slider is equivalent to one floor.
When you have finished editing the block and floor arrangements, click Close.