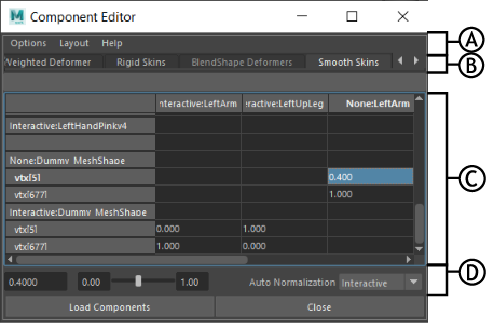
Component Editor: A. Component Editor menus, B. Component Editor tabs, C. Component Editor spreadsheet area, and D. Auto Normalization menu
Component Editor menus
Options
- Auto Update
-
Controls whether the editor automatically shows the components of the current selection, or you need to manually update the editor to show the current selection.
When Auto Update is off, click the Load Components button to update the editor with the current selection.
- Hide Zero Columns
-
When this item is turned on, all columns whose values are zero are hidden (for example, a joint with no influence on vertices in the Smooth Skins tab). When this item is turned off, columns whose values are zero are shown.
- Right Justify Headers
- When on (default), headers are right-justified. When off, headers are left-justified.
- Sort Alphabetically
-
When Sort Alphabetically is turned off, the items that make up the columns are displayed in their order in the hierarchy. When Sort Alphabetically is turned on, the items are sorted in alphabetical order.
- Show Path Name
-
Shows the path.
- Change Precision
-
Controls how many decimal places Maya shows for numbers in the cells.
- Remember This Layout
-
Creates a custom layout in the Component Editor. You are prompted to name this layout. A tab appears with the name and column layout you selected.
- Delete Current Layout
-
Deletes the current custom layout.
Layout
- Load Selected Components
-
This is the same as the Load Components button at the bottom of the window. Updates the editor with the current selection when Auto Update is off.
- Show Selected Columns
-
Removes all columns from the view, except those which are selected. This gives you a way to specify a set of influences/joints and view only them.
- Show Selected Objects
-
Allows you to view only those components which are influenced by a selected object.
For example, create a Smooth Skinned object and select all of its CVs. The Component Editor shows all the CVs. If you select one of the influences and select Show Selected Objects, you'll see only CVs for that influence; the others will be hidden.
- Show All Columns
-
Shows all columns.
Component Editor tabs
- Polygons
-
Lists component data of polygonal vertices, including color or normal data in world space coordinates. If color or normal data are not shared at the vertex level, the column displays the word UnShared. These unshared values can be viewed and edited from the AdvPolygons tab.
- AdvPolygons
-
Lists vertex face component data, including color and normal values for the vertex face.
- Weighted Deformer
-
Lists component data of CVs, vertices, or lattice points influenced by cluster deformers (cluster weights).
- Rigid Skins
-
Lists component data of CVs, vertices, or lattice points bound to a skeleton’s joints by rigid skinning (joint cluster weights).
- BlendShape Deformers
-
Lists component data of CVs, vertices, or lattice points influenced by a target object.
- Smooth Skins
-
Lists component data of CVs, vertices, or lattice points bound to a skeleton’s joints by smooth skinning (skin cluster weights).
- Springs
-
Lists component data for springs, including stiffness and damping data.
- Particles
-
Lists component data for particles, including color or velocity data.
Component Editor spreadsheet area
- Each component is a row, and each value or influence on the component is a column.
- Click, shift-click, or drag across a cell, column, or row to select it.
- Type a value to enter it in all selected cells.
Auto Normalization menu
| Value | Function |
|---|---|
| None |
Turns off smooth skin weight normalization. |
| Interactive | When on, Maya normalizes skin weight values as you add or remove influences, and as you paint skin weights. |
| Post |
Selecting this mode lets you paint or change weights without affecting the weights for other influences, and still have the skin normalization occur when you deform the mesh. |
|
Note: The
Auto Normalization menu shows no value if nothing is selected, or the selection does not involve a skinCluster node as the
Auto Normalization menu value is driven by skinCluster nodes.
For more information about these settings, see skinCluster and Set Normalization mode and normalize weights. |
|