Before drawing joints or a joint chain, you first need a model in which to place them. For information on creating models, see NURBS Modeling or Polygonal Modeling.
To set the Joint Tool settings
- In the
Rigging menu set (press F3), select
Skeleton > Create Joints >
 .
.
The Joint Tool settings panel appears.
- Adjust the Joint Tool settings as desired.
To create a joint or joint chain
- In the Rigging menu set (press F3), select Skeleton > Create Joints.
- In a view, click where you want to start your joint chain.
- Click again in the model where you want to place the next joint in the joint chain.
A bone appears between the first and second joints.
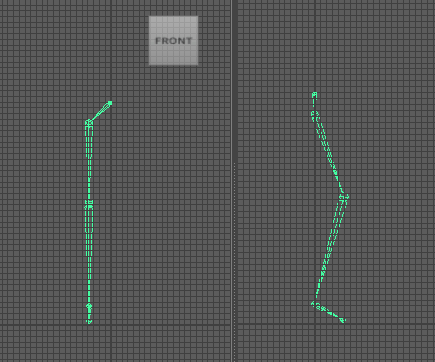
In this example, joints are created using the Front and Side orthographic views
Tip: Middle-click and drag to move the last placed joint. - Continue clicking in the view until you create all the joints for your joint chain.
- Press Enter to complete your joint chain.
- Optional: Select the joints connected to the center joint, and duplicate them (Ctrl +
D) to create a second limb.
In this example, the joints are duplicated and dragged next to the first chain
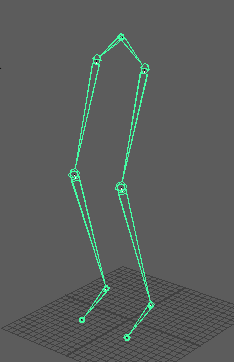
The result in the Perspective view: a pair of legs
To create a joint or joint chain that is automatically centered in the model
- Click the
Snap to Projected Center icon
 on the
Status Line to enable centering mode.
on the
Status Line to enable centering mode.
- In the Rigging menu set (press F3), select Skeleton > Create Joints.
- In a view, click on the location in your model where you want to create a joint.
The joint is automatically centered in the model.Note: If your model has multiple mesh layers, centering mode minimizes displacement and places the joint in the center of the layers.
- If desired, use the
Move Tool to re-position the joint.
The joint is dynamically centered in its new position.
- Click again in the model where you want to create the next joint in your joint chain.
A bone appears between the first and second joints and the second joint is also centered in the model.
- Continue clicking in the view until you create all the joints for your joint chain.
- Press Enter to complete your joint chain.