The Pose Editor is where you can create pose space deformations for skinned characters and save them as blend shapes. It provides a pose interpolation system that reads joint transformations in order to drive blend shape weights.
For more information on using the Pose Editor, see Create pose space deformations.
- In the
Sculpting shelf, click the
 icon.
icon.
- In the main menu bar:
- In the Modeling, Rigging, and Animation menu sets:
- In a panel:
To open the Pose Editor:
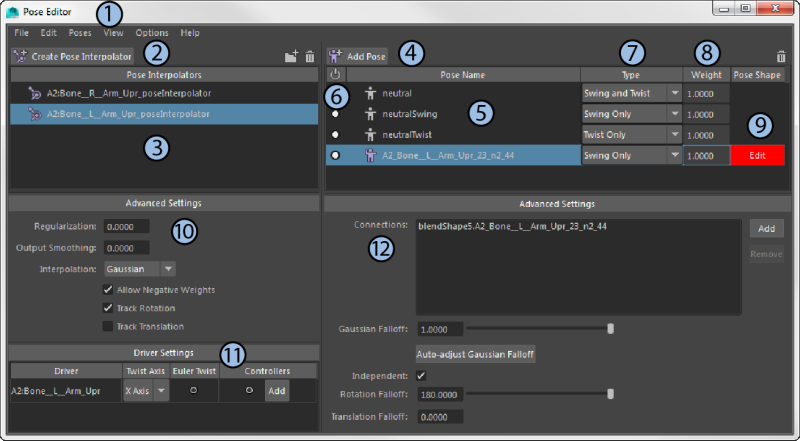
See the table below this image for information on each part of the Pose Editor:
|
Adjust the Pose Editor layout |
You can adjust the layout of the Pose panel:
|
|
1 - Menu commands |
See below for a list of all menu commands in the Pose Editor. |
|
2 - Create Pose Interpolator |
Select a skinned character's joint you want to track for pose interpolation and click this icon to create a Pose Interpolator (PI) node. You can also right-click in an empty area of the Pose Editor and choose Create Pose Interpolator. If you want to set options before creating the Pose Interpolator node, choose
>
|
|
3 - Pose Interpolators panel |
Lists the Pose Interpolator nodes you have created for the joints on a character's skin mesh. Select a Pose Interpolator node to display all poses created for this node in the Poses panel on the right. By default, the PI node name is the joint name with a "_poseInterpolator" suffix. Right-click a Pose Interpolator node and choose Rename to give it a new name. Drag and drop the Pose Interpolator nodes in the tree to change their order. You can also drag one Pose Interpolator node and drop it onto another one to group them, or drag a Pose Interpolator node into an empty area to remove it from the group. Right-click a Pose Interpolator node name to open a contextual menu with these commands: Select Drivers, Show Advanced Settings, Show Driver Settings, Attributes (opens the Attribute Editor for the pose interpolator), Export, Group, Mirror, Rename, and Delete. Group
Click the
Delete
|
|
4 - Add Pose |
Rotate and/or move the joint with an associated Pose Interpolator node to the desired pose you want to track. Then select the Pose Interpolator node and click this button to create a pose using the automatic settings. Poses have associated corrective blend shapes that you create in order to deform the skin mesh. The offsets of vertices from the skin in its original state are saved in each pose.
The new pose's Weight is set to 1 and its Edit button is automatically activated (turns red) so that you can immediately deform the skin mesh for this corrective shape. You can also choose
>
|
|
5 - Pose panel/Pose Name |
Poses created for the selected Pose Interpolator (PI) node are displayed in this panel. By default, the pose name will be the driverName_rx_ry_rz, where driverName is the name of the joint and rx/ry/rz are the rotation values of the pose. Right-click a pose name and choose Rename to give it a new name. Right-click a pose name to open a contextual menu with these commands: Go to Pose, Update Pose, Auto-adjust Gaussian Falloff if Gaussian is selected as the Interpolation in the Advanced Settings, Edit, Duplicate Pose Shape, Update Pose Shape, Attributes (opens the Attribute Editor for the pose), Show Advanced Settings, Export, Mirror, Rename, and Delete. Click the
Delete
|
|
6 - Active/Not Active |
Click the circle to toggle the activation of the effect of the poses on the character's skin mesh. You can also select multiple items and click the circle for one of them to toggle the active state for all of them. Weighting and editing are disabled when the pose is not active. |
|
7 - Type |
Type of pose: Swing and Twist, Swing Only, or Twist Only - see Add Pose Options. |
|
8 - Weight |
The influence of this pose on the skin mesh. Drag the slider to set the weight (influence) of that pose to a value between 0 (no influence) and 1 (100% influence), or enter a value in the Weight text box. When you rotate the joint, the weight value of the poses will update from 0 to 1 depending on how close the joint is to the stored pose. |
|
9 - Edit |
Click the Edit button, or right-click a pose name and select Edit, to enter edit mode for this pose. Modify the skin mesh with the Sculpting tools, or select components on the skin mesh and modify them with the Move, Rotate, and Scale tools. When you're done, click the Edit button again to save your changes to this pose and exit Edit mode. You can enter Edit mode for only one pose at a time and its Weight value must not be 0. |
|
10 - Advanced Settings (left side) |
Lets you control the interpolation of the poses. This panel is displayed when you select or right-click a Pose name and choose Show Advanced Settings. See below for more information. |
|
11 - Driver Settings |
Lets you edit joint for the selected pose interpolator. This panel is displayed when you select or right-click a Pose Interpolator node name and choose Show Driver Settings. See below for more information. |
|
12 - Advanced Settings (right side) |
Displays blend shapes connected to a selected pose, and lets you adjust the interpolation falloff. This panel is displayed when you select or right-click a Pose name and choose Show Advanced Settings. See below for more information. |
 icon in this panel, or right-click a Pose Interpolator node name and select
Pose Editor Menu Commands
As with other menus in Maya, you can click on a menu's dotted lines to detach it from the menu bar, and middle-click a menu name to repeat the last command you chose from it.
File menu
- Import imports a Pose Interpolator (*.pose) file - see Import and export pose interpolators.
- Export All exports all Pose Interpolator nodes, including their poses, shown in the Pose Editor in a (*.pose) file - see
Import and export pose interpolators.
Any pose shapes associated to the pose interpolator's poses are saved in shape (*.shp) files (see Import and export blend shapes) in the same directory as the .pose file with a matching prefix.
- Export Selection exports only the selected Pose Interpolator nodes or poses (along with their pose interpolators) in a *.pose file - see Import and export pose interpolators.
Edit menu
- Group creates a group with the selected Pose Interpolator nodes. If nothing is selected, it creates an empty group. You can also press Ctrl+G or click the
Group icon
 . See
Create groups of target shapes or blend shape deformers for gerneral information.
. See
Create groups of target shapes or blend shape deformers for gerneral information.
Poses menu
- Create Pose Interpolator creates a Pose Interpolator node for the selected joint, the same as clicking the
Create Pose Interpolator button.
Select
 to select whether or not to use Neutral poses for the Pose Interpolator you will create. For best results, you should select this option because a neutral pose ensures that no other poses added to this Pose Interpolator node will be activated when the joint is at this neutral pose. However, if you're working with joints that driven by controllers, you don't want to create the neutral poses immediately - see
Use controller-driven joints with pose space deformations for more information.
to select whether or not to use Neutral poses for the Pose Interpolator you will create. For best results, you should select this option because a neutral pose ensures that no other poses added to this Pose Interpolator node will be activated when the joint is at this neutral pose. However, if you're working with joints that driven by controllers, you don't want to create the neutral poses immediately - see
Use controller-driven joints with pose space deformations for more information.
- Add Pose creates a pose for the selected Pose Interpolator (PI) node, the same as clicking the
Add Pose button.
Select
to open
Add Pose Options where you can select the Pose Type (Swing, Swing and Twist, or Twist).
- Add Neutral Poses creates the three neutral poses for the selected Pose Interpolator (PI) node using the current joint's orientation: neutral, neutralSwing, and neutralTwist. See Use controller-driven joints with pose space deformations for more information.
- Update Pose: If you updated a pose by rotating the joint to a new orientation, choose this command. Updating a pose changes where the pose will be fully activated. Note that this does not change the name of pose, so if the pose has rotation values in the name, they will not be updated. Also, if you created a blend shape for the pose, the shape may need to be updated to work with the new pose.
Select
to select whether or not to Rename the pose.
- Mirror creates a mirror version of the selected pose interpolators or poses - see
Mirror pose interpolators.
Select
to open the Mirror Options to set the symmetry axis.
View menu
- Default shows the default layout of the Pose Editor that includes only the Pose Interpolators and Poses panels.
- Advanced shows additional panels in the Pose Editor's layout: the Driver Settings and Advanced Settings panels, described below.
Options menu
- Show full pose names toggles the display of the complete and longer name of the poses in the Poses panel. The full pose names include the name of the associated Pose Interpolator node as a prefix.
Advanced Settings (left side)
-
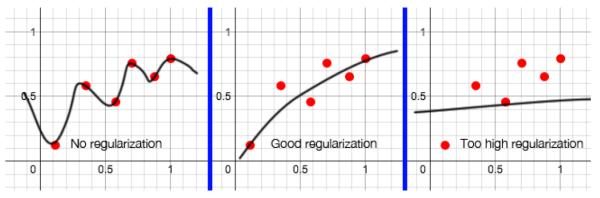
Regularization: Since the Pose Editor uses a linear regression curve-fitting algorithm, there are cases when the interpolation between poses is too “jaggy” or undesirable. This can sometimes occur with a high amount of poses. Increasing this value can smooth out this interpolation. A good regularization value is usually somewhere between 0.01 and 1.0.
- Output Smoothing: Remaps the output weights to a smooth interpolation. This is useful with Linear interpolations because it give you the stability of a linear interpolation with the smoothness of a Gaussian falloff.
- Interpolation: Modifies the falloff interpolation between poses. Select the interpolation type for the smoothing: either Linear or Gaussian. Gaussian tends to give smoother results, while Linear can sometimes give more predictable results. If you select Gaussian, you can set the Gaussian Falloff in the Advanced Settings panel on the right.
- Allow Negative Weights: Pose weights may be solved to negative values or values greater than 1.0. This is the default because it provides the smoothest interpolation. However, if you want to prevent having negative values, turn off this option. This may cause sharp steps in the output because negative values will be clamped.
- Track Rotation: When this is on, the orientation of the joint is used when solving the pose.
- Track Translation: When this is on, the translation of the joint is used when solving the pose.
Driver Settings
- Driver: Name of the joint driving the pose for the selected Pose Interpolator node. You can quickly select this joint by right-clicking on the Pose Interpolator node name and choosing Select Driver. If this joint is driven by a controller, see Use controller-driven joints with pose space deformations for information about defining its attributes.
- Twist Axis: To calculate the driver joint twist properly, the Pose Interpolator node needs to know which axis is defined as the twist axis: X, Y, or Z. This is the X-axis by default.
- Euler Twist: If this option is on, the joint's rotation is calculated in Euler Twist mode. This is an alternate method of evaluating the twist component of a Pose Interpolator node. By default, the twist component stays local to the transform(s) driving the Pose Interpolator node. However, this can lead to undesirable behavior if you want the twist to remain relative to the rotation-order-dependent Euler twist axis. For example, sometimes you want a wrist to twist around the axis of the forearm: by default, the twist axis travels with the wrist joint, which would cause poses to not evaluate the way you want. If you activate Euler Twist, the twist is evaluated from the Euler value and the rotation order can be used to control the twist axis.
- Controllers: Lets you add the driving attributes of controllers that drive the joint. Click Add to open a window in which you can add the controller's driving attributes - see Use controller-driven joints with pose space deformations for information on how to do this.
Advanced Settings (right side)
- Connections: Displays the pose shapes connected to the selected pose. Select a pose shape and click Remove to remove the association between this pose shape and the pose. Click Add to open the Add Pose Shape Connection window, which helps you select a connection based on its blend shape and target. See Add Pose Shape Connection window.
- Gaussian Falloff: Select
Gaussian as the
Interpolation method in the Advanced Settings in the left panel to make this option available. If a pose is activating when you don’t want it to, you can adjust the kernel falloff. Calculating the kernel falloff will automatically adjust the Gaussian falloff of the selected pose to the closest other pose. This option lets you manually control the kernel falloff in Gaussian interpolation mode. This can reduce or increase the area of effect of a pose in relation to other poses.
- If a pose output weight is getting into the extreme negatives or significantly higher than 1, it usually means that either the inputs are outside of the saved pose range or the Gaussian kernel falloffs are too big. To resolve this, you can either add a new pose at that location to better inform the system or select the pose and click Auto-adjust Gaussian Falloff.
- If there is a lot of “wobbliness” between poses, you can either click Auto-adjust Gaussian Falloff or increase the Regularization to something like 0.001. Increasing regularization may prevent poses from fully activating, but the result will generally be smoother.
- Auto-adjust Gaussian Falloff automatically adjusts the falloff of the selected pose to the closest other pose.
- Independent: Sets whether the pose is calculated independently from the other poses of the selected Pose Interpolator node. This is useful if you want a pose to be activated regardless of other poses in the system. When a pose is independent, it is removed from the normalization calculations with the other poses, and can be adjusted only by its falloff. The falloff changes the area of influence of the pose.
- Rotation Falloff: The rotation area of influence of the pose. This affects only independent poses.
- Translation Falloff: The translation area of influence of the pose. This affects only independent poses.