Applying deformer falloffs
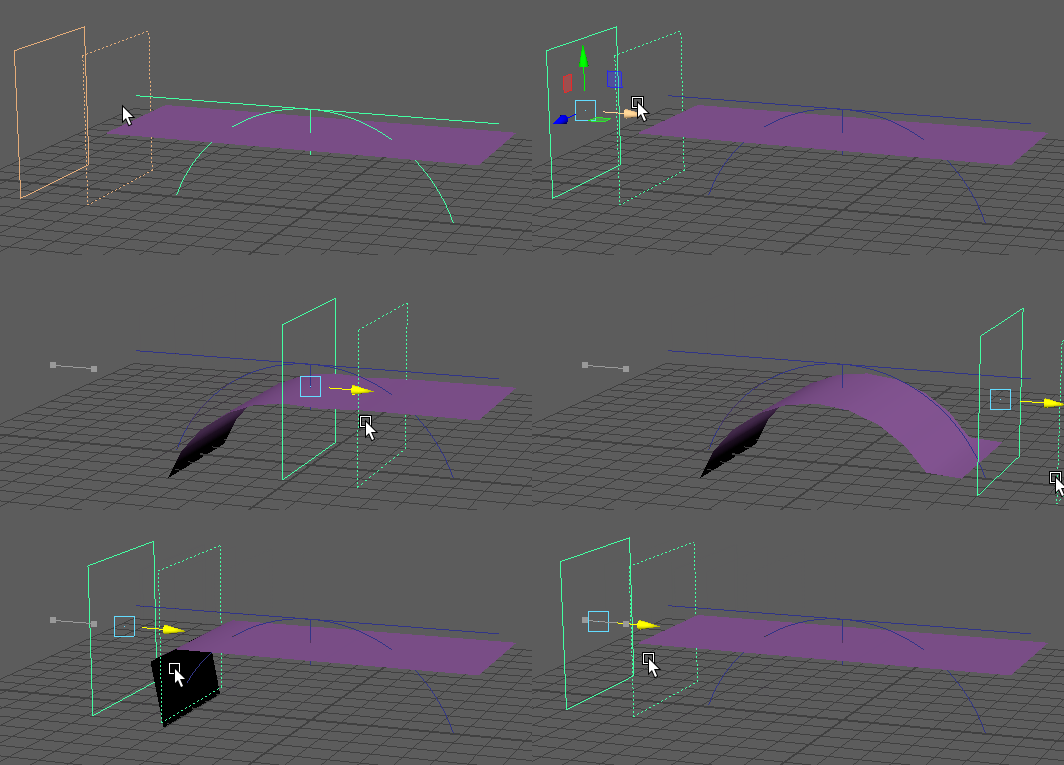
- Primitive falloff: Use falloff objects to control effects
-
- Select geometry and add a deformer.
- In the Attribute Editor, select the <deformername> tab and expand the Deformer Attributes widget.
- Right-click the
Component Tag column, and select
.
Note: You can still apply Falloff effects for deformers if you do not have any Component Tags assigned to the geometry. Component Tags let you create sub-sections of geometry. See Assign Component Tags to geometry.
- In the <deformername>tab, right-click the Component Tag Expression Editor again, and select Select Falloff. A wireframe representing the deformer falloff appears in the scene. (If the falloff object is not visible, it may be hidden inside the geometry: select Primitive Falloff in the Outliner .)
- Select the PrimitiveFalloff tab in the Attribute Editor, and edit the falloff Ramp in
Primitive Falloff Attribute settings. Switch the falloff object for either a sphere or a plane in the ramp
Primitive menu.
Note: You can choose either a sphere or a plane as the falloff object. The shape type governs the behavior of the falloff. Choose Sphere (B) to have the falloff occur from the center of the sphere to its outer edge, and choose Plane (A) if you want a two-dimensional falloff effect. When using a plane falloff object, the falloff effect occurs in the space between the two planes.
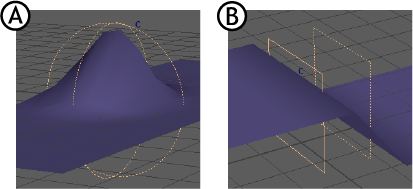
If you prefer to use your own geometry as a falloff object, see Proximity Falloff, below.
See Primitive Falloff attributes for more information on the Attribute Editor settings for this falloff.
- Uniform falloff: Create consistent falloff effects
- The Uniform falloff is a simple falloff that lets you apply a even falloff effect to geometry.
-
- Select geometry and add a deformer.
- In the Attribute Editor, select the <defomername> tab and expand the Deformer Attributes widget.
- Right-click the
Component Tag column, and select
.
Note: You can still apply Falloff effects for deformers if you do not have any Component Tags assigned to the geometry. Component Tags let you create sub-sections of geometry. See Assign Component Tags to geometry.
- Right-click the Falloff and choose Select Falloff. A new UniformFalloff1 tab is added to the Attribute Editor.
- In the UniformFalloff1 tab, expand the Extra Attributes section to expose the Uniform Weight field.
- Enter a value for the deformation falloff in the Uniform Weight field.
A weight value of 1.00 means 100% deformation, that is, there is full deformation and no falloff effect, while a weight value of 0 erases the deformation effect. Increasing the value over 1.0 amplifies the deformation.
- Blend falloff: Mixing deformer weighting
- Use the Blend falloff when you want to combine falloff effects on your geometry.
Note: You must have multiple deformers applied to the same geometry to use this feature.
-
- Select geometry and in the Attribute Editor, select the principal deformer tab and expand the Deformer Attributes widget.
- Right-click the
Component Tag column, and select
.
Note: You can still apply Falloff effects for deformers if you do not have any Component Tags assigned to the geometry. Component Tags let you create sub-sections of geometry. See Assign Component Tags to geometry.
- In the Falloff column again, right-click Blend Falloff and choose Select Falloff. The Attribute Editor switches to the Blend Falloff 1 tab.
- In the
Blend Falloff widget in the Attribute Editor, click the
Add New Assignment
 icon above the
Blend Falloff Attributes widget. A new row is added.
- Right-click in the name field and choose a falloff you wish to blend from the right-click menu. Be careful to choose an existing falloff in the scene and not create a new falloff effect.
- Keep adding falloffs from the scene in new rows.
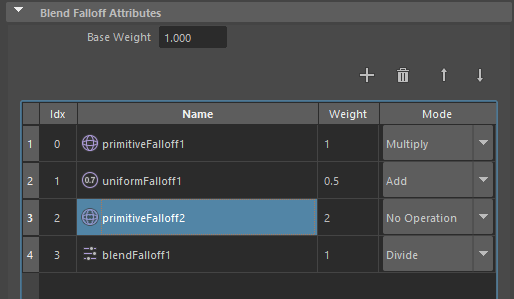
- Select how the falloffs are blended using the
Mode menus for each row:
- You can multiply, divide, add, subtract, override and max each falloff
- Right-click the Weight field to create a new expression or texture, lock or key the attribute.
See Blend Falloff attributes topic for more information.
Note: You can reorder the falloffs in the Blend Falloff Attributes table, by selecting a row and using the move up or move down icons above the table. The last falloff in the table has precedence over the falloffs in the table before it, as it is the last falloff added. - Proximity Falloff: Controlling effects with custom geometry
-
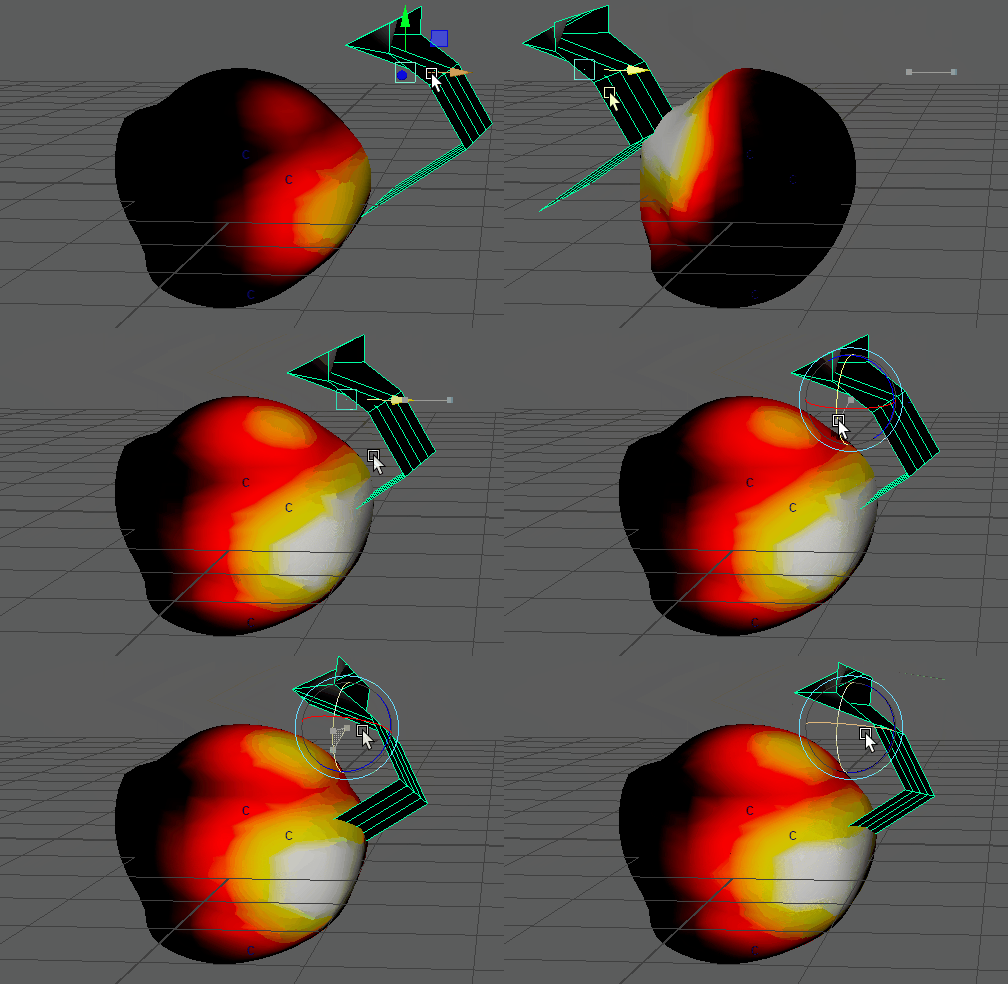
A Proximity Falloff with Weights Visualization active
- Use the Proximity Falloff to use proximity of geometry as a method to create the falloff effect.
-
- Select geometry and add a deformer.
- In the Attribute Editor, select the <deformername> tab and expand the Deformer Attributes widget.
- Right-click the Component Tag column, and select .
- Open the Node Editor, locate the <shape1> node of the object you want to use as a deformation influence and the ProximityFalloff1 node.
- Connect the World Mesh 0 of the influence object to the Proximity Geometry object the ProximityFalloff node.
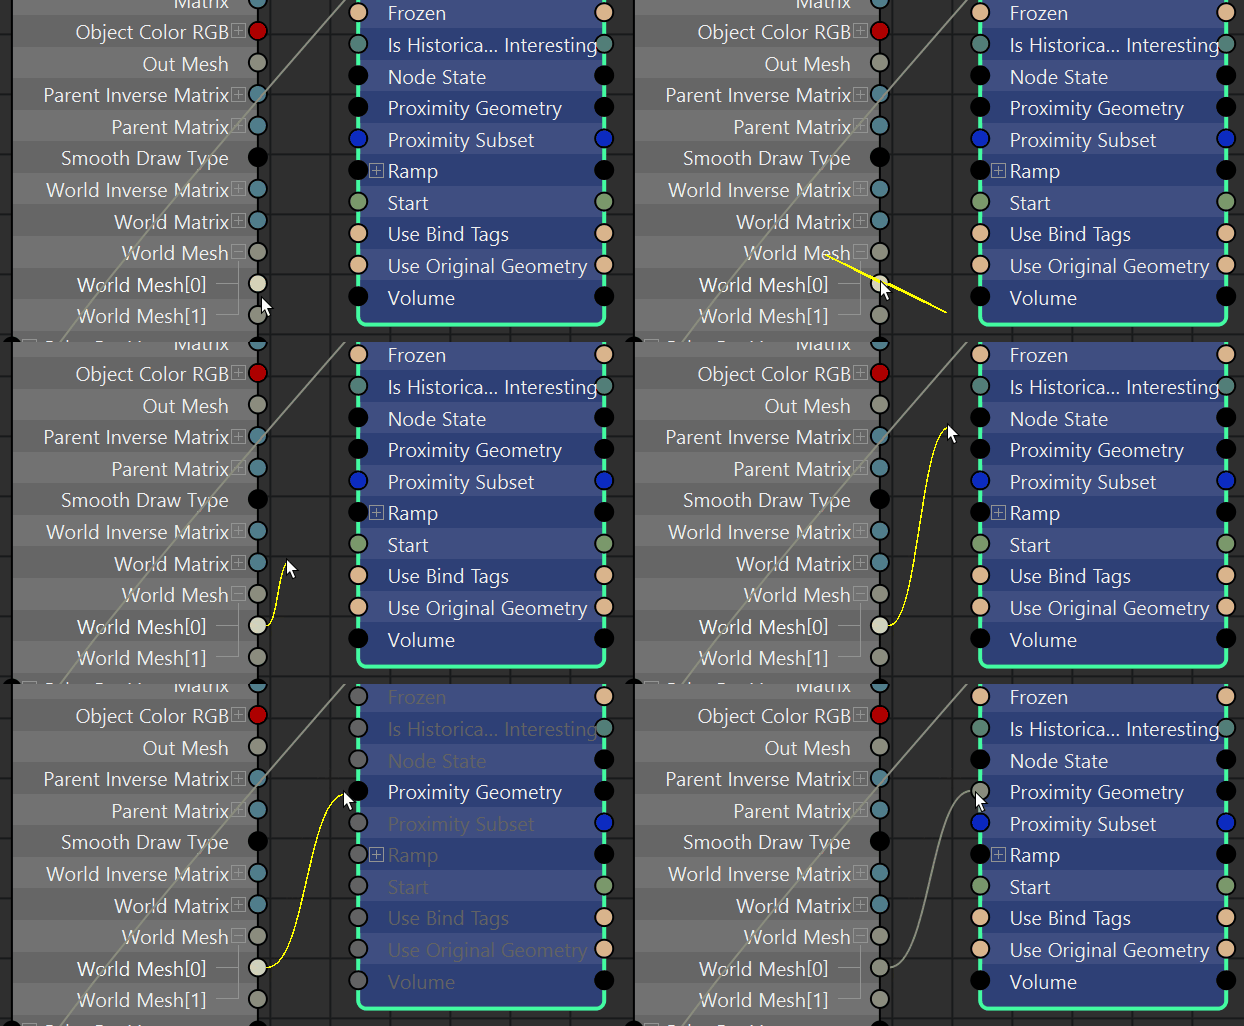
- (optional) To view the influence of the Falloff Object, right-click the Falloff tab in the Attribute Editor, and select Weights Visualization.
- Select the
Proximity Falloff tab in the
Attribute Editor, and choose
Inside,
Outside, or
None from the
Volume menu to set how the geometry mass influences the falloff effect. See
Proximity Falloff attributes for information on the settings.

Cone Primitive Falloff Object: Volume set to A. None, B. Inside, and C. Outside.
Once created, the Proximity Falloff has several options.
- Specify a Component Tag expression for a proximity subset and bind tags to define the subsets you want to check proximity against
- Specify a pseudo-volume approximation based on surface normals
- Subset falloff: deformation applied to Component Tags
- Use the Subset falloff to limit deformation to subsets of geometry, defined by Component Tags.
-
- Select geometry and add a deformer.
- In the Attribute Editor, select the <deformername> tab and expand the Deformer Attributes widget.
- Right-click the Falloff column, and select .
- Double-click the SubsetFalloff1 cell in the Falloff column of the Deformer Attributes table. The Attribute Editor shows the Subset falloff attributes.
- Turn on Use Falloff Tags. If this option is not activated, the deformation is applied to the deformation membership.
- Add the name(s) of the
Component Tag(s) that you want to use for the deformation in the
Falloff Tags field and press
Enter. The
Falloff Tags field supports regular expressions to simplify adding Component Tag(s).
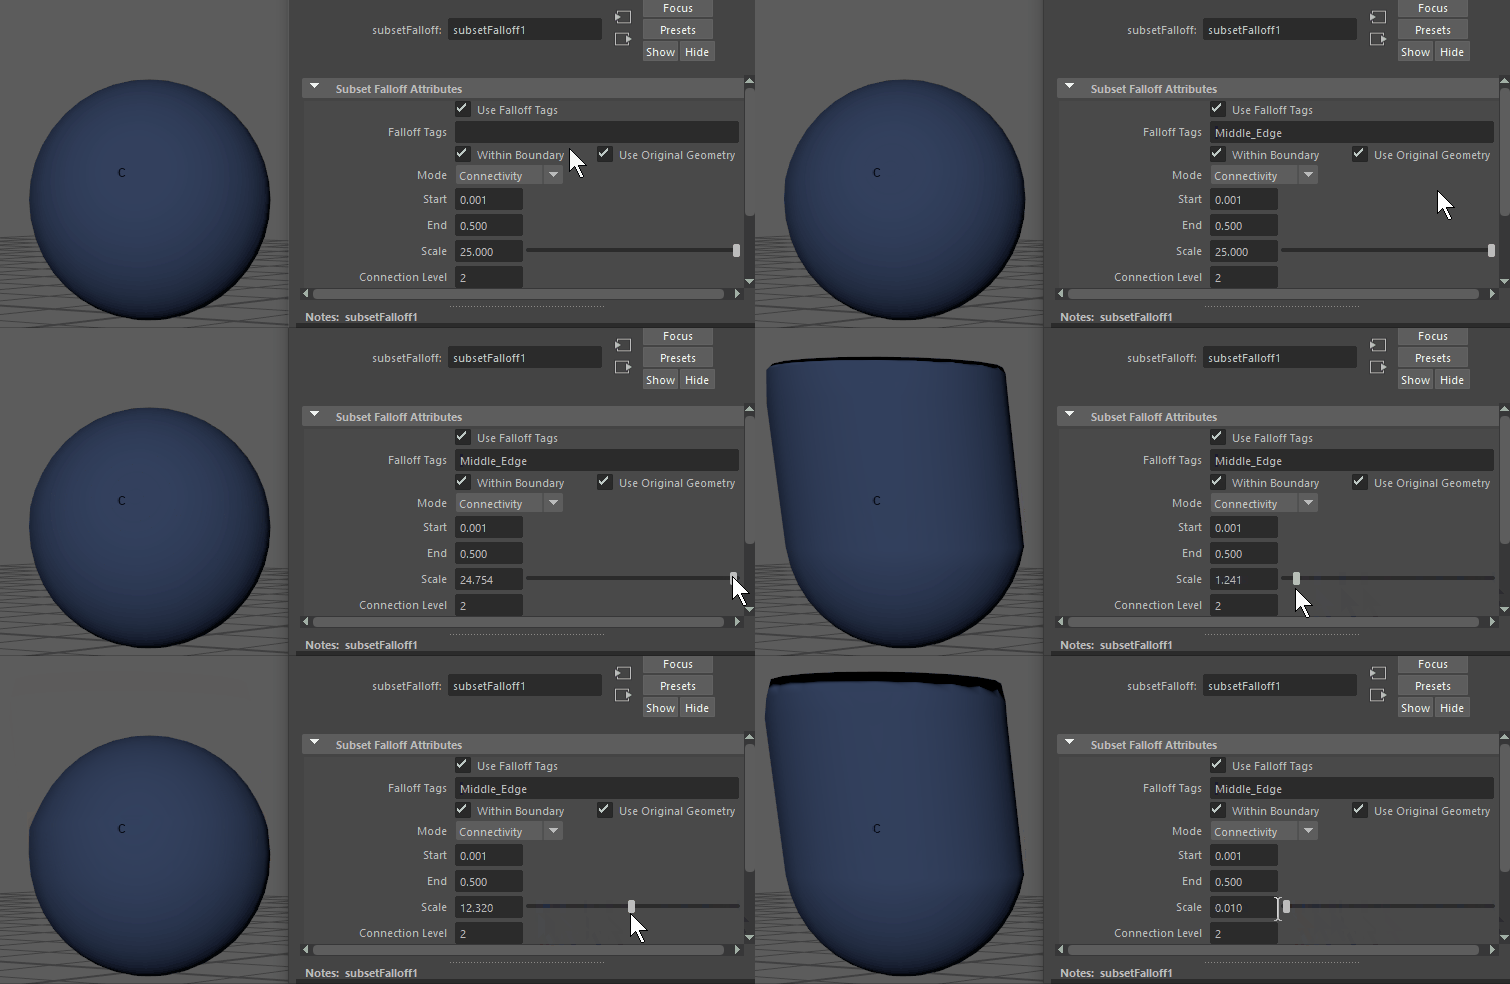
- Adjust the Subset Falloff Attributes to control how the deformation is applied and what method to calculate values. See Subset falloff attributes for information on the settings.
- (optional) To better view the falloff influence, right-click the Falloff tab in the Deformer Attributes widget in the Attribute Editor, and select Weights Visualization.
- Component falloff: Paint deformer weights
- The Component falloff lets you paint deformer falloff values onto your Component Tag selections.
-
-
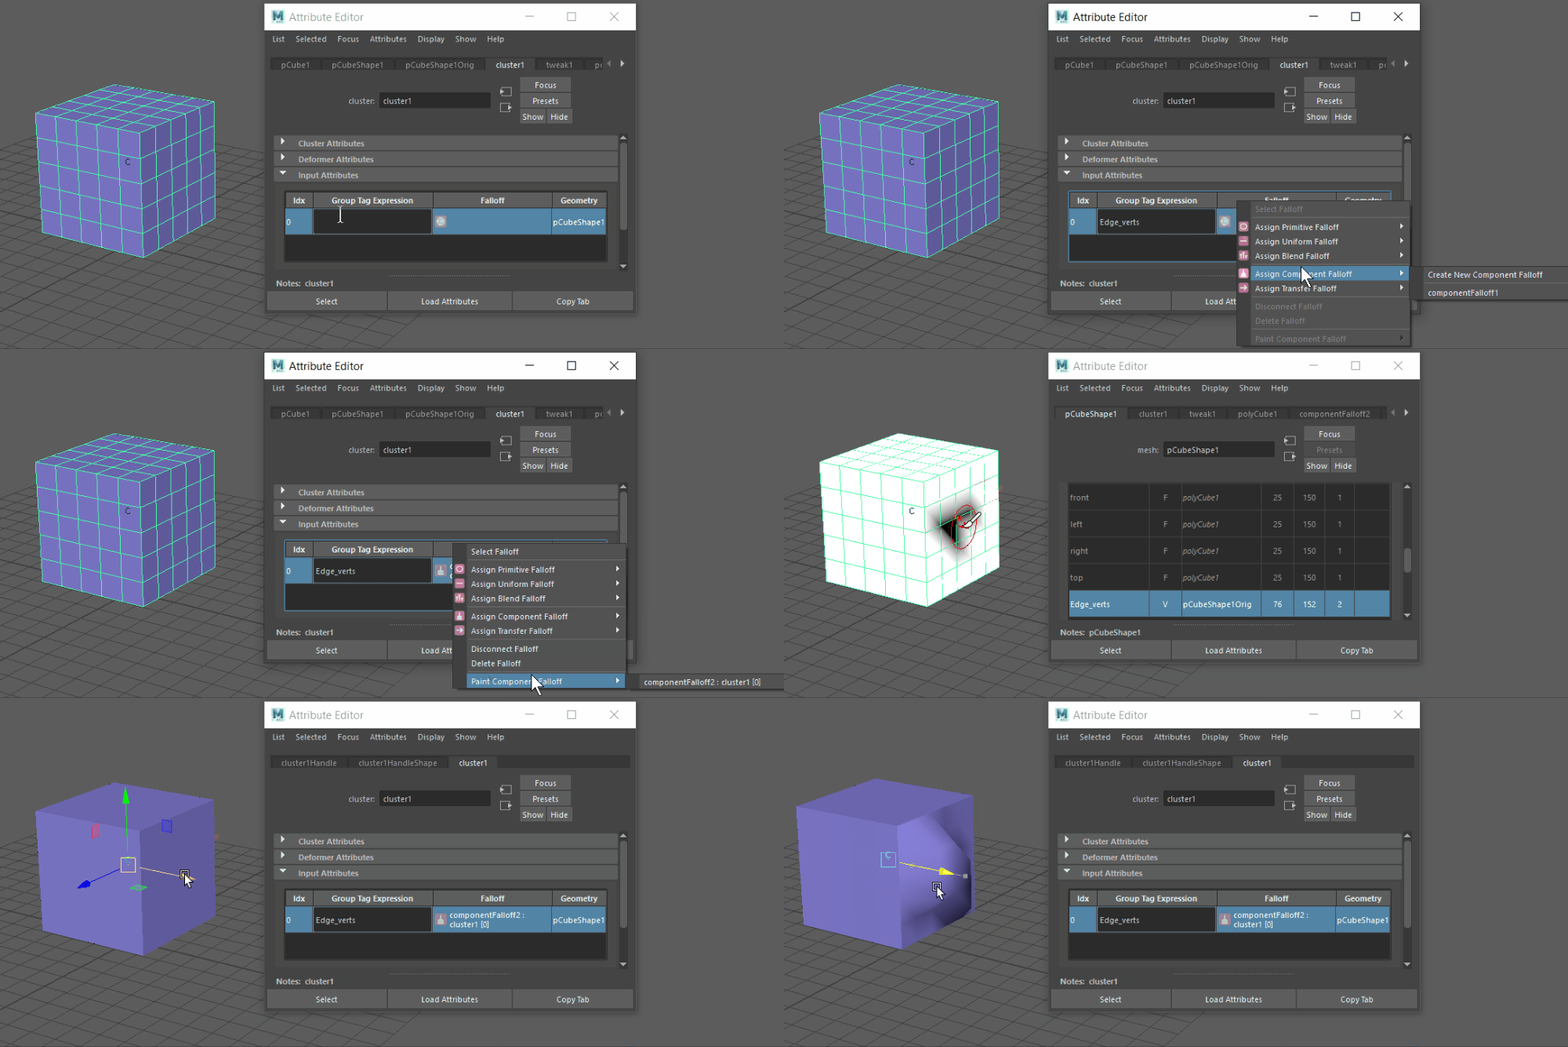
On geometry that has Component Tags and a deformer
- Select the deformer tab in the Attribute Editor and expand the Deformer Attributes widget.
- Right-click the
Component Tag column, and select
. A
Component falloff tab is added to the Attribute editor.
Note: You can still apply Falloff effects for deformers if you do not have any Component Tags assigned to the geometry. Component Tags let you create sub-sections of geometry. See Assign Component Tags to geometry.
- Right click the Falloff column again, and select <deformer name>.
- The geometry turns white and is ready for painting. Paint the weight on the geometry, with white being no weighting and black being full weighting. (You can set the Paint tool attributes by double-clicking the Paint icon in the Tool Box or clicking the tool settings icon in the upper right of the Maya interface.
- When finished, return to Object mode (F8).
- Select the cluster handle to view your deformation.
- Transfer falloff: Reusing falloff weighting
- Use the Transfer falloff when you want to apply the falloff weighting from one deformer to another.
-
- On the geometry with a deformer that you wish to receive the falloff, select in the Deformer Attributes section of the deformer's Attribute Editor tab.
- In the
Component Tag column, right-click
Transfer Falloff and choose
Select Falloff. The
Attribute Editor switches to the
Transfer Falloff 1 tab.
Note: You can still apply Falloff effects for deformers if you do not have any Component Tags assigned to the geometry. Component Tags let you create sub-sections of geometry. See Assign Component Tags to geometry.
- Click the Add new assignment icon above the Transfer Falloff Attributes table. A new row is added.
- Right-click in the name field and choose a falloff you wish to Transfer from the right-click menu. Be careful to choose an existing falloff in the scene and not create a new falloff effect.
- In the transfer falloff (Input Attributes tab), right-click inside of the table, and choose "Add (the original) falloff", and choose, from the existing falloffs listed there, the one that you wish to "transfer" to this geometry.