Use these settings to paint in 3D space.
- In the
Rendering menu set,
 .
.
Brush settings
Defines the brush profile (or shape).
- Radius (U) (Artisan)
-
Displays when an Artisan brush is selected. If you are using a stylus and have Radius or Both selected for the Pressure map, set the upper or maximum possible radius for the brush. No matter how hard you press the stylus, the brush radius will not exceed this radius. If you are not using a stylus, this setting defines the radius for the brush.
- Radius (L) (Artisan)
-
Displays when an Artisan brush is selected. If you are using a stylus, set the lowest or smallest possible radius for the brush when pressure is applied to the stylus. If you are not using a stylus, this setting is not used.
- Artisan
-
Select which Artisan brush profile to use when the Paint Operations is Paint, Erase, or Clone. Artisan profiles are defined by grayscale images. You can select from 40 predefined brushes in your mayapath/brushShapes or mayapath/Maya/Contents/brushShapes (Mac OS X) directory, including the following four common ones.

You can create your own shapes using any supported file format. Maya Creative uses the luminance values of the image and scales the image to 256x256.
To select an image, click the Browse button, select the shape and click Open. Adjust the Stamp Spacing to get the effect you want when you paint.
To select the last opened image, click the icon
 to the left of the
Browse button. If you select an image file provided in the brushShapes directory, this icon changes to show what the shape is.

- Rotate To Stroke
-
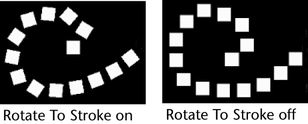
Determines the alignment of brush shapes that are not uniformly round. Turn this option on to align the stamp shape relative to the direction you move the brush. Turn this option off to align the stamp shape relative to the up vector. The stamp shape retains its orientation when you change the view.

Color settings
- Color
-
Click the Color box to open the Color Chooser and select the color you want to paint with. For details on using the Color Chooser, see Color Chooser. Use the Color value slider to change the color value (from 0 to 1).
- Opacity
-
Set the fraction of the Color value to apply to each brush stamp within a stroke. Values build up when stamps overlap. Stamps overlap when you paint over the same area. Using the Opacity setting, you can produce more gradual changes to achieve more subtle effects. When you set Opacity to 0, your brush stroke has no effect.

Flood section
Use the settings in this section to define the color and opacity to use when you flood all or part of the texture with the set color or erase the color from the texture.
- Color
-
Click the Color Value box to open the Color Chooser and select the color you want to flood with.
- Opacity
-
Set the fraction of the Color value to apply to apply when you flood.

- Flood Paint
-
Click this button to flood paint the set color.
- Flood Erase
-
Click this button to erase as either Flood All or Flood Selected Faces.
- Flood
-
Set one of the following options:
- All
-
Floods the entire texture with the Color value and the Opacity value. You can only flood the surface when the Paint Operation is set to Paint or Erase. When you flood Erase, the texture is restored to its last saved version.
- Selected Faces
-
Floods only the selected faces of the polygon or subdivision surface with the Color value and Opacity value. You must exit the 3D Paint Tool to select the faces.
Paint Operations settings
Select the paint operation and blend mode want to use.
Artisan
Select one of the following Artisan brush operations. Maya uses the last Artisan brush profile selected for that operation. However, if the last profile was a custom profile, Maya remembers only that it was a custom brush, not which custom brush. This means that changing the custom brush for one operation changes it for any other operation with the custom brush profile selected.
- Paint
-
Applies paint to the surface according to the defined settings.
- Erase
-
Removes the color from the painted pixels, revealing the last saved texture. To set the background texture to erase to, turn off Update on Stroke and click the Save Textures button. Flooding with the operation set to Erase restores the texture to its last saved version.
- Clone
-
Clones a sample of the paint already applied to the surface. You can then paint that sample elsewhere on the surface or on other surfaces. You cannot flood with the operation set to Clone. See Clone paint.

- Set Erase Image
-
Click this button so you can set the current paint layer as what to erase back to.
- Reset Brushes
-
Click Reset Brushes to restore the Artisan brush profile for each operation to the default (Soft Brush Profile, softBrush.jpg).

- Blend Mode
-
Select how you want to alter the way paint is applied to the texture. These blend modes are a subset of those available in popular paint packages. The base color is the color you are painting on.
- Default
-
Paints each pixel to make it the resulting color. This is the default mode.
- Lighten
-
Uses the base or paint color, whichever is lighter, as the resulting color. Replaces pixels darker than the paint color, and leaves pixels lighter than the paint color unchanged.
- Darken
-
Uses the base or paint color, whichever is darker, as the resulting color. Replaces pixels lighter than the paint color, and leaves pixels darker that the paint color unchanged.
- Multiply
-
Multiplies the base color by the paint color. The resulting color is always a darker color. Multiplying any color with black (value of 0) produces black. Multiplying any color with white (value of 1) leaves the color unchanged. When you’re painting with a color other than black or white, each overlapping stroke produces progressively darker colors.
- Screen
-
Multiplies the inverse of the paint and base colors. The resulting color is always a lighter color. Screening with black leaves the color unchanged. Screening with white produces white.
- Overlay
-
Multiplies the colors, depending on the base color. Patterns or colors overlay the existing pixels while preserving the highlights and shadows of the base color. The base color is mixed with the paint color to represent the lightness or darkness of the original color.
- Clone Brush Mode
-
Select Dynamic to move the clone source (the area the paint is sampled from) as you move the destination brush.
Select Static to keep the clone source stationary.

- Set Clone Source
-
Click this button and then click an area on the surface to set that area as the source, or area where the paint sample is cloned from. If you paint over the clone source during a stroke, the original paint sample is used for the rest of the stroke, but the next stroke uses the updated clone source paint sample.
File Textures section
To paint an attribute directly on a model, the surfaces making up the model must have a file texture assigned to it for the attribute. You can create the file texture and assign it to the selected surfaces in this section, or you can do it in Hypershade.
- Attribute to Paint
-
Select the material attribute you want to paint. Available attributes vary depending on the material type. If you want to paint other attributes, assign a material to your model that has the available attribute. For details on these attributes, see Common surface material attributes. You can select from the following RGB and single channel attributes.Note: To paint custom attributes, add them onto the material and select them from the Attribute to Paint drop-down list.
RGB Single Channel Color
BumpMap
Transparency
Reflectivity
Incandescence
Diffuse
Specular Color
Translucence
Ambient
Reflected Color
- Assign/Edit Textures
-
To assign a file texture, select the attribute you want to paint and then click this button.
Notes:
- If you have not previously painted or assigned file textures to the selected surfaces, a warning displays in the Command Feedback line that some surfaces have no file texture assigned to the current attribute. Also, the brush outline displays an X across it when you move the brush over the surface to indicate that you are unable to paint on it.
- Be sure to assign a new shader before painting your object, otherwise you will modify the default shader. If this happens, the painted texture will be assigned to any new objects you create in your scene.
- Save Textures
-
Click the Save Textures button at any time to save the texture.
- Reload File Textures
-
Use this button to update the 3D Paint texture if it has been modified in some other paint package. If you do not reload a file texture after making changes to it in another program, the changes might not be recognized by 3D Paint.
- Update on Stroke
-
Turn this option on to save the texture after each stroke you paint.
Note: You cannot erase with Update on Stroke turned on.You can use the 3D Paint Tool while High Quality Rendering is turned on; this enables you to preview attributes such as bump and transparency while painting them, however you cannot see the stroke itself while it is being painted, since the texture is updated only at the end of each stroke.
Turn on Update on Stroke in order to automatically refresh the view in the UV Texture Editor window.
- Save Texture on Stroke
-
Turn this option on to save each stroke to the file texture you are editing. The changes remain even if you do not save the scene. When this option is off (the default), you must save your scene for changes to the file texture to take effect.
- Extend Seam Color
-
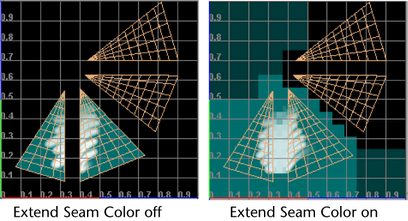
This option ensures a smooth transition between texture attributes at UV shell borders when you render. When this option is on, Maya extends the color you paint into the background past the shell and averages the painted and background colors at the border. This option is off by default.
