The lookdevKit plug-in provides a set of noise, math and utility nodes most useful for creating procedural networks in the Hypershade.
To create these nodes, ensure that the lookdevKit.mll plug-in is enabled in the Plug-in Manager ().
See LookdevKit Simplex Noise node for information on the noise node.
Each node has color and alpha inputs, where the color input only affects the color values and the alpha input only affects the alpha values.
All of the Color nodes listed below have a Float counterpart, for example Float Composite versus Color Composite, which accepts a single float input (such as a displacement map) instead of a float 3 input (such as color). It is more efficient to use the Float nodes if you only need to manipulate a single channel.
Color Composite
Layer textures using this node, and select from among several Operation modes. Experiment with the various layering modes to create the effect that best suits you.
Adjust the Factor attribute to control the intensity of the compositing effect; for example, for fading off a particular effect, or to animate an aspect of your shading graph.
In this example, a sky image and a lace pattern are combined using the Color Composite node. This image compares the results of all the different modes.

Textures courtesy of www.cgtextures.com.
The layering modes are as follows:
- Add: Adds the values of Color A with Color B. Use this mode to add a glow effect to your texture.
- Subtract: Subtracts Color B from Color A to darken your texture. You can also use this mode to create holes in your texture.
- Mix: Mixes the values of Color A with Color B. Use this mode to fade between two textures, or to mix two animated textures.
- Multiply: Multiplies the values of Color A with Color B to darken your textures. Use this mode to apply an ambient occlusion map, to create shadows, or add a layer of dirt.
A common use of this mode is to multiply your diffuse texture with a texture that is white with dark areas. All dark areas will be darkened.
Tip: You can reverse the white and dark patterns of your texture with a Reverse node.In this example, Color Composite is set to Multiply so that the ramp can be used to darken the areas below the horizon in the sky texture.

Sky texture courtesy of www.cgtextures.com.
- Screen: Composites two textures and makes darker areas transparent. It is similar to the Add mode, but it does not add the emissive effect that Add does. A sample application is to add a layer of dust to your diffuse texture.
- Overlay: Darker areas become darker, and lighter areas become lighter, while mid-tones are transparent. This mode adjusts the contrast.
It can be used to make details sharper; for example, to add highlights to the eyes of a character face texture.
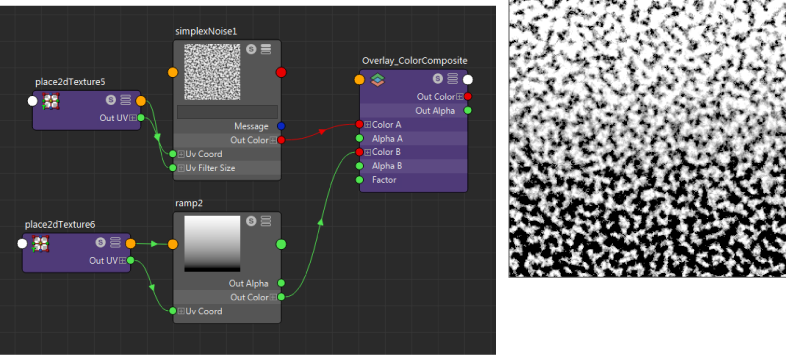
- Difference: Compares two textures and outputs only the pixels that are different between the two.
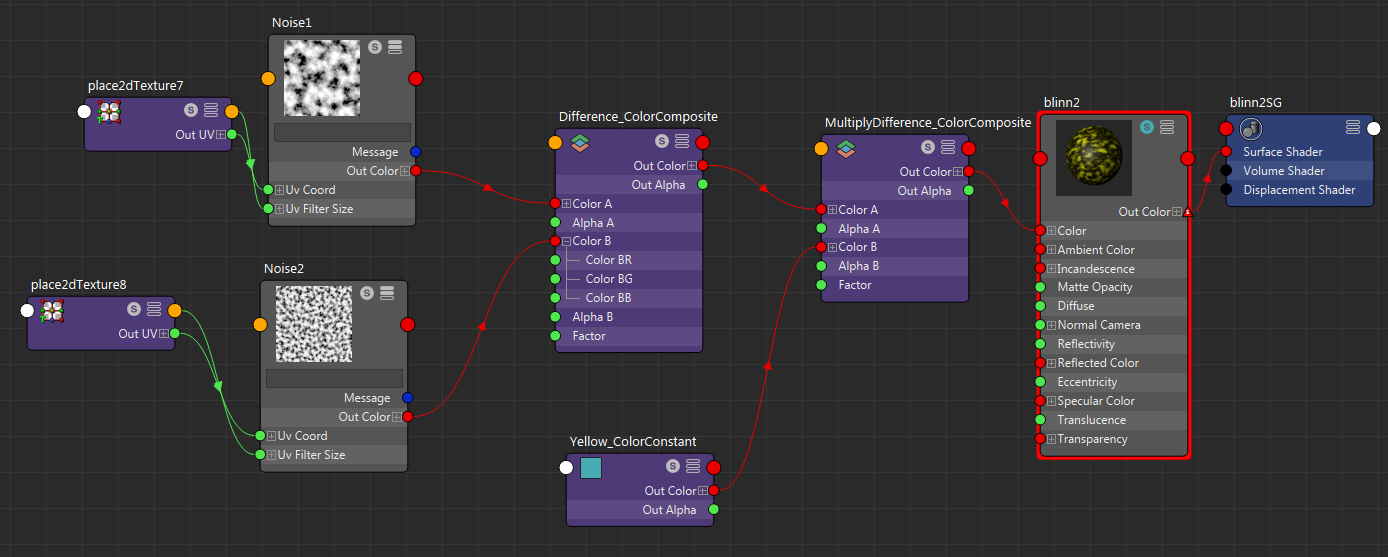
A sample application is to get the intersection between two textures, for example, two noises, and then apply the composite to another texture.
In this example, the intersection between the two noise nodes is obtained by setting Difference_ColorComposite to Difference mode. The result is then blended with a yellow color (Yellow_ColorConstant) using another Color Composite node (MultiplyDifference_ColorComposite).
- Dodge: Increases the exposure of white areas. Combine your diffuse texture with a texture that has white areas to highlight the areas that are white.
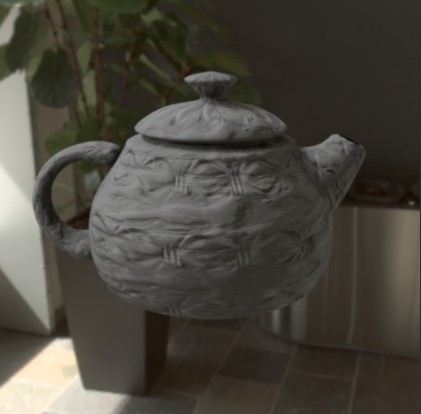
Use this mode to combine two normal maps as in the example below. For each normal map, create a Bump2d node, and connect the Out Alpha of the normal map to the Bump Value input of the Bump2d node. Connect each of the Bump2d Out Normal values to the Color Composite node as input color.

- Burn: Darkens black areas. Combine your diffuse texture with a texture that has black areas to darken the areas that are black.
Color Math
Use this node to combine inputs. This node is similar to the Color Composite node, but simplified with a choice of math operations.
Color Correct
Connect an input texture to this node to correct its color and/or alpha values. For example, you can adjust the saturation or color contrast, adjust the alpha gain and offset, and clamp your color or alpha channels. Color and alpha are separate inputs and can be adjusted separately.
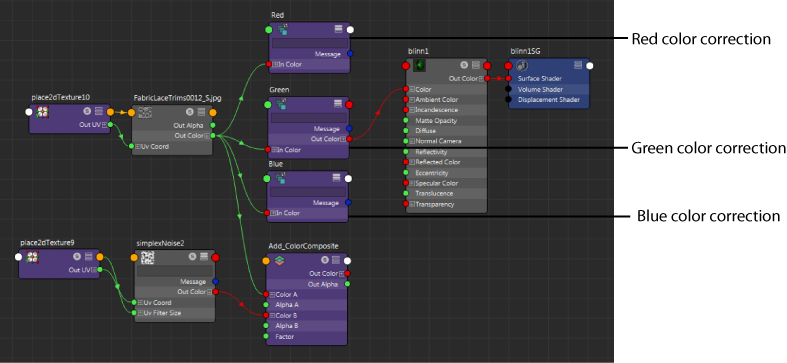
The Color Correct node enables you to experiment with various color correction settings. For example, you can create a File node, then connect it to three Color Correct nodes, each with different color correction settings, and easily switch among them to find the effect that best suits you. Meanwhile, you can also connect the same File node to another part of the node network without performing any color correction. If your texture file changes, you only need to adjust the file path for one File node.
In this example, you can switch among the red, green and blue color corrections by simply reconnecting the Blinn Color input to a different Color Correct output. You can also connect the same file texture, without any color correction, to another part of your shader network.
On the other hand, if you perform color correction by adjusting the Color Balance attributes on the File node, you must create three File nodes with three set of color settings to accomplish the same goal. If your texture file changes, you must adjust the file path for three file nodes as a result.
Color Constant
Use this node to output a simple solid color for use in your shading graph.
Use this node to procedurally control multiple aspects of your shading graph and make your shader easy to adjust and control. Example applications include:
- As an input to the Distortion U and Distortion V attributes of Simplex Noise, to distort the noise pattern
- As an input to the Blender attribute of a Blend Colors node that combines two procedural textures
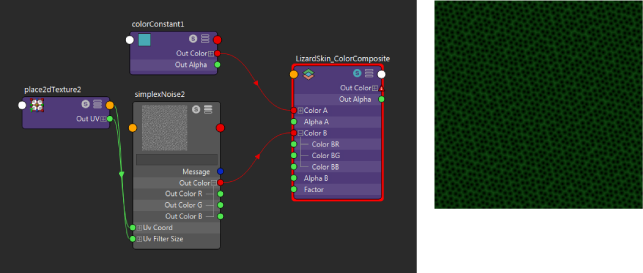
In this example, Color Constant provides a solid green color that can be combined with Simplex Noise to create a green lizard skin pattern. You can easily change the color of the skin while keeping the pattern constant by simply adjusting the Color Constant node. Setting the skin color using a separate node allows you to easily find and change your color, as well as to connect it to multiple nodes for procedural control.
In this example, the Color Constant is connected to a Channels node that outputs its red channel. This red channel is connected to three different Color Correct nodes, each with a different Alpha Gain value, that act as multipliers in order to control three different attributes on the Simplex Noise node: Scale, Frequency, and Frequency Ratio. The red channel also directly controls the Amplitude of the noise node. This noise node controls the bump of the Blinn shader.
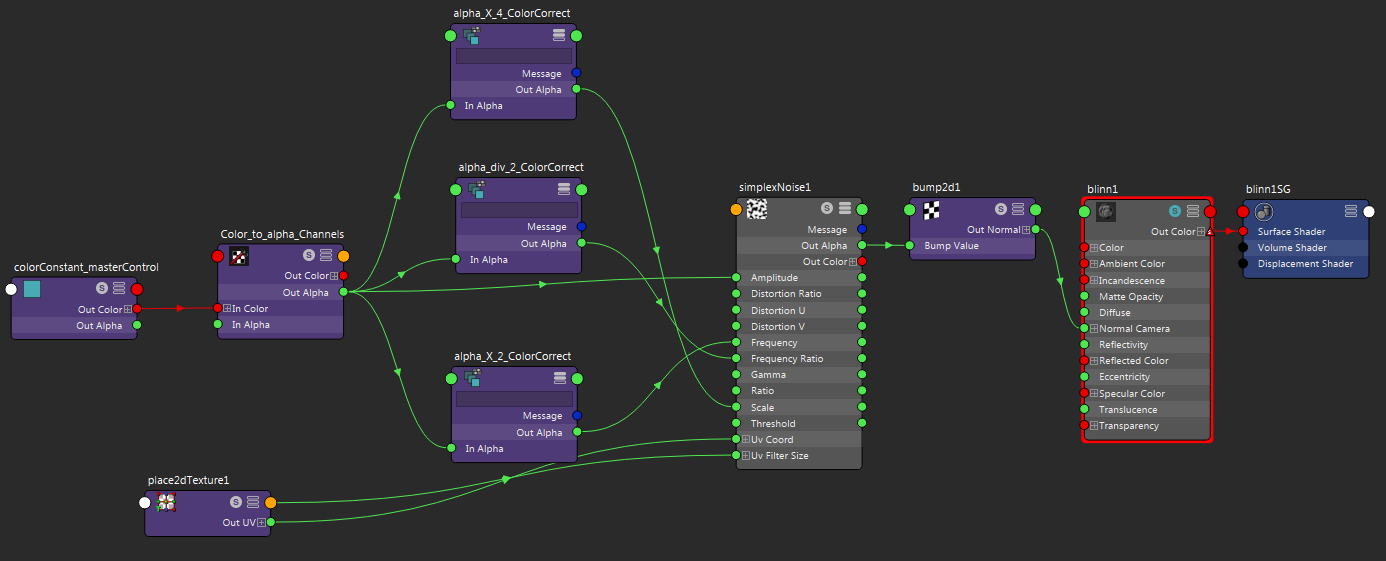
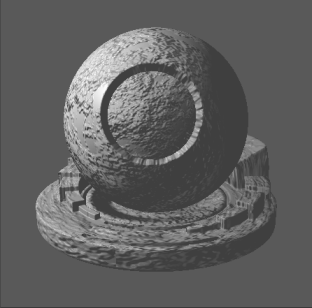
To adjust the bump effect, you only have to adjust the Color Constant. This example demonstrates that you can use a single node to adjust multiple effects by connecting it with various multipliers.
Watch the effect on Simplex Noise as Color Constant is adjusted.
Color Mask
Connect an input color or texture, and a texture as an alpha mask, to produce a masked output.
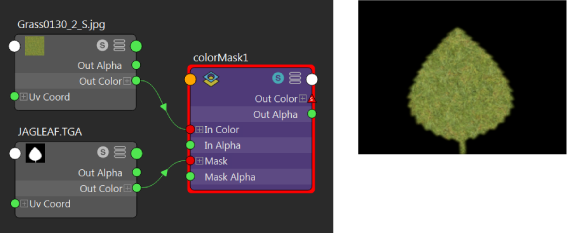
Leaf texture courtesy of www.cgtextures.com.
A sample application is to use the Color Composite node to layer your Color Mask result on a diffuse texture.
Channels
Connect a texture node as input to the Channels node, then use this node to rewire the RGBA channels in its output. For example, output Alpha in any of the RGB channels by setting any of Channel R/G/B to A.
You can also use this node to modify a mask. For example, paint a texture map in a painting application that uses red, green, and blue to mask different areas of the texture: green to mask the shirt, red to mask the hat, and blue to mask the sneakers. To output the texture with only the hat and shirt, create a Channels node and set Channel A to R to output the red channel, then create a second Channels node and set Channel A to G to output the green channel, then create a Color Composite node to add the two alpha channels.
Premultiply
Multiplies the input color RGB channels with the Alpha value. Connect an input texture to the Color attribute and a texture with an alpha channel to the Alpha attribute. Any pixel that is black in the alpha channel becomes black in the output, and any pixel that is white in the alpha channel leaves the input texture unchanged.
Unpremultiply
Divides the input color with the Alpha value. Connect a premultiplied image as an input texture and use this node to reverse the pre-multiplication.
For example, you may want to unpremultiply an image before performing a set of color corrections, then premultiply again so that you do not accidentally color correct any of the transparent alpha edges.
In this example, the texture image has already been premultiplied. Therefore, its color channel must first be unpremultiplied before its values can be clamped, and then remultiplied again. The same alpha output (from the texture image) is input to the Unpremultiply and Premultiply nodes.

Color Logic
This node compares Color A and Color B using a variety of equality operators, such as <= or !=. It always outputs a boolean value: 1 (white) if the comparison returns a true result, 0 (black) if the comparison returns a false result.
Color Logic and Color Condition are often used in conjunction with each other.
In this example, Color Logic compares whether its two inputs are equal. If they are, then Color A is used to provide the color for the Surface Shader. Otherwise, Color B is used.

Color Condition
If the condition is true, then Color A is used. Otherwise, Color B is used.