Poly Bevel History
Additional modifications can be made to a bevel by editing the following attributes on the polyBevel node using the Channel Box or the Attribute Editor.
- Offset As Fraction
- When enabled, the bevel width will not be larger than the shortest edge. This option limits the size of the bevel to ensure inside-out bevels are not created.
- World Space
- When a bevel has been applied to a scaled object and World Space is turned on, the offset will ignore the scaling and use world space values.
- Offset
- Specifies the size of the bevel: the distance between the original edge and the center of the offset face. The Offset value is limited to a range between 0 and 5. The default is 0.20. Offset is only available when World Space is turned on.
- Fraction
-
Specifies the size of the bevel: the distance between the original edge and the center of the offset face. The Fraction value is limited to a range between 0 and 1. The default is 0.50. Fraction is only available when Offset As Fraction is turned on.
Note: When you use the Fraction attribute, your bevel results are not affected when you change the working units in your scene. - Segments
-
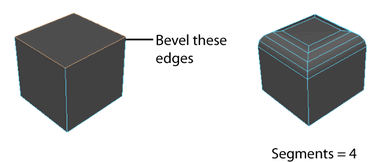
The Segments value determines the number of segments created along the edges of the beveled polygon. Use the slider or enter a value to change the number of segments. The default is 1.

- Output Smoothing Angle
-
Lets you specify whether you want the beveled edges to be hard or soft when shaded.
Note: In previous versions of Maya (prior to 2025), Output Smoothing Angle was named Smoothing Angle.If you want the beveled edges to be soft, set the Output Smoothing Angle to a high value (180). If you want the beveled edges to be hard, set the Output Smoothing Angle to a low value (0).

In general, if the angle between two shared edges is greater than the value specified by the Smoothing Angle attribute, the beveled edge will be shaded to appear hard. The default Output Smoothing Angle value is 30 degrees.
- Auto Fit
- When enabled, Maya automatically determines how the bevel fits the object.
- Roundness
-
By default, Maya automatically adjusts the rounding to bevel an object based upon the object's geometry. If you select Automatically fit bevel to object, this option is dimmed. If Automatically fit bevel to object is not selected, use the Roundness slider or enter a value to round the bevel edges. You can set the Roundness to a negative number to create inward bevels.
- Planar project per face
-
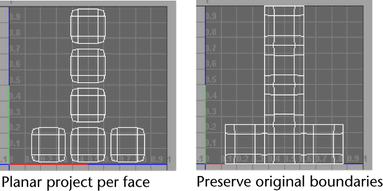
Each original face is projected using a planar projection to produce UVs that incorporate the new faces resulting from the bevel. The boundaries of the original UV coordinates may be modified as a result.
- Preserve original boundaries
-
UVs are incorporated into a UV map that maintains the UV boundaries that existed prior to the bevel. For best results, use an even value for the number of Segments.

Poly Bevel Filter
- Selected Edges
- When turned on, the bevel operation is only applied to the selected edges. When this option is turned off, the bevel operation is applied to all edges in the object.
- Beveled edges dynamically update when you make any changes to the object's attributes, like poly history attributes for polygon primitives.
- Hard Edges
- When turned on, explicit hard edges (those defined using Mesh Display > Harden Edges) on the object are beveled.
- To apply this filter to a specific area of your object, Selected Edges must be enabled and a group of edges must be selected.
- Turning off Selected Edges (when Hard Edges is still turned on) applies this filter to the entire object, beveling any edge that is marked hard.
-
Note: Beveled edges dynamically update when you adjust an object's attributes. For example, existing beveled edges on a cube update as you make changes to any of the Poly Cube History attributes in the node.
- Edges By Angle
- When turned on, edges are beveled based on the specified Filter Angle tolerance. If the angle between adjacent faces exceeds the specified Filter Angle, the edge between the faces is beveled.
- To apply this filter to a specific area of your object, Selected Edges must be enabled and a group of edges must be selected.
- Turning off Selected Edges (when Edges by Angle is still turned on) applies this filter to the entire object, beveling any edge that exceeds the tolerance value.
-
Note: Beveled edges dynamically update when you adjust an object's attributes. For example, existing beveled edges on a cube update as you make changes to any of the Poly Cube History attributes in the node.
- Filter Angle
- Lets you set a Filter Angle tolerance for the Edges By Angle option. This option is only available when Edges By Angle is turned on.
Cleanup
- Subdivide Ngons
-
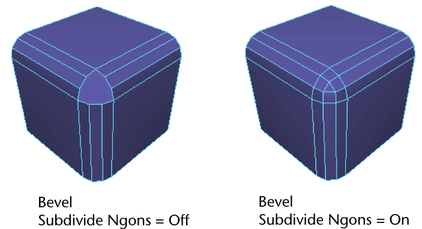
Subdivides any faces that have large numbers of edges as a result of doing a bevel operation with more than one segment. The Subdivide Ngons option is turned on by default and can alternately be controlled within the Channel Box.

- Mitering angle
-
Controls how two intersecting beveled edges get joined when an intersecting non-beveled edge is involved. You can specify whether you want the recently beveled edges to be mitered or not by setting the Mitering Angle value as required.

If the angle between the two beveled edges is greater than the specified mitering angle, the beveled edges will not be mitered. The Mitering Angle feature is on by default and is set to 180 degrees.
- Angle tolerance
-
Bevel uses this angle to decide whether it needs to insert extra edges. If your model still has unwanted edges, try increasing this value to remove them.

- Merge Vertices
-
Lets you merge vertices automatically when beveling an edge without having to use the Merge Vertices feature separately. Coincident edges and their associated UVs are also merged automatically (within a specified threshold). The Merge Vertices attributes are turned on by default and can alternately be edited within the Channel Box.
- Merge Tolerance
- When Merge Vertices is enabled, the Merge Tolerance value specifies how close vertices must be before they are merged.