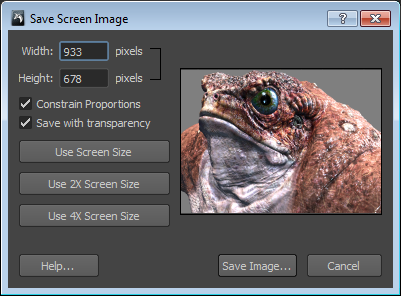
You can save an image of the 3D View using Render > Save Screen Image. You can:
- Save an image of your model as it appears in the 3D View for a presentation or design review.
- Save images produced in conjunction with the Mudbox viewport filters for use as stamps, stencils, normal, and displacement maps.
- Specify a custom image resolution and image aspect ratio.
- Preview a thumbnail version of the image before you save it.
- Specify a custom directory to save the image.
- Choose from a variety of image formats: .bmp, .png, .jpg, or .tiff.
Note: The TIFF and PNG image formats that are output when using Save Screen Image contain a transparent background that can be composited using your favorite image editing application. Using certain viewport filters will make the background layer non-transparent.
- Select Render > Save Screen Image.
The Save Screen Image window appears.

A preview image of the 3D View is displayed to assist in previewing the image that will be saved.
- To save an image of the 3D View, do one of the following:
- To save an image of the current 3D View, click Use Screen Size, then click Save Image.
- To save an image that is two or four times the resolution of the 3D View, click either the Use 2X Screen Size or Use 4X Screen Size buttons.
- To save an image that is of higher resolution than the current 3D View yet maintains the same aspect ratio as the 3D View, enter a larger number in either the Height or Width field. The other resolution field automatically updates provided the Constrain Proportions options is turned on. Then click Save Image.
- To save an image that is of a different aspect ratio than the 3D View, turn off the Constrain Proportions options and then enter new values into the Height and Width fields. The thumbnail image updates to indicate the final result. Then click Save Image.Note: Save Screen Image supports image aspect ratios up to 1:100. When this maximum ratio has been exceeded the Save Image button becomes disabled. If this occurs, try entering larger or smaller values for either the image height or width to reduce the aspect ratio to a smaller value.
- In the file browser window that appears, specify the filename, image format, and directory path, then click Save.Tip:
If the saved image appears aliased (jagged edges on the 3D model), try saving a larger resolution image first and then resize it smaller to the desired resolution using your favorite image editing application. The downsampling that occurs during the resize will provide some anti-aliasing of the edges in the resulting image.