Identifying the Navigable Areas
The NavData generation system always accepts and takes into account all triangles that you provide in the input geometry. This can often lead to NavData being generated in areas that are not intended to be accessible to your characters at runtime. For example, on rooftops, in treetops, inside closed buildings, etc.
This extra data is not a problem for performance, as long as you do not attempt to make a bot plan a path to one of those unreachable areas. However, it does take up some extra memory that you may need to use for other purposes.
You can take advantage of several different approaches for excluding the unwanted data, described in the following sections. These approaches are not exclusive; you can use whatever process works best for different levels or different areas of your terrain.
You can provide the NavData generation system with any number of seed points for each sector, which identify the walkable areas of the terrain. If you provide one or more seed points for a sector, a post-processing phase propagates through the NavMesh from each seed point. Only the NavMesh that cover the areas reachable from those seed points are kept. All other NavData is discarded.
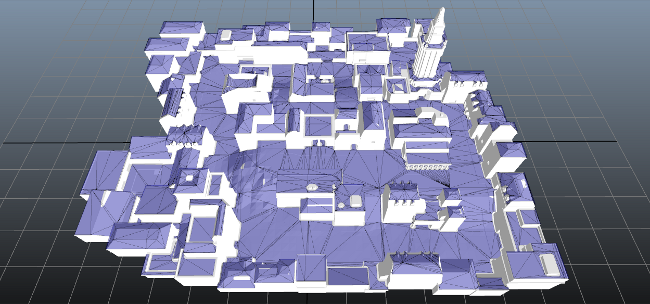
For example, consider the following terrain. By default, isolated areas of NavData are created on all the rooftops and within each building (though the indoor NavData is not visible in the image, it takes up significant extra memory at runtime).
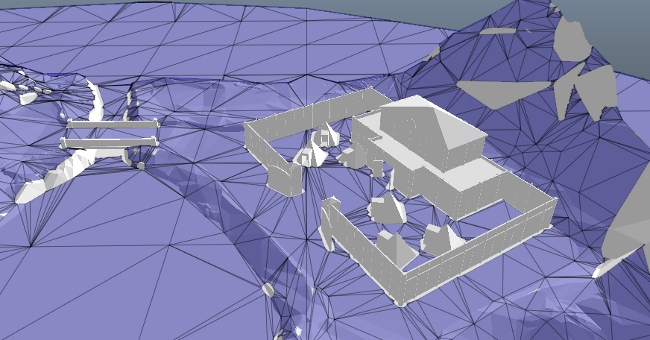
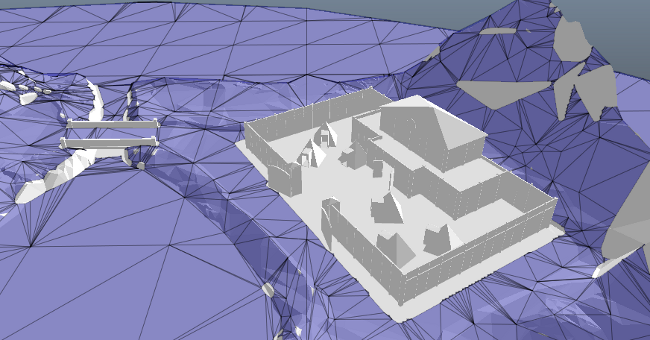
With a single seed point placed anywhere on the ground, all of the NavData that is not accessible from the ground is automatically discarded. This includes all the rooftops and inside the buildings, as shown below.

To create a seed point in the Navigation Lab, right click anywhere on the terrain, and select Generation > Spawn Seed Point from the contextual menu.
When you create each sector, you can provide the seed points for that sector by calling either the GeneratorSectorConfig::AddSeedPoint() or GeneratorSectorConfig::AddSeedPointInClientCoordinates() method in the configuration you create for that sector.
Alternatively, you can provide the seed points in your GeneratorInputProducer class, by calling ClientInputConsumer::ConsumeSeedPoint().
Note that each sector takes into account only the seed points that you specify for it in its configuration or when the GeneratorInputProducer is called to get the triangles for that sector. Therefore:
- If you want the NavMesh for all sectors to reflect the same walkable areas, you should set up the same list of points for each sector. In order to enforce the consistency of filtering between sectors, this approach is generally recommended.
- In some cases, you may need different sectors to reflect different sets of seed points. For instance, you may need seed points placed at different locations in two different versions of a swappable sector. In this case, you can set up each sector with only the set of seed points it needs.
You can provide the NavData generation system with 3D volumes that enclose unwanted areas, and flag those volumes as being unwalkable. No NavData will be generated for any input triangles that lie within those volumes.
In this example, we want to make the camp on the right-hand side of the terrain into a safe zone, where a player can rest without fear of attacks from hostile NPCs.
To do this, we create a TagVolume that encloses the safe area, and flag it as "exclusive". After generation, the NavMesh stops at its boundary, making NPCs unable to enter the area.
- Click the Generation tab and select GenerationTagVolume.
- Press the spacebar to set positions around the area that you want to delimit. Press Enter when done to create the TagVolume.
- Select the new TagVolume in the Scene panel. The TagVolume vertices and properties appear in the TagVolume panel on the right.
Note: Each TagVolume has a minimum and maximum altitude. By default, the Navigation Lab determines these altitudes for a TagVolume from the set positions on the terrain. If the set positions of a TagVolume are at a higher altitude (such as on the flanks for a TagVolume that covers a valley), it results in NavData getting generated for the area (valley) within the TagVolume because the default minimum altitude is higher. In such cases, you must set the minimum altitude and maximum altitude in the TagVolume panel to exclude the area from NavData generation.
To create a TagVolume for the Generator:
- Create an instance of the ClientInputTagVolume class to represent your volume. Set it up with the desired extents and position.
- To mark the TagVolume as an exclusion volume, call DynamicNavTag::SetAsExclusive() on ClientInputTagVolume::m_navTag.
When you create each sector, you can provide the TagVolumes for that sector by calling the GeneratorSectorConfig::AddTagVolume() method of the configuration you create for that sector.
Alternatively, you can provide the TagVolumes in your GeneratorInputProducer class, by calling ClientInputConsumer::ConsumeTagVolume().
Note that each sector takes into account only the TagVolumes that you specify for it in its configuration or when the GeneratorInputProducer is called to get the triangles for that sector. Therefore:
- TagVolumes that lie on the border between two adjacent sectors must be set up for all of the sectors they intersect.
- In some cases, you may need different sectors to reflect different TagVolumes. For instance, you may need different TagVolumes placed at different locations in two different versions of a swappable sector. In this case, you can set up each sector with only the set of TagVolumes it needs.
If you use the API of the NavData generation framework directly, you can tag each individual input triangle in the areas you want to exclude with a special NavTag. During the generation process, any pixel that has only triangles tagged with this terrain type will not have any NavData generated for it, and NPCs will be unable to navigate in those areas.
To use this approach, your custom class of GeneratorInputProducer should provide each input triangle to the ClientInputConsumer using either the ClientInputConsumer::ConsumeTriangle() or ClientInputConsumer::ConsumeTriangleFromPosInClientCoordinates() method. Set the DynamicNavTag that you provide in the argument list to these methods as being exclusive by calling its DynamicNavTag::SetAsExclusive() method.
Note that it is recommended to use this terrain type mechanism rather than simply omitting triangles when you pass them to the generation system, to ensure that those triangles are still taken into account as static obstacles when necessary.
You can set the minimum surface area for any part in the NavMesh. After generating NavData, a post-processing phase discards any NavFloor that has a smaller surface area than this threshold.
This setting can be useful in cases where the NavMesh contains many small isolated areas that are not connected to each other and that should not be traversed by your characters.
Note that in order to guarantee coherence with the NavData in adjacent sectors, all areas of the NavMesh that touch the overlap with an adjacent sector are always kept. Therefore, if you have a small rooftop that lies right on the border between two adjacent sectors, it may not be filtered out as expected.
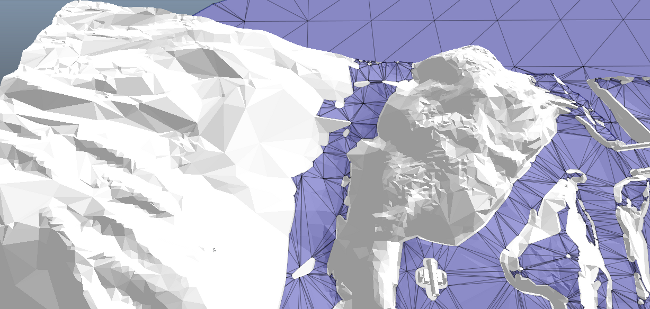
In this test terrain, the local variations in the terrain on the slope result in several small unconnected areas that characters will never need to move to at runtime.

By raising the minimum surface area threshold, we can have all the NavData in those small areas discarded automatically without affecting the characteristics of the surrounding NavData.
 Note that if a seed point is present on a surface that would normally be filtered using the minimum surface are parameter, the surface that contains the seed point will be kept unless that surface is small enough to be considered noise: i.e. less than the GeneratorAdvancedParameters::m_noiseReductionSurface parameter. See below.
To set the threshold value in the Navigation Lab:
- Open the Generation window, and expand the Advanced Parameters section.
- Set the Minimum Navigable Surface value to the minimum surface area that each separate area of the NavMesh must occupy, in square meters.
You can set the surface area threshold in the value of the GeneratorAdvancedParameters::m_minNavigableSurface member, accessible through GeneratorInputOutput.m_params.m_advancedParameters.
In addition to the GeneratorAdvancedParameters::m_minNavigableSurface parameter described above, another parameter is used to control noise reduction: GeneratorAdvancedParameters::m_noiseReductionSurface. This latter parameter is similar in effect, except that:
- It is applied in the first stages of the generation process, in order to speed up generation by discarding tiny areas as early as possible.
- It ignores the presence of seed points.
- It is applied cell-by-cell. It can only remove areas that lie entirely within the borders of a single NavMesh cell. The GeneratorAdvancedParameters::m_minNavigableSurface parameter, by contrast, is taken into account during a global processing phase, so it can remove areas that span the boundary between adjacent cells.
In most projects, it is recommended that you tune the GeneratorAdvancedParameters::m_minNavigableSurface parameter and leave the GeneratorAdvancedParameters::m_noiseReductionSurface parameter at its default value. However, for best performance and consistency, the value of GeneratorAdvancedParameters::m_noiseReductionSurface is typically kept lower than the value of GeneratorAdvancedParameters::m_minNavigableSurface, so you may need to lower its value yourself if you set GeneratorAdvancedParameters::m_minNavigableSurface to a very low value.