Visual Debugging
This page contains some details about the visual debugging system provided by the Autodesk Navigation**World and the Navigation Lab.
Each World contains a built-in instance of the VisualDebugServer class. This class manages all runtime communications with the Navigation Lab:
- Visual debugging of the Bots, obstacles, TagVolumes and points of interest that have been added to the World.
- Sending statistics on the use of Autodesk Navigation in the game.
- Sending log messages. The VisualDebugServer attaches itself to the BaseLog set up in the BaseSystem. All log messages sent through the BaseLog through calls to the KY_LOG_MESSAGE macro are sent through the first attached VisualDebugServer.
- Rendering ScopedDisplayLists created and sent by the game.
- Matching the camera in the 3D view of the Navigation Lab with your game camera. See Following the game camera below.
You activate the VisualDebugServer for a World by calling World::StartVisualDebug().
When you activate the VisualDebugServer, you need to provide a VisualDebugServerConfig configuration object. This configuration object contains several parameters that you can set as desired.
The most important configuration parameters are probably the port settings, VisualDebugServerConfig::m_serverPort and VisualDebugServerConfig::m_broadcastPort, which determine the ports the server will use to listen to incoming connections and to broadcast its availability. If you have trouble connecting the Navigation Lab to your game, make sure that these ports are open, or change them both in your game and when you try to connect the Navigation Lab.
You can retrieve the VisualDebugServer for a World by calling World::GetVisualDebugServer().
You can stop the VisualDebugServer for a World at any time by calling World::StopVisualDebug().
See Integration Phase 1d: Setting up Visual Debugging, or the Tutorial_VisualDebug.cpp file.
Each object that derives from the WorldElement class, such as Bots, dynamic obstacles, TagVolumes and points of interest, automatically sends data over the network to the Navigation Lab at each frame to indicate its current position, velocity, etc. By default, each object is configured to send only the most important, commonly used items of information, such as its current position, dimensions, velocity, etc. When you debug your game in the Navigation Lab, you can choose which items you want to view for each class of WorldElement in the Visual debug panel.
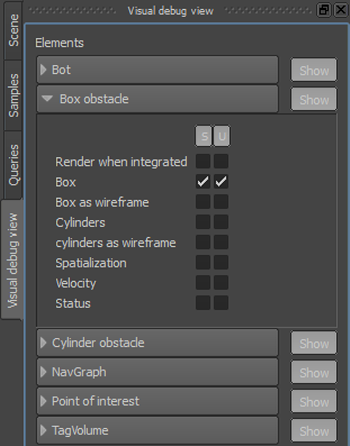
Each type of object can send additional details to the Navigation Lab as well; for instance, Bots can send detailed information about the state of their path following and dynamic avoidance calculations. However, in order to avoid flooding the network communications bandwidth between your game and the Navigation Lab, these details are not sent by default.
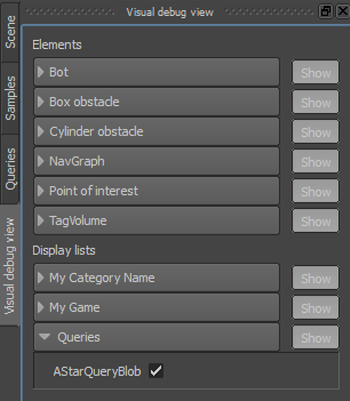
If you need to see the entire range of data that can be recorded and sent for an object, you can set that object in your game code to use the maximum level of detail (LoD). If you do so, the object internally creates additional display lists and sends them to the Navigation Lab for display. These additional display lists appear under the Display lists heading in the Visual debug panel. However, for Bots that are set to use the maximum LoD, the additional display lists mostly appear under the Bot heading in the Visual debug panel. Similar to any other display list, you can show or hide the data contained in the additional display lists.
You can set the LoD for any object at any time by calling its SetCurrentVisualDebugLOD() method. You can pass any of the following levels:
- VisualDebugLOD_None: no data about the object is sent to the Navigation Lab at all.
- VisualDebugLOD_Default: the default level of visual debugging info is sent.
- VisualDebugLOD_Maximal: additional display lists are created internally to extra data about the object is sent to the Navigation Lab using .
You can send your own 2D shapes and 3D volumes from your game to the Navigation Lab by setting up instances of the ScopedDisplayList class.
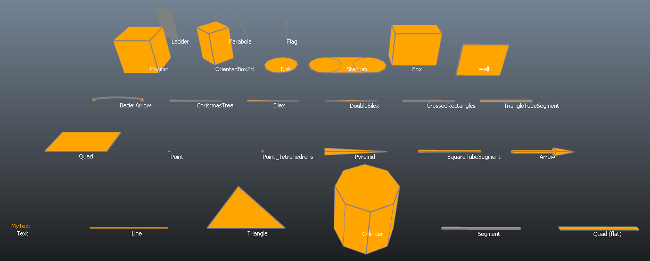
The API of the ScopedDisplayList class offers methods for creating a wide variety of common shapes and volumes.
For a visual legend, enter the following command into the command line of the Navigation Lab:
ToggleDrawAllShapes
Every ScopedDisplayList you create is only sent to the Navigation Lab once, after the frame in which you create it. However, each display list has a lifespan that determines how long the Navigation Lab will display its data.
Display lists with a single-frame lifespan are rendered only once, when the Navigation Lab receives them from the game. In order to make data in a single-frame display list appear to persist over multiple frames in the Navigation Lab, you have to re-create a new ScopedDisplayList object every frame. This approach is typically used for data that changes often. For example:
{
    Kaim::ScopedDisplayList displayList(navWorld);
    displayList.InitSingleFrameLifespan("Display list name", "Category name");
    displayList.PushLine(gameBot->GetPosition(), Kaim::Vec3f::Zero(), Kaim::VisualColor::White);
    ... // Add more shapes here
} // Here the ScopedDisplayList is sent to the Navigation Lab.
Display lists with a multiple-frame lifespan are also sent once to the Navigation Lab, but they are rendered every frame from then on until you modify or remove them. If you have data that remains static through your gameplay session, this approach allows you to eliminate the computations involved in re-creating the display list at each frame, and saves the network bandwidth involved in re-sending the display list each frame.
Display lists with multiple-frame lifespans are uniquely identified either by the combination of the category name and display list name that you provide, or by a numeric ID that is generated by the DisplayListManager:
- When you initialize your display list without providing a unique ID, or with an invalid ID (KyUInt32MAXVAL), the DisplayListManager auto-generates a valid ID and returns it.
- Alternatively, you can pre-generate a valid numeric ID by calling the DisplayListManager::GenerateDisplayListId() method.
You can use either this category and name combination, or the unique ID, in order to identify the display list when you need to modify or remove it:
- To modify a multiple-frame ScopedDisplayList, create a new ScopedDisplayList object with the same category and name previously assigned to the original ScopedDisplayList, or the same unique ID.
- To remove a multiple-frame ScopedDisplayList, call the DisplayListManager::RemoveDisplayList() method and pass the category and name previously assigned to the ScopedDisplayList, or its unique ID.
For example, using the unique IDs explicitly:
// Get a unique ID
m_displayListId = navWorld->GetDisplayListManager()->GenerateDisplayListId();

// Create a ScopedDisplayList:
{
    Kaim::ScopedDisplayList displayList(navWorld);
    m_displayListId = displayList.InitUserControlledLifespan("Display list name", "Category name", m_displayListId);
    displayList.PushLine(gameBot->GetPosition(), Kaim::Vec3f::Zero(), Kaim::VisualColor::White);
    ... // Add more shapes here
} // Here the ScopedDisplayList is sent to the Navigation Lab and rendered every frame.

...

// Modify the existing ScopedDisplayList:
{
    Kaim::ScopedDisplayList displayList(navWorld);
    m_displayListId = displayList.InitUserControlledLifespan("Display list name", "Category name", m_displayListId);
    ... // Add different shapes here
} // Here the ScopedDisplayList is sent to the NavigationLab, replacing the previous display list.

...

// Remove the existing ScopedDisplayList:
{
    navWorld->GetDisplayListManager()->RemoveDisplayList(m_displayListId); // The list is no longer displayed in the Navigation Lab.
}
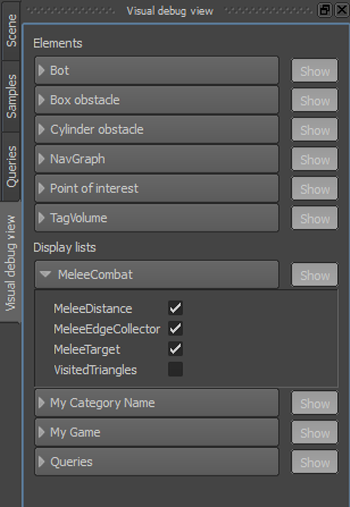
Each time the Navigation Lab displays the data for a frame in your game, it lists all of the display lists valid for that frame under the Display lists heading in the Visual debug panel, organized by the category name you provided for your display lists. You can use these controls to toggle the visibility of each display list in the 3D view.
For example, in the following image, "MeleeCombat" is a category name that was set for display lists with different display list names like "MeleeDistance", "MeleeEdgeCollector", "MeleeTarget", and "VisitedTriangles". Each of those display lists has its own checkbox, organized under the shared category name.
You can associate a ScopedDisplayList with a particular WorldElement, such as a Bot or dynamic obstacle. When a display list is associated with a WorldElement, you can control the rendering of the display list in the Navigation Lab along with other items of information related to that object.
To associate a WorldElement with a ScopedDisplayList, retrieve the ID of the WorldElement object by calling its GetVisualDebugId() method, and provide that ID in the initialization for your ScopedDisplayList. You can still supply a category name, which will be used to organize the display lists for that WorldElement within the Visual debug panel.
For display lists with user-controlled lifespans, as discussed in the previous section, you can identify the display list either by the combination of its category name and display name, or by explicitly specifying its unique ID.
For example:
KyUInt32 worldElementId = m_gameBot->GetVisualDebugId();
displayList.InitSingleFrameLifespan("Display list name", "Category name", worldElementId);
or
KyUInt32 worldElementId = m_gameBot->GetVisualDebugId();
m_displayListId = displayList.InitUserControlledLifespan("Display list name", "Category name", worldElementId, m_displayListId);
See also Integration Phase 1e: Sending Data to the Visual Debugger.
If you send your game camera attitude and parameters to the visual debugger, you can make the camera in the 3D view of the Navigation Lab follow the position and orientation of your game camera.
In each frame of your game, call VisualDebugServer::SendGameCamera() or VisualDebugServer::SendGameCameraAttitude().
NoteYou must send the game camera attitude and parameters in the Navigation coordinate system. You can use the Kaim::CoordSystem methods for conversion.
For example:
m_navigationWorld.GetVisualDebugServer()->SendGameCameraAttitude(
m_coordSystem.ClientToNavigation_Pos(pos),
m_coordSystem.ClientToNavigation_Normal(right),
m_coordSystem.ClientToNavigation_Normal(up),
m_coordSystem.ClientToNavigation_Normal(front),
m_FOV);
In the Navigation Lab, select the Game camera mode in the Camera toolbox. The Game camera mode is only visible when the camera exists in the visual debug data.

You can set up the VisualDebugServer in your game to accept custom commands from the command line in the Navigation Lab. This allows you to trigger events in your game while debugging.
For a code example, see the Tutorial_VisualDebug.cpp file.