Inventor Nesting Interface Overview
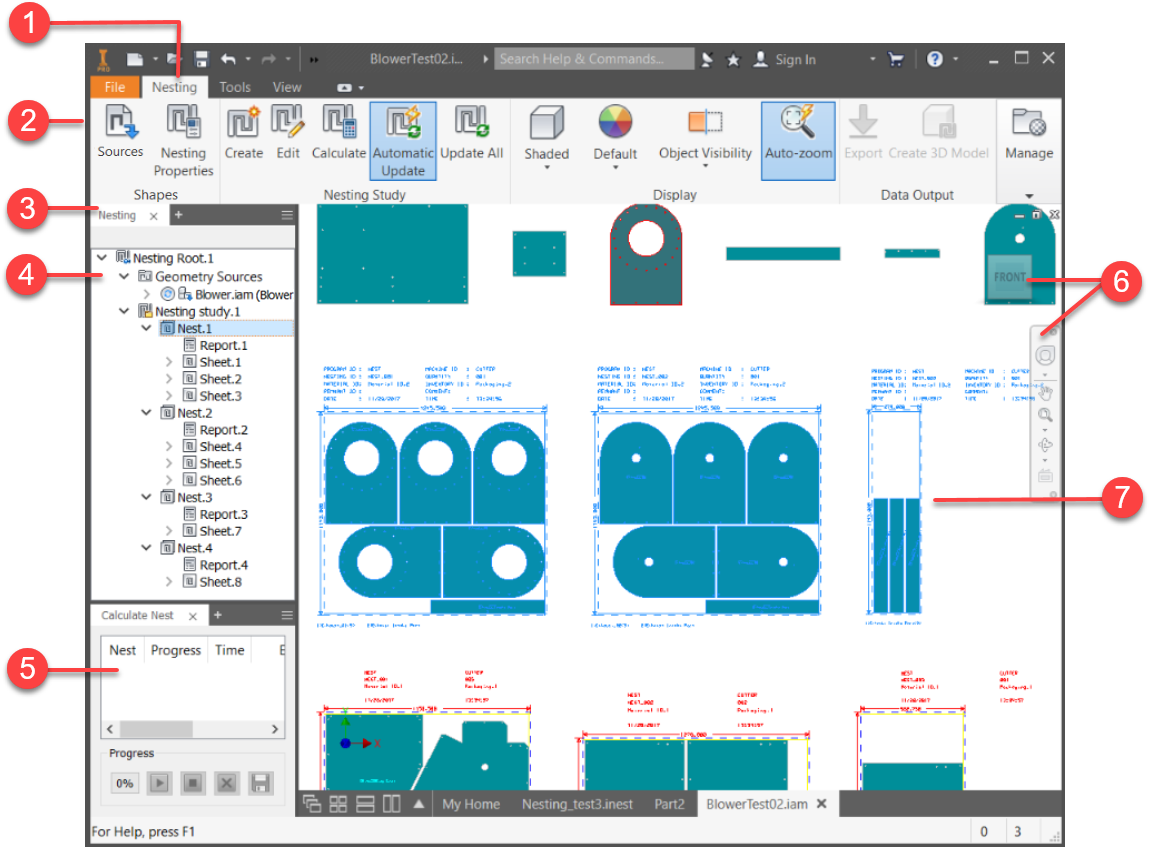
The Inventor Nesting interface consists of a ribbon tab within Autodesk Inventor.

- Inventor Nesting tab within Autodesk Inventor.
- Inventor Nesting ribbon. Read through the help for information on working with materials and packaging, extracting shapes, creating nests, and generating output files.
- Browser view box. Select Nesting to see the Inventor Nesting browser.
- Inventor Nesting browser. A hierarchical view of the elements in an Inventor Nesting file, including geometry, nests, reports, sheets, and so on.
- Calculate Nest panel. Show progress of nest calculations and enables you to stop and start them. If this panel is not visible, enable it from .
- Autodesk navigation tools: ViewCube, SteeringWheel, and so on. See the Inventor help.
- Nests and shapes (children of sources).
Access the Inventor Nesting browser
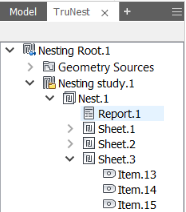
The Inventor Nesting browser is similar to the Inventor Model browser on the left side of the Inventor window.
To access the browser, Click + beside the Model tab in the Inventor browser, then select Nesting from the drop-down list.

Inventor Nesting Browser Structure
- Root (top) node (in this example, "Nesting Root.1")
- Geometry sources
- Nesting studies
- Nests
- Reports
- Sheets
- Nested items

You can expand items in the browser, and right-click them to see context menu commands.
About Selecting Items
Availability of buttons on the Inventor Nesting ribbon depends on what you have selected in the browser. For example, the Edit button is not available unless you first select a nest to edit. Use the Ctrl and Shift keys to select multiple items as you would in most Windows applications.
About Visibility of Items
Use visibility to show or hide items to make your work easier. For example, if you only want to see certain sheets in the canvas, right-click them in the browser and make sure that Visibility is selected. Right-click the items you do not want to see and deselect Visibility.

The visibility setting of a parent node overrides the visibility settings of its children. So if you deselect visibility for a parent node, all its children are hidden no matter what their visibility settings are. If you enable visibility for a parent node, only its children with visibility enabled are shown.
Icons in the Inventor Nesting Browser
Each type of item in the Inventor Nesting browser is represented by a corresponding icon.

|
Nesting root |

|
Geometry sources |

|
Assembly file |

|
Part file |

|
Shape |

|
Nesting study |

|
Nest |

|
Report |

|
Sheet |

|
Needs extraction |

|
Ready to calculate |

|
Needs update |