Create a BOM View
If you're a Fusion user, this feature is not available in the Components or Drawings workspaces. Learn more about system workspaces.
Follow these steps to create and configure a BOM view for a workspace.
Open the BOM layout page
You configure a BOM view for a workspace using the Workspace Manager BOM Layout page.
- From the main navigation menu, go to Administration > Workspace Manager.
- Expand the workspace panel you want to configure a BOM view for.
- Click Bill of Materials Tab.
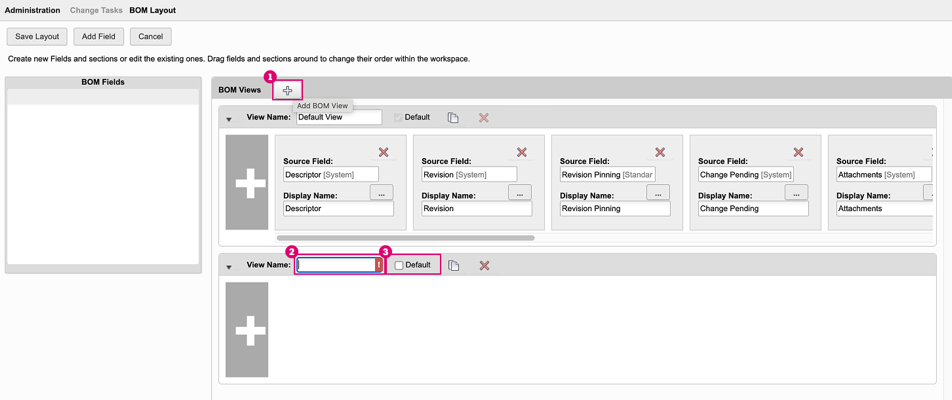
Create a new view
In the BOM Views panel header, click the Add BOM View icon
 .
.Enter a View Name.
You must name the view before adding fields.
(Optional) Check Default to make this the default view.
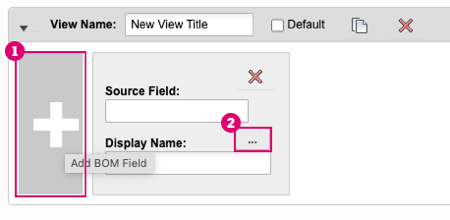
Add fields to the view
You can add fields to the BOM view from multiple sources, including BOM fields, item detail fields, system fields, custom fields, and more.
In the new view panel, click the Add BOM Field button.
Click the More button
 .
. The Choose BOM Field Source dialog appears.
Click the name of the field you want to add.
Click Ok.
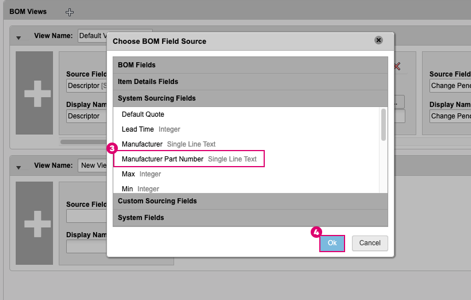
You can repeat this process and add more fields as needed. You can change the Source Field at any time.
Add custom fields to the view
You can add custom BOM fields to a view using drag and drop. Custom BOM fields are those created for the workspace, including roll-up fields. For help on creating custom BOM fields, read Create fields.
- In the BOM Fields panel, locate the custom field you want to add.
- Click and drag the field into the view layout.
The Source Field and Display Name are automatically populated. If the field has a unit of measure (UOM), the Display Name will include the unit in brackets (example: Total Weight [Kilograms]).
Configure the view's layout
You can customize the layout of your view by reordering fields and editing how their names appear in the column headers.
- Reorder columns: Click and drag field tiles to change their position.
- Edit column headers: Update the field's Display Name to change how it appears.
Save the view
To save your new view, click Save Layout above the BOM Fields panel. To exit without saving, click Cancel.